
Fisheries Certificate System (FCS) - User manual
Table of content
Introduction
Operations centre information
Account registration
- Creating a GCKey
- Self-registration
- Forgot GCKey username
- Forgot password
- Profil recovery
- Locked out
- Register a new exporter company
- Email to confirm registration
- Complete the Terms and Conditions of Use and Delegation of Authority form
- Proof of signing authority
- Final approval of registration request
FCS home screen and navigation
Catch certificate application
Catch certificate standard
Grouping request application
Renewing a grouping and updating a grouping
Catch certificate - Group based
Foreign export catch certificates
Manage documents menu
Profile
Applicants/Exporters
Change of applicant manager
Certificate functions
Introduction
The Fisheries Certificate System (FCS) User Manual is an online, user-friendly resource, designed to serve as a guide and to provide instructions on the functions of FCS, as well as, answer any questions you may have regarding the use of the system.
FCS is designed for Canadian processors and exporters of fish and seafood products to apply for and retrieve, catch certificates for the European Union, United Kingdom, Ukraine, and Japan.
Catch certificates are required by these jurisdictions to attest that exported products originated from legal, reported, and regulated fisheries.
For more detailed information on the Catch Certification Program please visit the Catch Certification Program website.
Catch Certification Program (CCP)
Canada’s Catch Certification Program (CCP) was created in response to the European Union’s Illegal, Unreported, and Unregulated (IUU) fishing regulation implemented January 1, 2010. It requires that fish and seafood exports to the EU are accompanied by a catch certificate issued by the competent authority in the country of origin. In 2014 Canada signed similar agreements for fisheries exports to Ukraine and crab exports to Japan.
Fisheries and Oceans Canada (DFO) is the competent authority that is solely responsible for the administration of Canada’s Catch Certification Program. The Program consists of the following elements:
- a. Catch Certification Program: Operations Centre (CCP: OC)
- Responsible for the issuance of catch certificates
- Provides client services to Canadian exporters
- b. Catch Certification Program: Integration and Planning Bureau (CCP: IPB)
- Responsible for program coordination, reporting, development and integration
- Acts as single liaison bureau with officials in the European Union, United Kingdom, Ukraine, and Japan and national-level stakeholders
- Fisheries Certificate System (FCS)
- A web-based system for industry applications and DFO validation / issuance of catch certificates
- Catch Certification Audit Office (CCAO)
- Responsible for post-issuance audits of catch certificates
- Ensures that information provided by clients at the time of application is true, accurate and complete
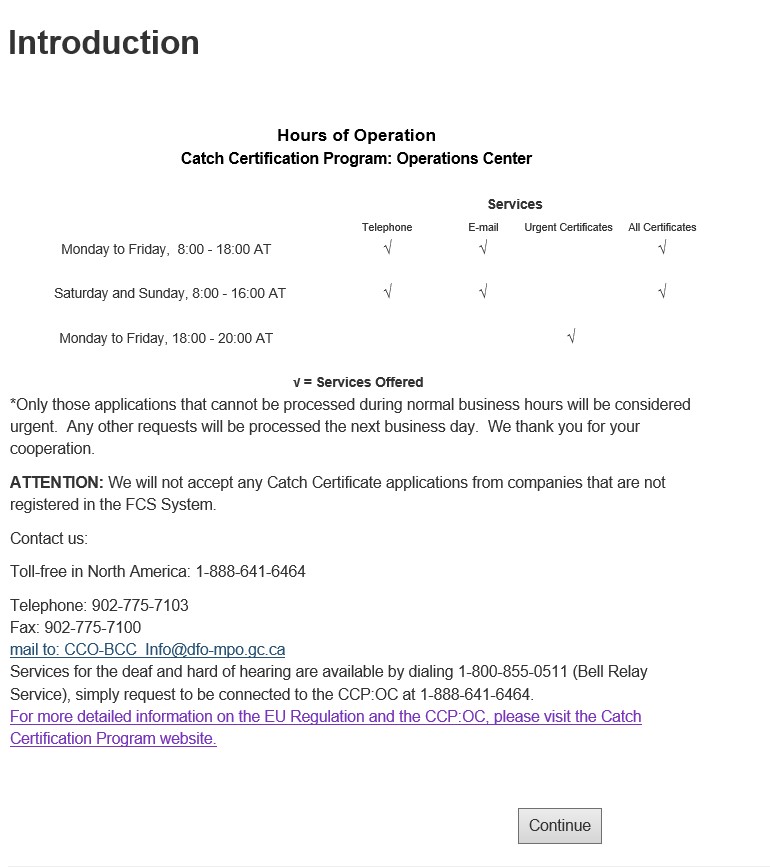
Operations Centre information
Contact information
Toll-free in North America: 1-888-641-6464
Telephone (outside North America): 902-775-7103
Fax: 902-775-7100
E-mail: DFO.CCP-PCC.MPO@dfo-mpo.gc.ca
Services for the hard of hearing are available by dialing 1-800-855-0511 (Bell Relay Service), simply request to be connected to the CCP: Operations Centre at 1-888-641-6464.
| Services | Telephone | FCS Urgent* Certificates |
FCS All Certificates |
|
|---|---|---|---|---|
| Monday to Friday 8:00 - 18:00 AST |
√ | √ | √ | √ |
| Monday to Friday, 18:00 - 20:00 AST |
√ | |||
| Saturday and Sunday 8:00 - 16:00 AST |
√ | √ | √ |
In order to have a catch certificate designated as urgent, the registered FCS Applicant must send a request to the Catch Certification Program by email. Email requests must be received before 20:00 AST. Any other requests (including applications submitted after 18:00 AST) will be processed the next business day. We thank you for your cooperation.
Service standards
Fisheries Certificate System Requests:
- Registration Requests – 10 Business days
- Grouping Requests – 10 Business days
- Grouping Request Updates – 2 Business days
- Catch Certificate (fresh and live products and / or exported on the day of application) – 2 hours (if submitted prior to 18:00 AST)
- Catch Certificate (processed and frozen products and / or exported after the day of application ) – 48 hours
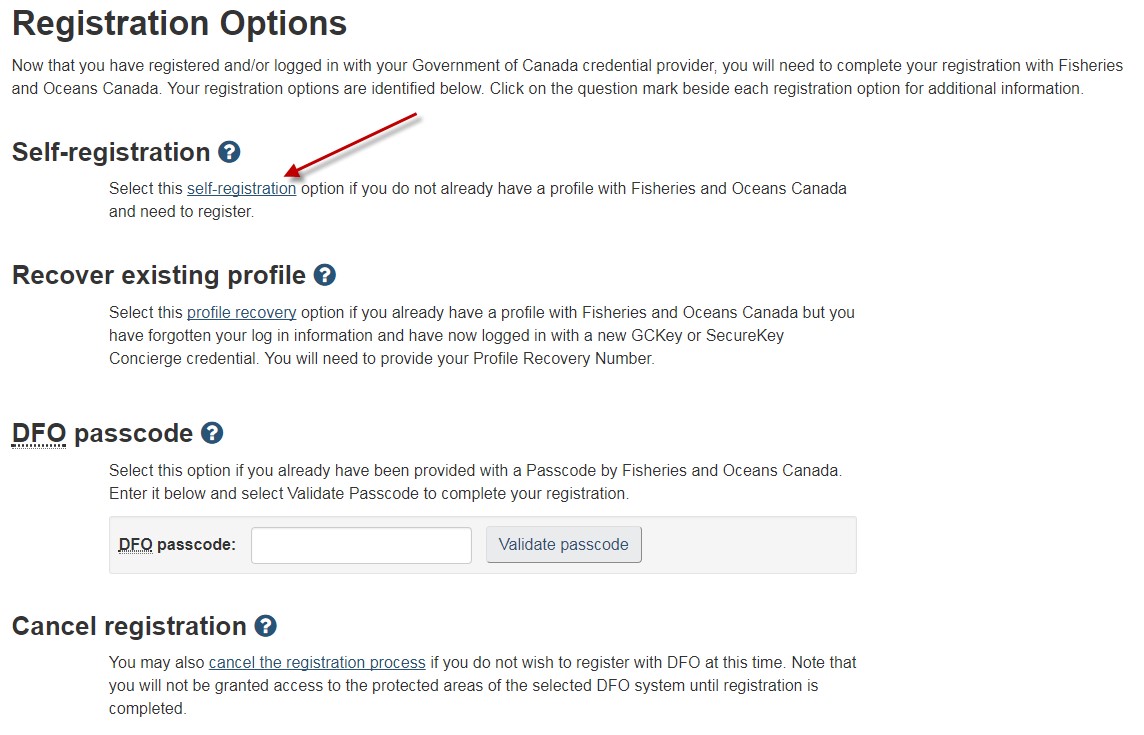
Account registration
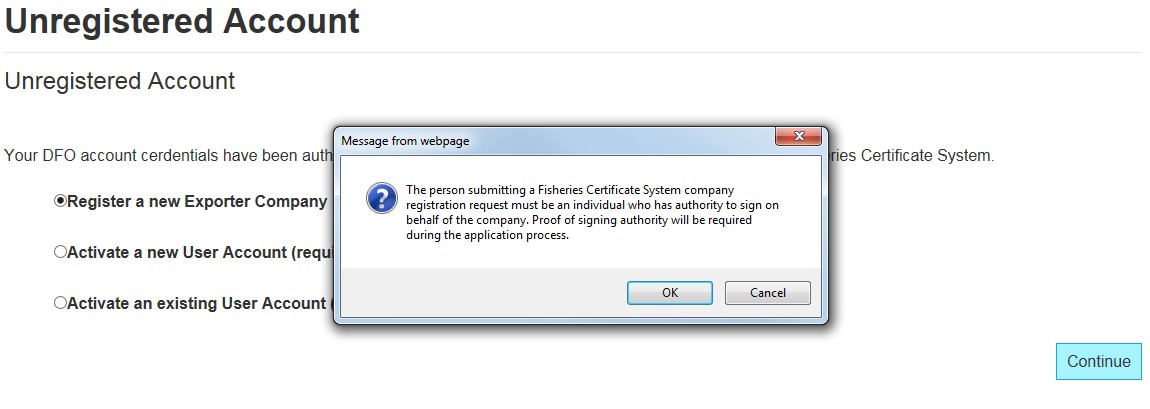
A company account is required to log in to FCS and to apply for certificates. Applications for catch certificates will not be accepted from a company that has not previously registered in FCS. The registration request should be made by an individual who has authority to sign on behalf of the company and who will be actively involved in the catch certificate process. An approved request will result in:
- The creation of a company account and profile;
- Establishing the Applicant Manager for the company;
- Only one Applicant Manager is allowed per company.
- The Applicant Manager will have the authority to create additional user accounts for the company.
- FCS login credentials for the Applicant Manager.
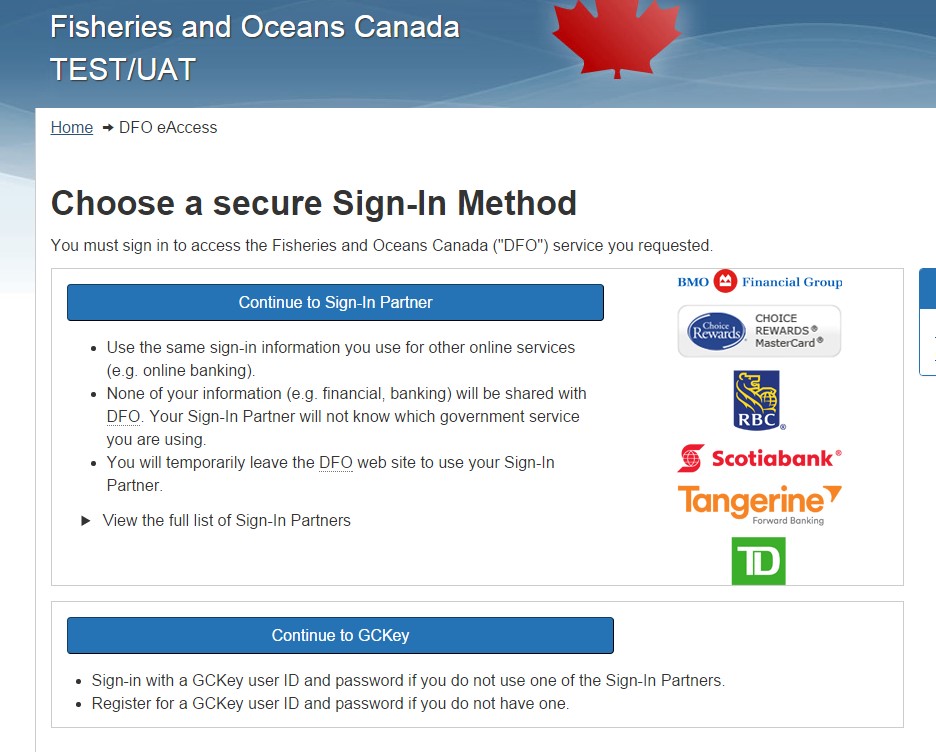
To register within FCS, go to the FCS website.
- Note: The person who is registering must have signing authority for the company and be able to provide proof of this authority.
- Note: The business address and contact information provided on the application for registration must be the address and contact information for the company.
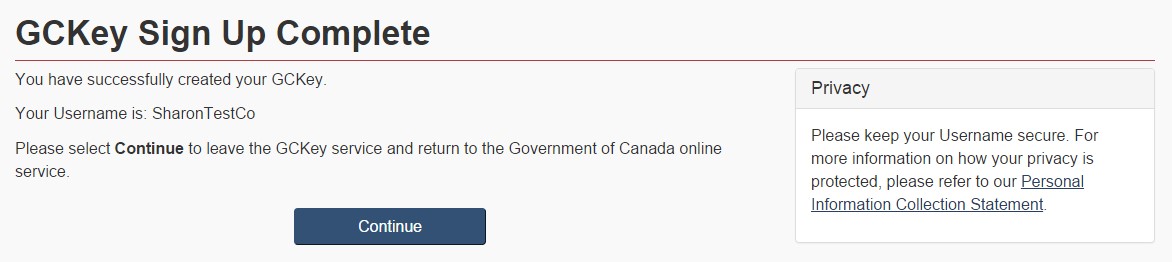
Creating a GCKey
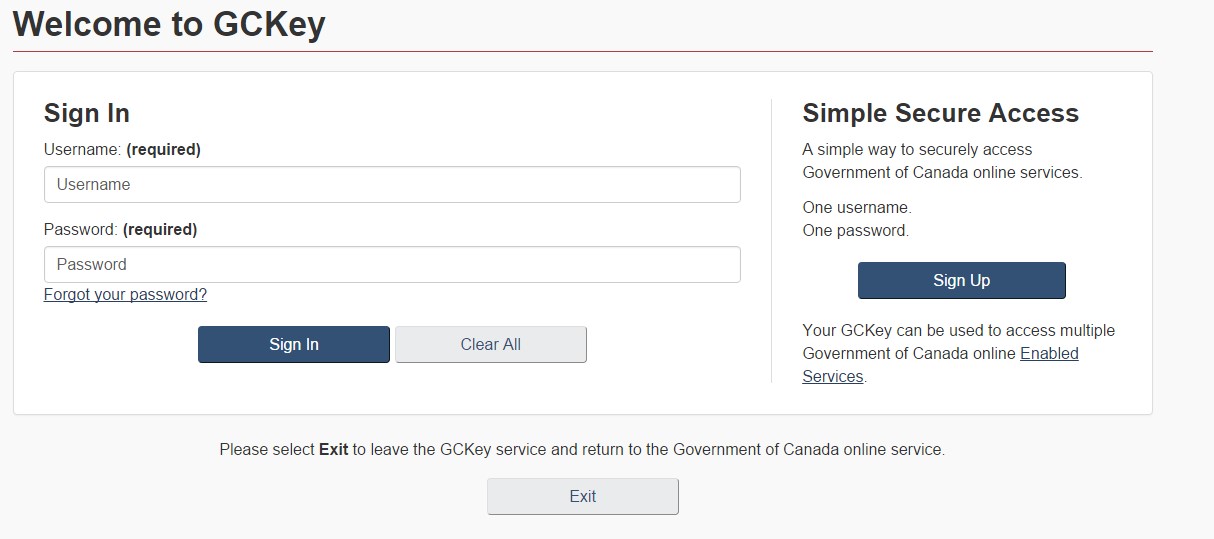
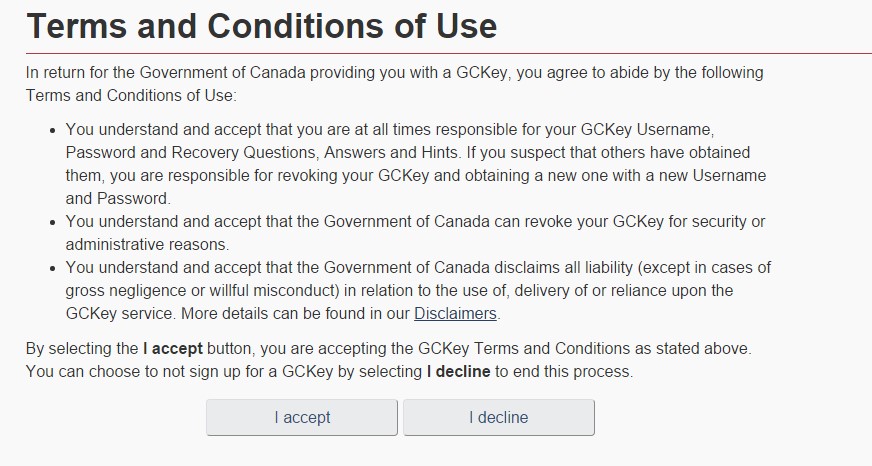
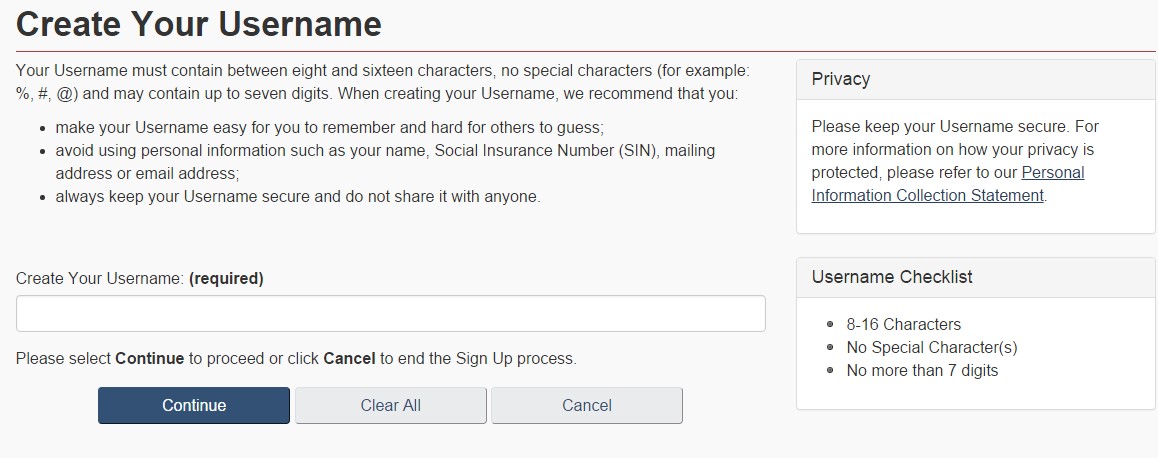
- Refer to the Username Checklist for tips.
- Click on ‘Continue’ when complete.
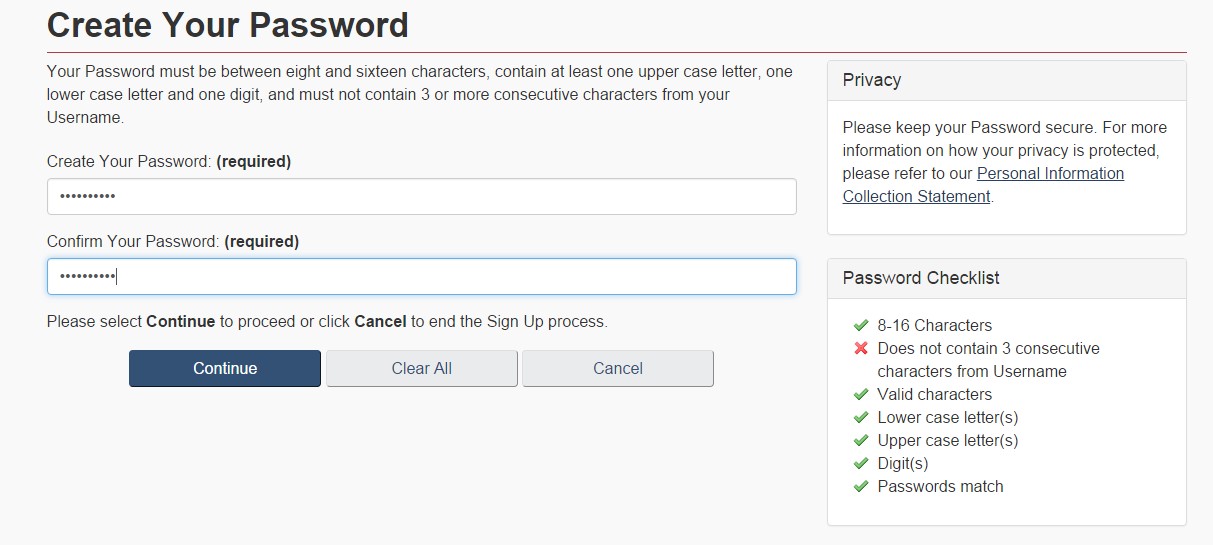
- Refer to Password Checklist for tips.
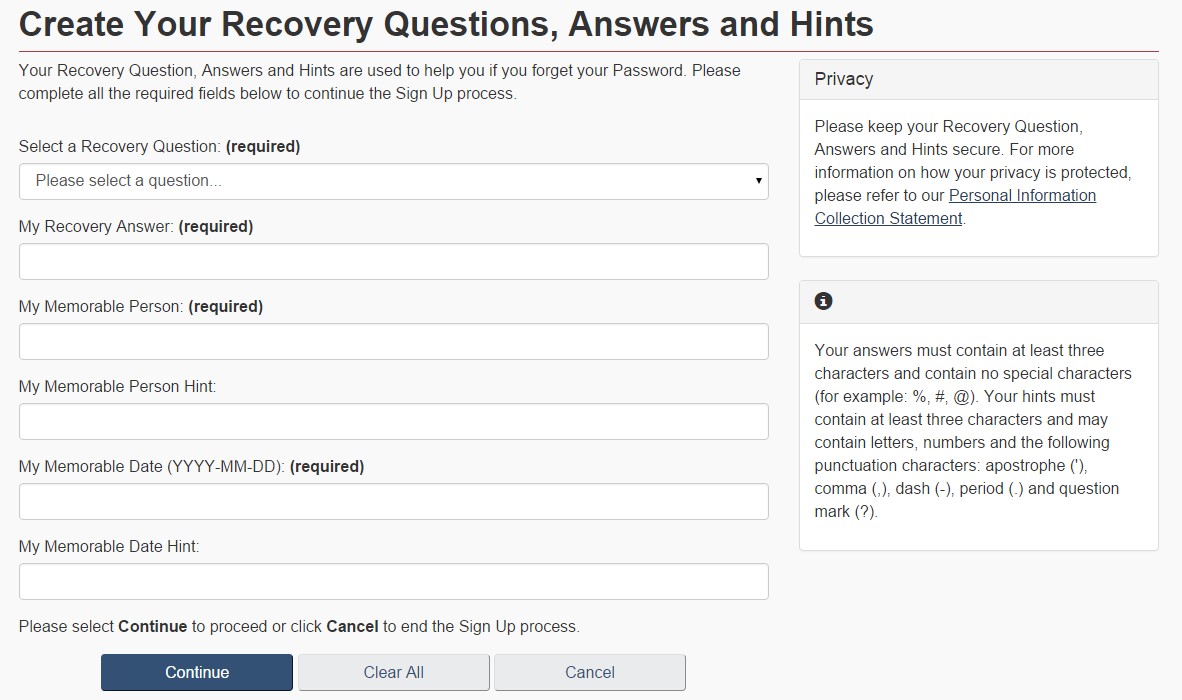
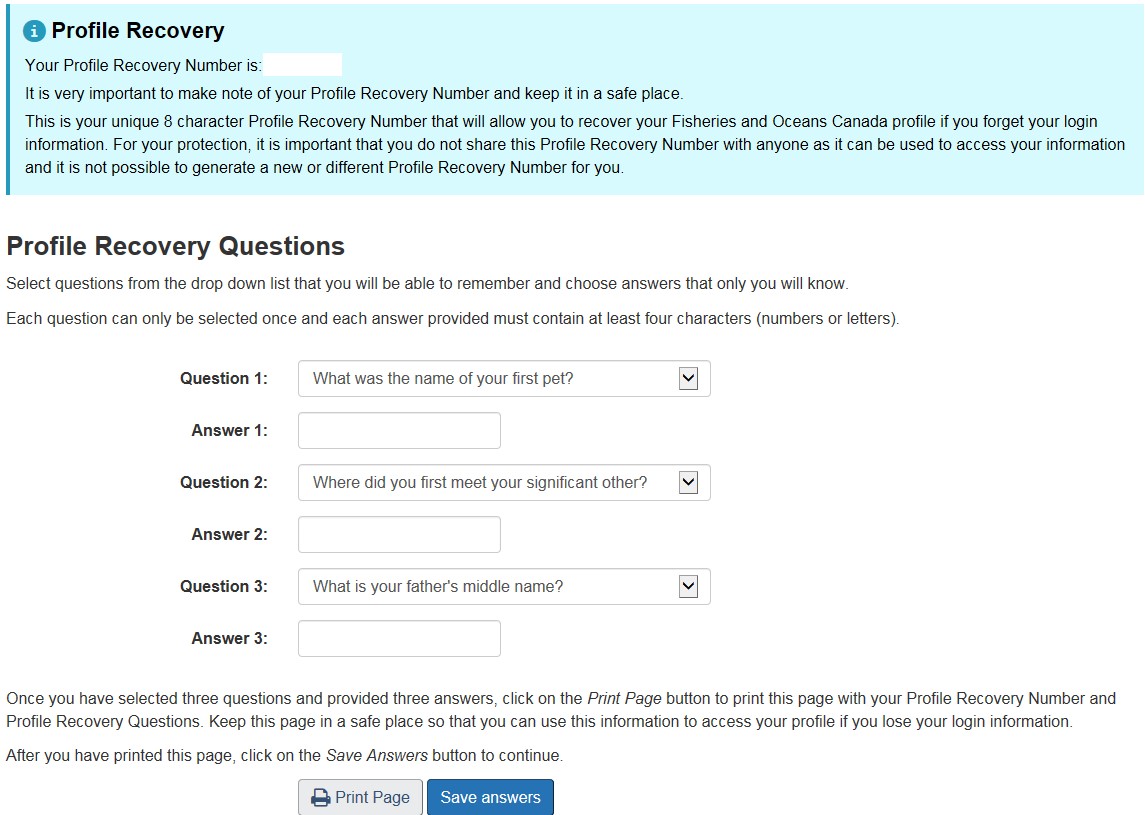
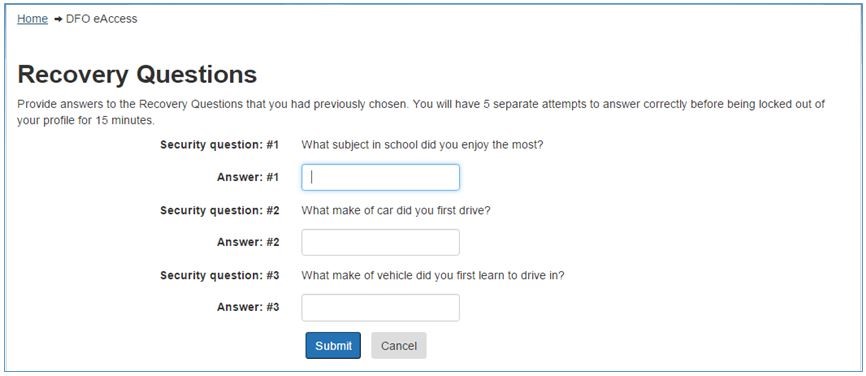
- Refer to Recovery Questions tips.
- GCKey process has now been completed. Record your Username.
Self-registration
Note: You cannot print the profile recovery questions and answers after you have pressed ‘Save Answers’.
Forgot GCKey username
If the Applicant has forgotten their GCKey username, there is no way of retrieving this information. To proceed, the Certification Officer must confirm if the Applicant knows their profile recovery number and recovery questions.
- If yes, the Applicant will need to create a new username and password through GCKey Sign up and complete a profile recovery.
- If no, the Applicant would need to contact a Certification Officer at the Catch Certification Program: Operations Centre by calling 1-888-641-6464.
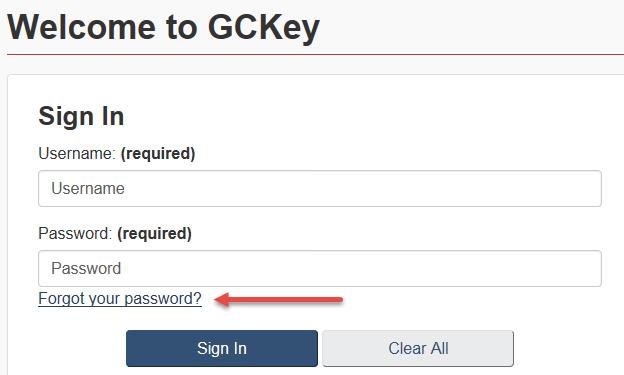
Forgot password
If the Applicant remembers their GCKey user name but forgets their GCKey password, the Certification Officer will advise them to create a new password by clicking ‘Forgot Password’ and answering the password recovery questions they previously set up while registering for a GCKey.
Can the Applicant correctly answer the password recovery questions know their profile recovery number?
- If yes, the Applicant will need to create a new username and password through a GCKey Sign up and complete a profile recovery.
- If no, the Applicant would need to contact a Certification Officer at the Catch Certification Program: Operations Centre by calling 1-888-641-6464.
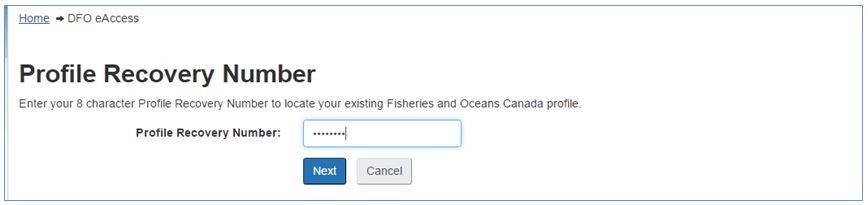
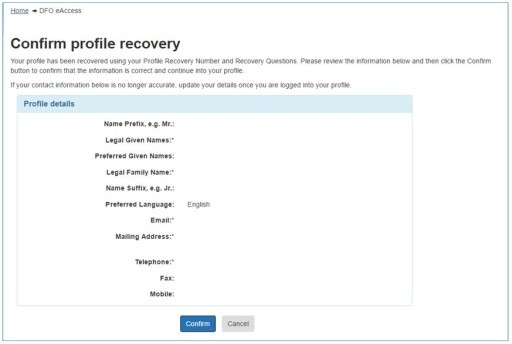
Profile recovery
Profile recovery is used when the Applicant has an existing FCS user account, but is unable to remember their GCKey user name and password, or password recovery questions but knows their profile recovery number and profile recovery questions.
The Applicant will need to create a new username and password through a GCKey Sign Up screen.
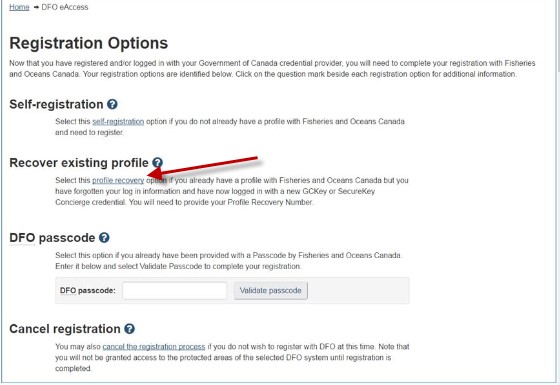
If the profile recovery was successful the Applicant will be logged into FCS.
Locked out
Sign-In Partner
If the Applicant is locked out of their Sign-In Partner account, the user must contact their Sign-In Partner for assistance.
GCKey
The GCKey will lock out a user once they have exceeded five (5) unsuccessful attempts to log in to their account. The Applicant’s access to the service will be suspended for 24 hours. The Applicant can choose to wait the 24 hour period or create a new GCKey and contact the Catch Certification Program: Operations Centre to activate their account for the Fisheries Certificate System.
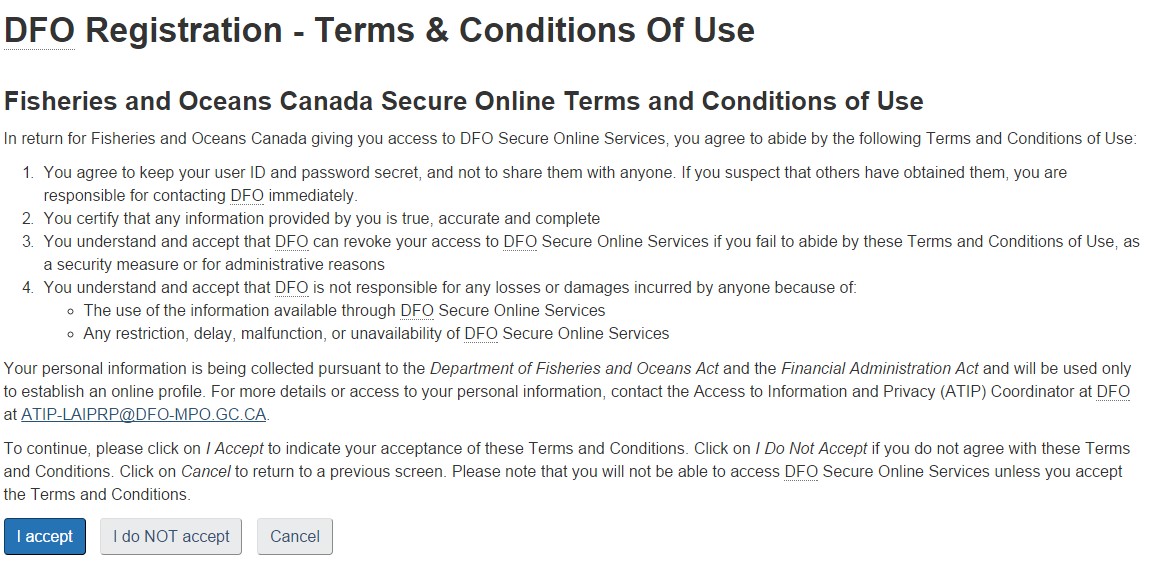
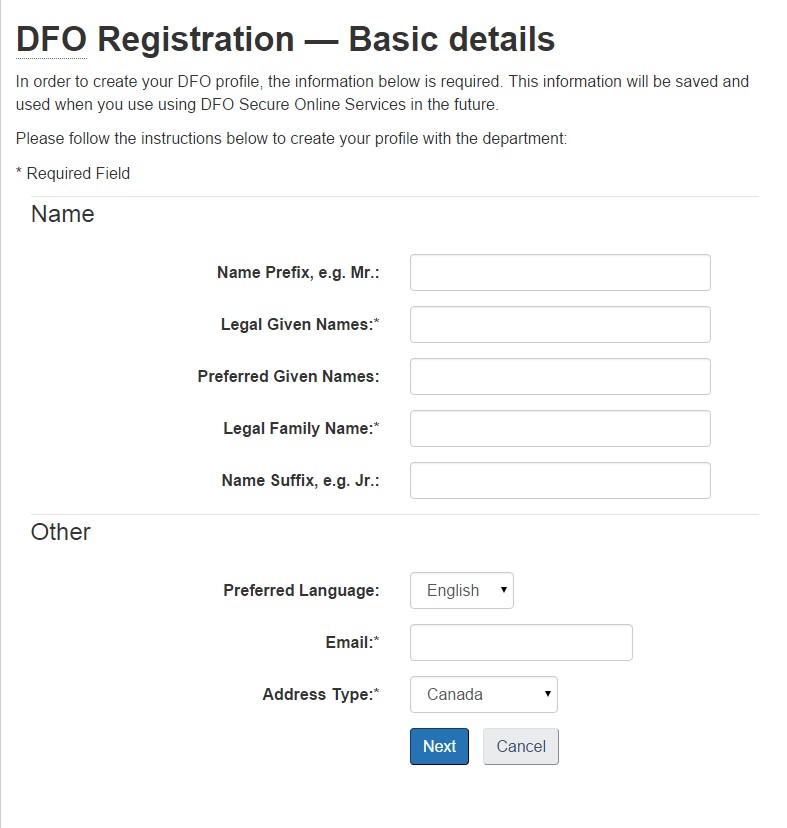
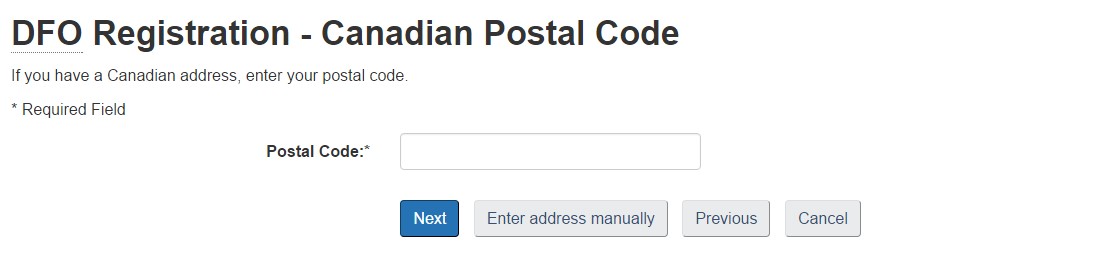
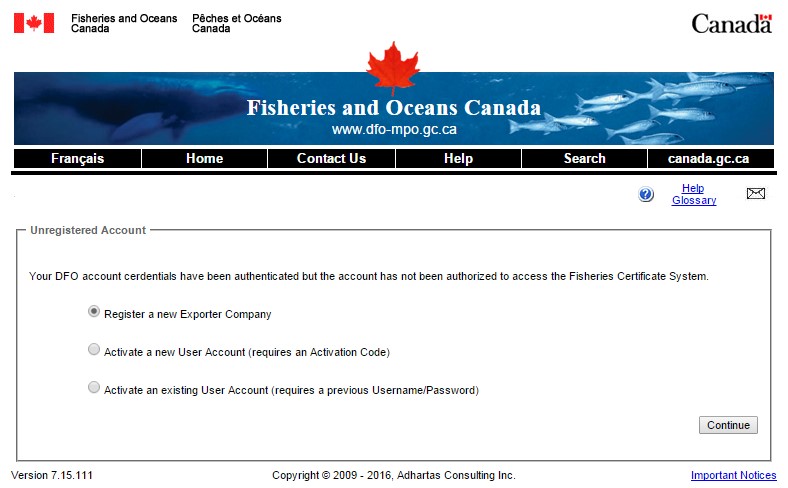
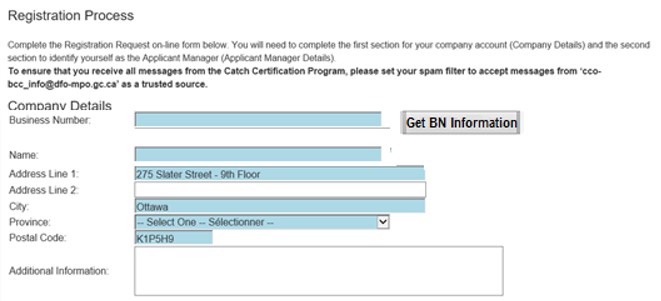
Register a new exporter company
The person registering the company can manually fill in all the fields under Company Details. Alternately, they can just enter the Business Number (BN) assigned by CRA and click the ‘Get BN Information’ button. This will auto populate the rest of the company’s information. If an incorrect BN is entered they will receive a message to manually fill in the remaining fields in the Company Details screen and submit the request. In all cases, the information submitted will be verified when the registration request is reviewed by the Catch Certification Program’s Operations Manager.
User would fill in the missing fields and press ‘Submit’.
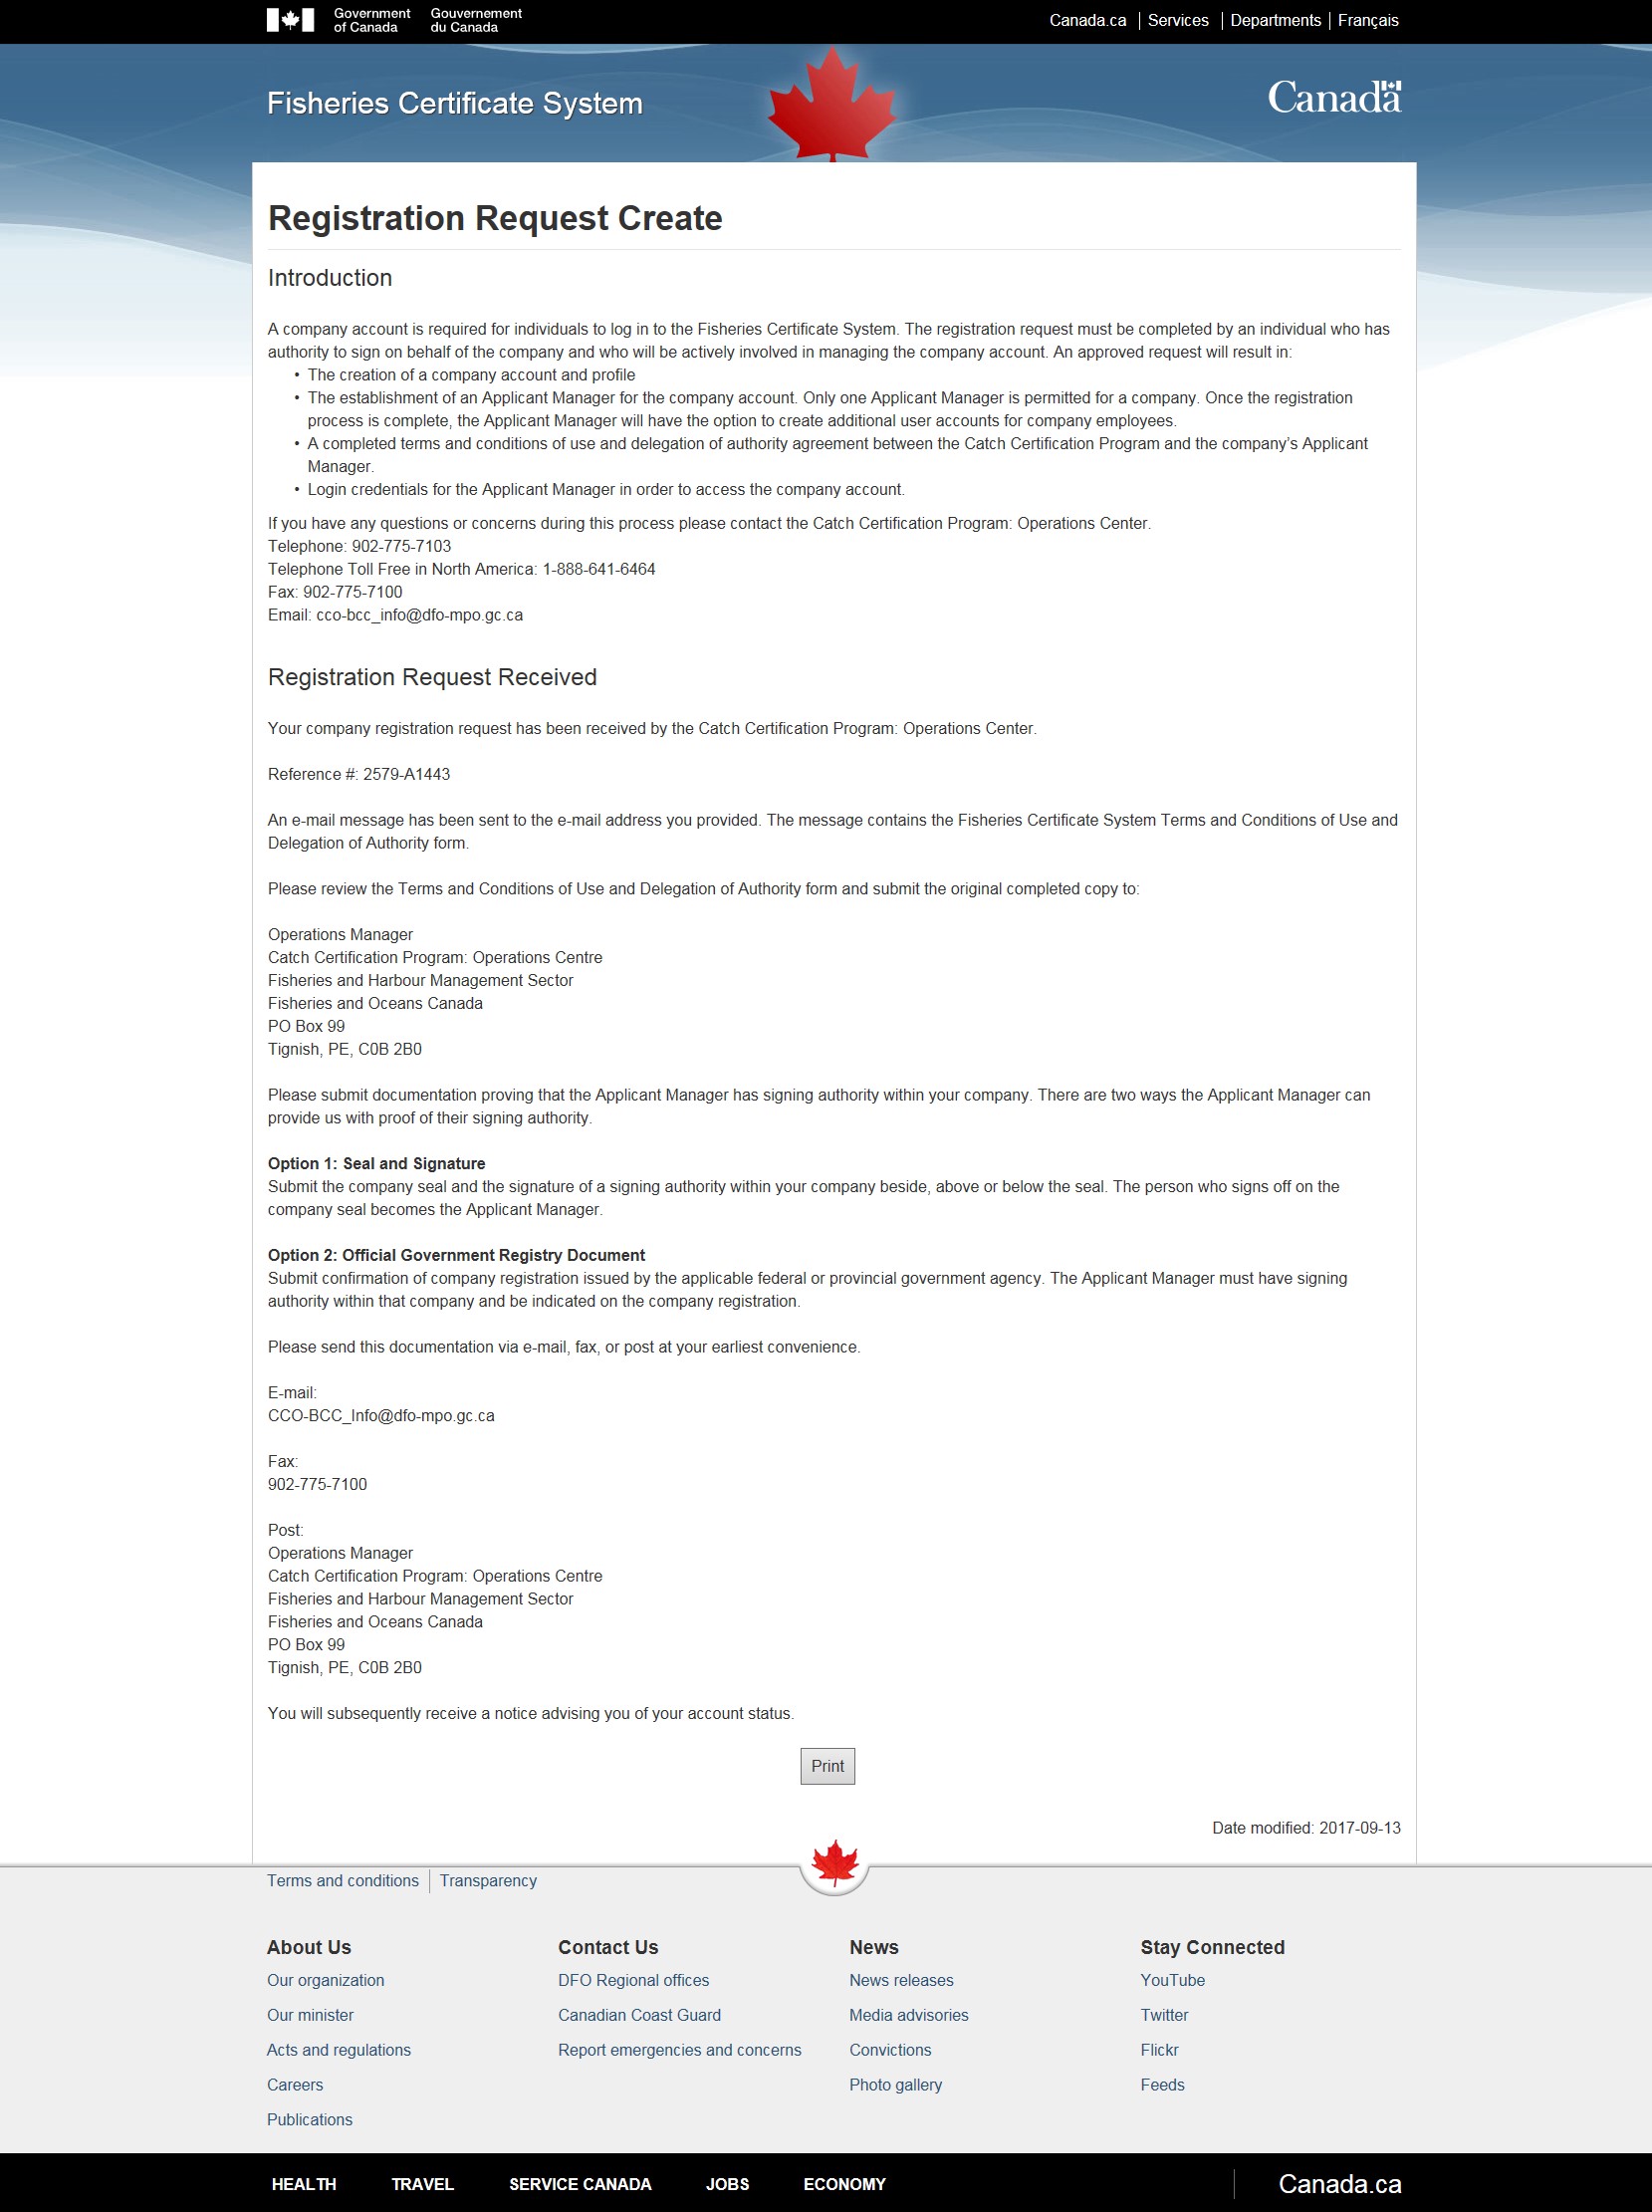
Email to confirm registration
- Within the email is a link to the Terms and Conditions of Use and Delegation of Authority form. The form is bilingual (4 pages long) with the English text first.
- The Catch Certification Program also receives an email confirming that a registration request was received.
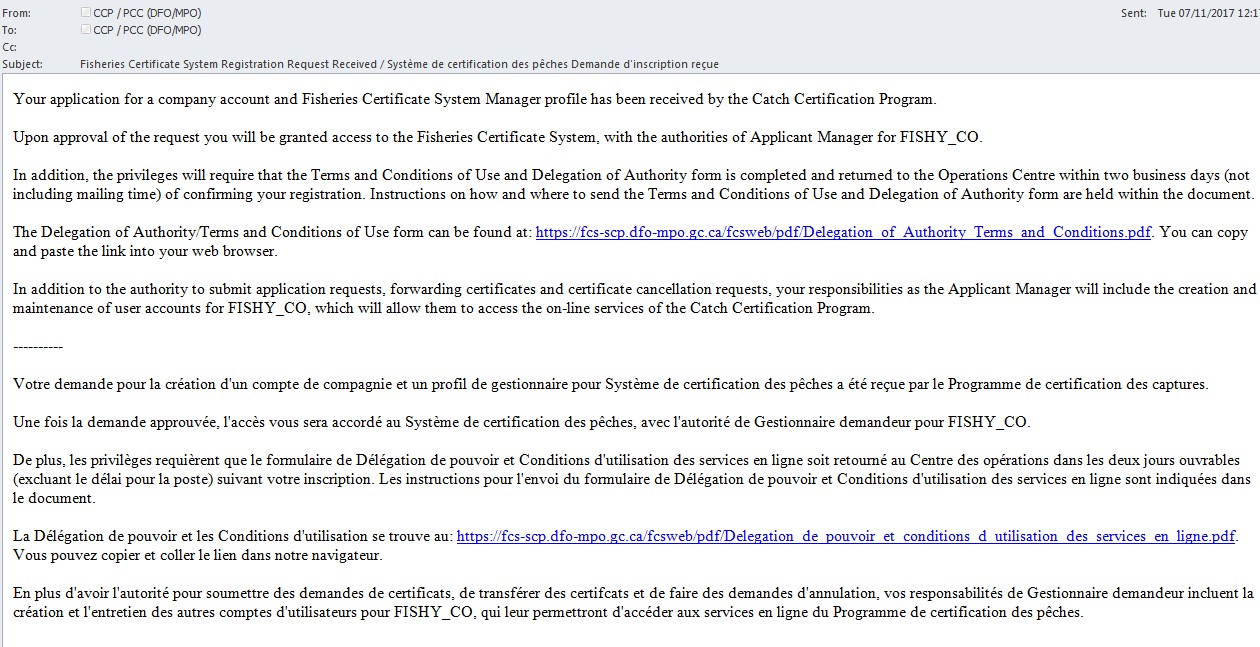
Complete the Terms and Conditions of Use and Delegation of Authority form
The Applicant Manager should have received a system generated email containing a link to this form, when they submitted their registration request in FCS.
If not, the form is available online (PDF 254 KB).
The Applicant Manager must complete this form and the original must be mailed to the Catch Certification Program: Operations Centre. We will accept a faxed or emailed copy of the form until the original is received.
Proof of signing authority
There are two ways the Applicant Manager can provide us with proof of their signing authority.
Option 1: Seal and Signature
- Submit the company seal and the signature of a signing authority within the company. Please provide the signature beside, above or below the company seal. The person who signs off on the company seal becomes the Applicant Manager.
- The original must be mailed to the Catch Certification Program: Operations Centre but we will accept faxed or emailed copies until the original is received.
Mail:
Operations Manager
Catch Certification Program: Operations Centre
Fisheries and Oceans Canada
PO Box 99
Tignish, PE, C0B 2B0
Fax: (902) 775-7100
Email: DFO.CCP-PCC.MPO@dfo-mpo.gc.ca - Note: If faxed or emailed, the seal must be clearly visible. This sometimes requires the person submitting the seal to lightly shade over the seal with a pencil.
Option 2: Official Government Registry Document
- Submit confirmation of company registration issued by the applicable federal or provincial government agency (i.e. Service NB, Access NS, etc.). The Applicant Manager must have signing authority within that company and be indicated on the company registration.
Final approval of registration request
There is a 10 business day service standard for the processing of registration requests once all information has been received.
Once the registration request is approved the Applicant Manager will:
- Have access to FCS using the GCKey they created during the registration process.
- Receive an email notifying them the request is approved and outlining the details of creating additional users.
FCS home screen and navigation
Once logged into FCS, you will be brought to the FCS home screen.
Note: When navigating in the system, only use the buttons within the system. Pressing the Back or Forward button in your internet browser may cause errors.
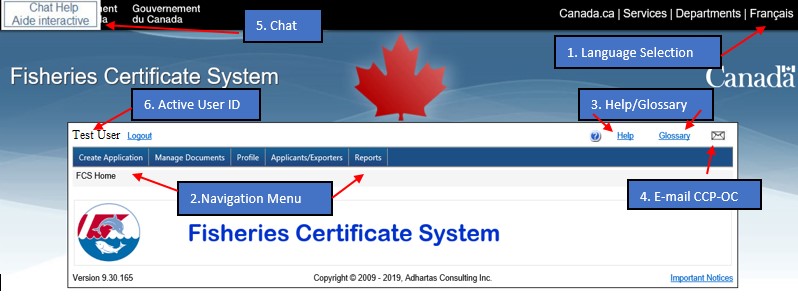
This screen will display any important messages regarding FCS. The following are detailed explanations of the items shown above in the screen shot.
- Language Selection – Allows you to select English or French
- Navigation Menu – Allows you to access each function within the system.
Each navigation menu item listed will be explained in further detail throughout this manual. A brief summary of each follows: - Create Application: Choose this option to create applications for Catch Certificates and Grouping Requests.
- Manage Documents: Choose this option to view and manage your applications, certificates, forwarded certificates and groupings. This menu also includes a Document Search feature.
- Profile: Choose this option in order to edit your user profile information (i.e. contact information) or update profile recovery questions.
- Applicants/Exporters: Choose this option to add or edit any other users for your company.
Note: Only the Applicant Manager for the company is able to add users. - Help/Glossary – The Help page is a general explanation with page layouts of FCS. The Glossary contains a list of common terms used in the system and for catch certificates. E-Mail CCP: OC – Clicking the small white envelope will allow you to directly email the Catch Certification Program’s Operations Centre.
- Chat – Clicking this icon will begin a chat session with a Certification Officer.
- Active User ID – Identifies the user who is currently using the system
Catch certificate application
Create application
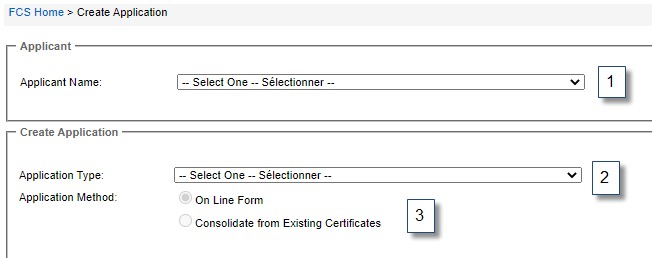
- Applicant Name – This displays your company name
- Application Type – This drop down menu allows you to choose from the different types of applications available within FCS.
- Application Method – There are two different methods to complete an application.
Types of applications
When creating an application in FCS, you will not select the country that product is to be exported to. The export country for which a catch certificate is to be issued, will only be selected by the exporter once a consignment is ready to be shipped. The exporter will assign a destination country to an already approved catch certificate using the Convert function.
There are four types of applications. A Standard catch certificate application; a Group Based catch certificate application; a Foreign Export catch certificate application; and a Grouping Request application. The type you choose will be based on how your product is sourced.
Standard catch certificates
This application form is used when the catch is sourced from only one vessel. It requires each vessel involved in the catch to be identified by the following information: vessel name, vessel registration number, homeport, applicable fishing licence number, licence expiry date, and call sign. Because this type of application is highly traceable, it is the optimal method to apply for a catch certificate. Note: Only one vessel can be listed on a Standard Catch Certificate.
Click link to access instructions for applying for a Standard Catch Certificate
Group Based catch certificate
This is a variation of the Standard Catch Certificate for situations where the catch is based on a previously approved grouping. Choose this application form when sourcing from a group of vessels, buyers, Aboriginal communities or fishers. Note: Before a Group Based catch certificate can be created, you must first create a grouping by applying for a Grouping Request.
Click link to access instructions for applying for a Group Based Catch Certificate
Grouping request
This application form allows you to create various types of groupings, either vessel based or non-vessel based (buyer/agent, Aboriginal fishery, or fisher) when a specific product may be purchased from multiple sources. After groupings have been approved, you may select the grouping(s) for inclusion in all future Group Based applications.
Click link to access instructions to apply for a Grouping Request
Foreign export catch certificates
This type of certificate is required for product that is imported from a foreign country and subsequently re-exported from Canada.
This certificate is referred to as a processing statement under Annex IV in the EU Regulation.
Click link to access instructions to apply for a Foreign Export Catch Certificate
Application method
Application Method – There are two different methods to complete an application:
- On Line Form – The on line option allows the user to enter all required data directly into the FCS system. This is the most common type of application method.
- Consolidation from Existing Certificates – Consolidation is used in cases where the exporter has a consignment that includes product from different sources. This allows applicants to combine multiple approved catch certificates, (either from their own company, or those forwarded to them by other companies), so that the product can be shipped in one consignment with only one catch certificate. Individual, Group Based, approved certificates can be consolidated into a single catch certificate by clicking on this option. A consolidated catch certificate is system-approved based on information already stored within the FCS system.
Note: This feature is only available for approved Group Based applications.
Click the following to find more detailed information regarding Consolidating Catch Certificates.
Creating an application
The following information is common to all types of applications within FCS.
Throughout the application process, you will notice that some fields are blue coloured. Only blue fields are mandatory.
Selecting the ‘Back’ button on your browser will not always work in the system and may cause errors. To minimize any potential errors or problems, you should only browse the pages using the buttons within the system.
The following screen will appear when you click ‘Continue’:
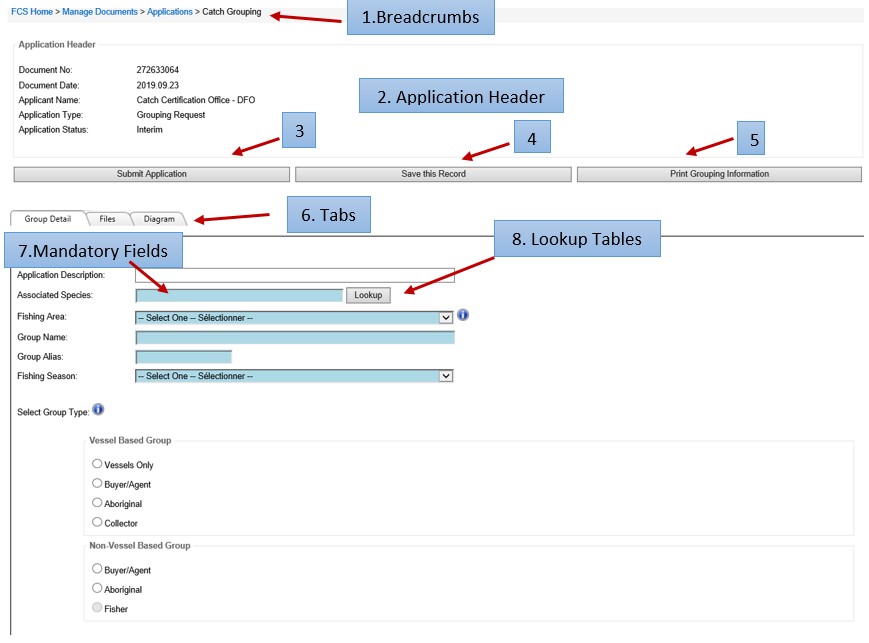
- Breadcrumbs – This section provides a listing of the path used to access the current screen. Links may be clicked to return to previous screens.
- Application Header – This section contains basic information about the application including:
- Document No – A unique application record number assigned by FCS when the record is created. This is the application reference number a Certification Officer will ask for should you require assistance with an application.
- Document Date – The date when the application was created.
- Applicant Name – The name of the Applicant Company submitting the application.
- Application Type – The type of application. For example, in this instance the application type is a Grouping Request. See Types of Applications.
- Application Status – Identifies the current status of the application. Types of application statuses include interim, submitted, recommended, approved or declined. For more information on each status, see Application Status.
- Submit Application – This button will allow you to submit the application once completed. All mandatory fields must be completed before an application can be submitted. The application is sent to the Catch Certification Program: Operations Centre and cannot be changed without contacting the Catch Certification Program: Operations Centre. For more information, see Submit Application.
- Save this Record – Saving a record will store the information that has been entered but does not submit the application to the Catch Certification Program: Operations Centre. A saved application can be accessed at a later time for editing or completion.
- Print Grouping Information (or Print Application Information) – The information contained in the application can be printed at any time during the process. The format of the printed information will be different from the format of an actual grouping or certificate.
- Tabs – Tabs are the primary means of navigating through the application. Each tab corresponds to a section of the application. Clicking on the tabs allows you to complete the sections required. Each time a new tab is clicked, the information contained in the previous tab is saved.
- Mandatory Fields – Fields that are required in order to save and submit an application are identified with a blue background.
- Lookup Tables – Lookup Tables allow you to search for information stored in DFO databases. For some fields, using this feature is mandatory (such as home port and HS code). Please see below for more detailed information on this feature.
Lookup tables
Each application will have the option to use Lookup tables for various fields. These Lookup tables allow you to search DFO databases for information. Lookup tables in FCS are used to assist in adding vessels, species, products, countries, communities, and home ports to your certificate application. Fields requiring the use of a Lookup table will have a button to the right labelled ‘Lookup’. Once clicked, a separate window will open with the Lookup table.
Types of searches
Exact Match - Enter the exact text for the item you wish to retrieve (for instance, the exact Vessel Name) and click the ‘Search’ button. FCS will return any records that match the data entered.
Wild Card Searches - Wild card searches can be conducted using the % character. For example:
- To search for all vessels beginning with the word May in the vessel name, enter May%. FCS will return only those records with the word May appearing at the beginning of the vessel name.
- To search for all vessels ending with the word May in the vessel name, enter %May. FCS will return only those records with the word May appearing at the end of the vessel name.
- To search for all vessels with the word May appearing anywhere in the vessel name, enter %May%. FCS will return only those records with the word May appearing somewhere in the vessel name.
When searching for items using a Lookup table, FCS will limit the return of searched items to 100 records. If a search results in more than 100 returned records, FCS will advise you that the search criteria must be refined. You can narrow the potential list of items by filling in additional fields, or by using only one % in your wildcard search.
Once your search is complete and you have successfully found the item that you are looking for, you must now select it. To select a single item within a Lookup table, click on the record and FCS will highlight the row in grey.
Click on the ‘OK’ button to add the item and return to your application.
Catch certificate – Standard
This application form requires the vessel involved in the catch to be identified by the following information: vessel name, vessel registration number, homeport, applicable fishing licence number, licence expiry date, and call sign. Because this type of application is highly traceable, it is the optimal method to apply for a catch certificate.
Please note only one vessel can be listed on a Catch Certificate - Standard application.
Each catch landed by a vessel of over 100 feet (30.48m) in length requires a Catch Certificate – Standard.
Catch certificate – Standard: Steps
- Select ‘Create Application’.
- Select the Application Type: Standard Certificate Application.
- Complete each tab (more detailed instructions appear below).
- Review for accuracy.
- Click ‘Submit’ to submit your application – see Submit Application. The system will then notify you of any errors or omissions
- Read and agree to the declarations listed.
- Click ‘Submit’ to submit your application for validation. You will receive an email with the application’s service standard – see Service Standards.
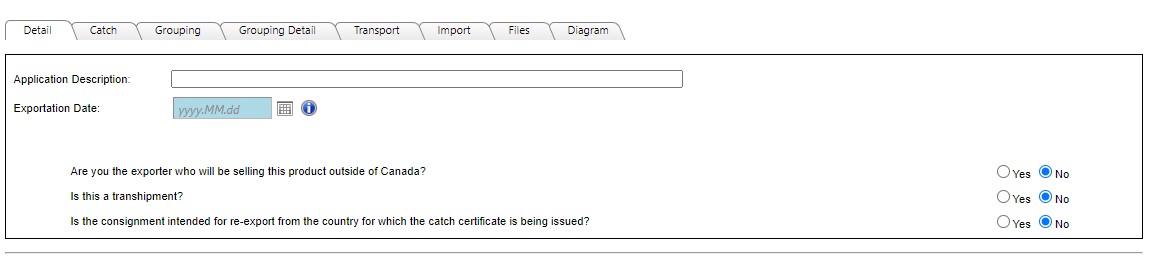
Detail tab
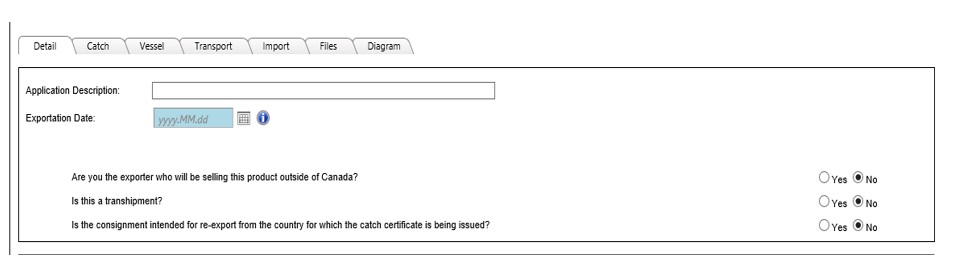
- Application Description – This field is optional. Users can enter a document description for their own tracking and reference purposes.
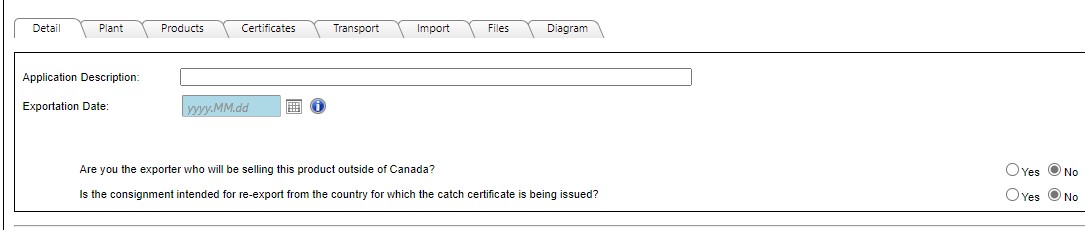
- Exportation Date – Enter the date the shipment will be exported from Canada or the date the product leaves your facility if being sold within Canada.
- Are you the exporter who will be selling this product outside of Canada?
- Select No: If you are selling the product to another Canadian company and will be forwarding the certificate.
- Select Yes: If you are the company exporting the product to any company outside of Canada.

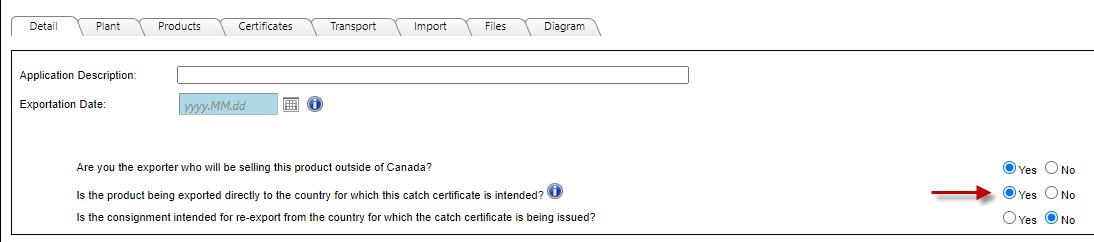
- Is the product being exported directly to the country for which this catch certificate is intended?
- Select Yes: If the shipment is going directly to the country for which the catch certificate will be issued.
- Example: You will use a catch certificate for the European Union when the product is being exported from a Canadian company directly to a company in any country within the EU.
- Example: The shipment will be transported to an airport or seaport outside of Canada and then directly to the country for which the certificate was issued. There is no change of ownership of the product as it moves to the foreign airport or seaport, you are selling directly to an importer located in the country for which the catch certificate is issued.
- Select No: If the shipment is going to another country before its final destination (considered an indirect shipment).
- Example: The shipment will be exported to a country which does not have a requirement for a catch certificate, prior to being re-exported to a country that does. e.g. product is being exported to China before being re-exported to Germany.
- Example: The shipment will remain in Canada but will be sold to a non-Canadian company prior to its export. Therefore, ownership of the product will be transferred to a company located in a country that does not have a requirement for a catch certificate, but since they are selling it to a country that has such a requirement, you will be providing them with a catch certificate. e.g. A company based in the United States is purchasing your product prior to exporting it from Canada to Ukraine. In this case, although the product never enters the United States, it is still considered an ‘indirect export’.
Note: Your answer must reflect the product’s chain of custody (ownership), rather than its transport or location.
- Is this a Transhipment? Transhipment refers to a consignment that is transferred to another vessel at sea or in a port, and continues to its final destination.
- Is the consignment intended for re-export from the country for which the catch certificate is being issued? Re-export refers to a consignment exported to the country for which the catch certificate is being issued that is then re-exported by that country to another foreign country.
Catch tab
Enter the catch information for the shipment in the necessary fields.
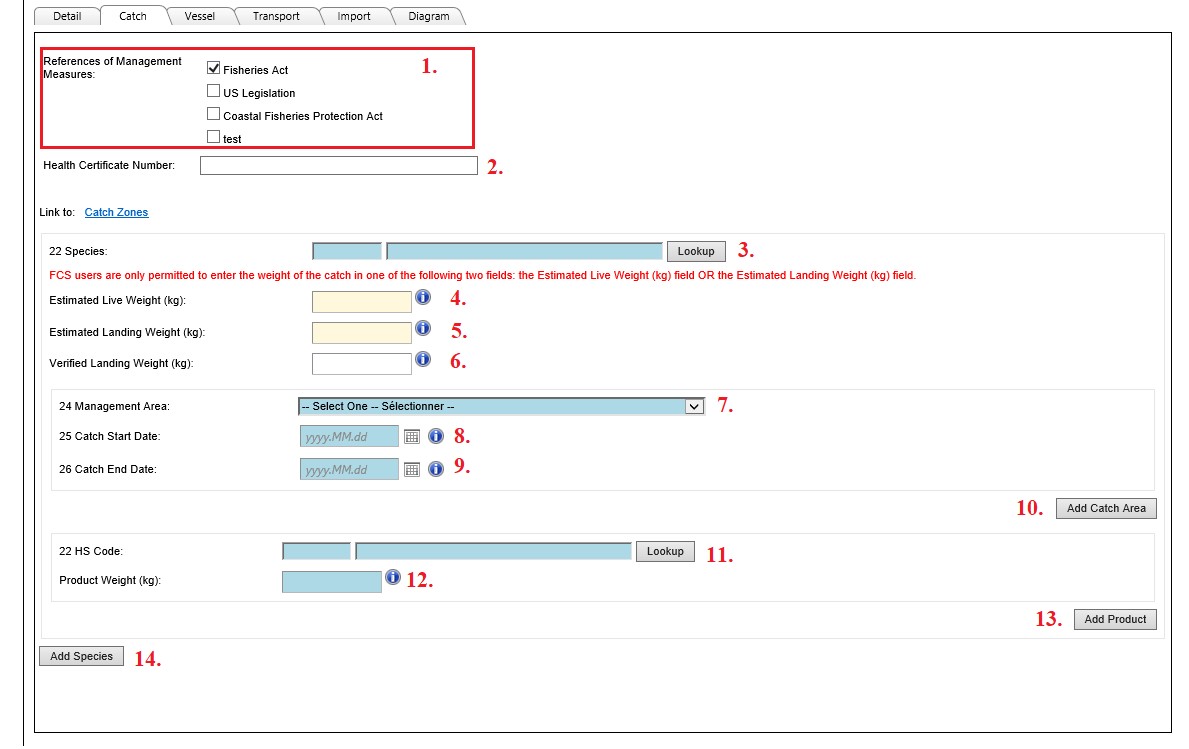
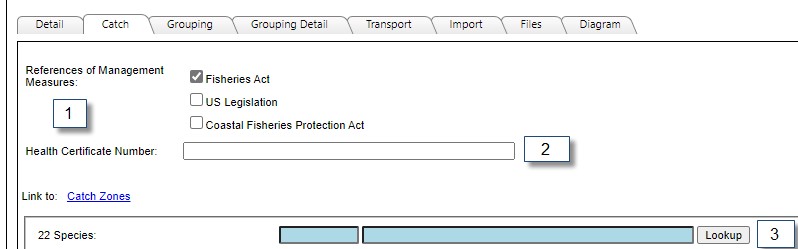
- References of Management Measures – The application will have ‘Fisheries Act’ selected as the default regulation. Please contact the Catch Certification Program: Operations Centre for more details on ‘US Legislation’ and ‘Coastal Fisheries Protection Act’.
- Health Certificate Number – Health certificate number as issued by the Canadian Food Inspection Agency (CFIA). If you do not know this number, you can leave it blank for Standard and Group Based applications. It is recommended that you complete this field; however, it is not mandatory.
- Species - The indicated species, and TSN Code. Click on Lookup to select the species.
- Estimated Live Weight (kg) – Fill in estimated live weight if a portion of the catch from a given landing (fishing trip) is being sent in this consignment. See Weight Guidance.
- Estimated Landing Weight (kg) – Fill in estimated landing weight if entire catch for one landing (fishing trip) is being sent in this consignment. See Weight Guidance.
- Verified Landing Weight (kg) – Fill in verified landing weight if you have an official weight such as from a dockside monitoring company. See Weight Guidance.
- Management Area – Select the management area in which the product was harvested.
- Catch Start Date – Enter the start date of the period during which the product was harvested.
- Catch end Date – Enter the end date of the period during which the product was harvested.
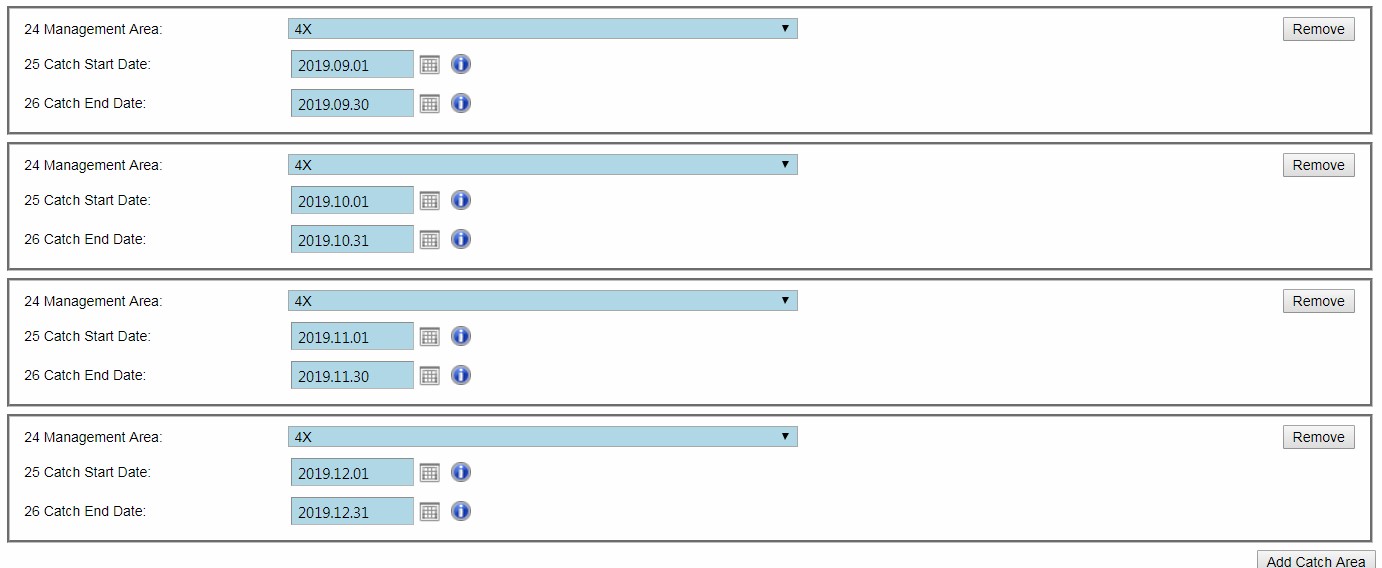
- Add Catch Area – Use if you need to add additional catch areas or catch dates
- HS Code – Click on the lookup button to select the appropriate HS code.
- Product Weight – The product weight should be the same as the Estimated Live or Estimated Landing Weight. See Weight Guidance.
- Add Product – Use if you need to add additional product.
- Add Species – Use if you need to add additional species.
Species

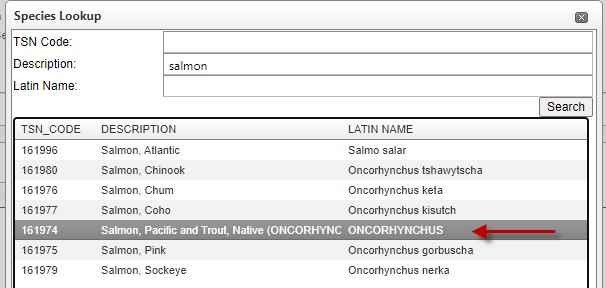
- Taxonomic Serial Number (TSN) Code – The TSN is a coding system that provides structure to species names and their hierarchical classification. If you know the TSN Code for the species of product that you are shipping, type it in this field then press ‘Search’. If you do not know the TSN Code of your product, conduct the search using the species description. All TSN codes can be found on the Integrated Taxonomic Information System website.
- Description – Enter the description (common name) of the species you are looking for (e.g. if you are shipping lobster, type Lobster into this field and press 'Search’).
- Latin Name – This allows you to search the species by its Latin name (e.g. the Latin name for American Lobster is Homarus americanus).
Multiple species are likely to be displayed when conducting a species search by common name. Ensure that you select the correct species from the list displayed.
Note: If you cannot find the species that you are looking for, or you need assistance, see Lookup Tables.

Weight guidance
Estimated Live Weight (kg) – This weight category should be used when only part of the landed catch is being exported. This is the weight of the product being shipped free of any preservatives, ice or other added materials. The Estimated Live Weight will always be the same as the Product Weight.
Estimated Landing Weight (kg) – This weight category is to be completed only when all the fish from one landing is being exported in one consignment. Please remember your provided amount should only include the weight of the product without ice, brine or any other added materials.
Note: A weight can only be entered in either the Estimated Live Weight or the Estimated Landing Weight, but not in both.
Verified Landing Weight (kg) – The official weight of the landed catch for the provided catch dates. This weight is recorded by a Dockside Monitor, at the time the catch is landed. It should only to be entered if it is available. This field is not a mandatory field.
Product Weight: The product weight must not include any added materials, such as brine or ice. Verify the Product Weight by comparing it to the Estimated Landing or Estimated Live Weight and Verified Landing Weight to ensure additional weight was not added.
Note: The Product Weight should always be the same as the Estimated Landing or Estimated Live Weight.
Management area and catch dates

- Management Area – Use the drop-down menu to indicate the area where the product was caught. More information on management areas can be found below. To add multiple areas, see ‘Add Catch Area’.
- Catch Start Date – Enter the start date of the catch. This is the first day that fishing took place.
- Catch End Date – Enter the end date of the catch. This is the last day that fishing took place.
Note: If the catch was made during a period exceeding six weeks (or 42 days), you must split the catch date range into shorter periods. (It is suggested that you split catch dates by month). The six week maximum must not be exceeded because it shows a lack of traceability.
To add additional dates, click ‘Add Catch Area’.
- Add Catch Area – If the product was caught in multiple management areas or over multiple catch date ranges, additional areas and catch dates can be added by clicking ‘Add Catch Area’.
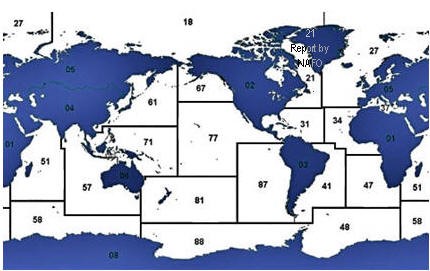
See the map below.
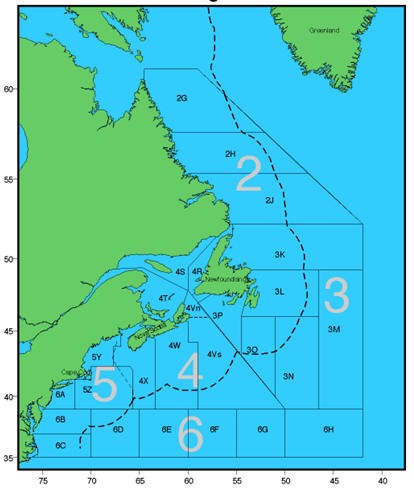
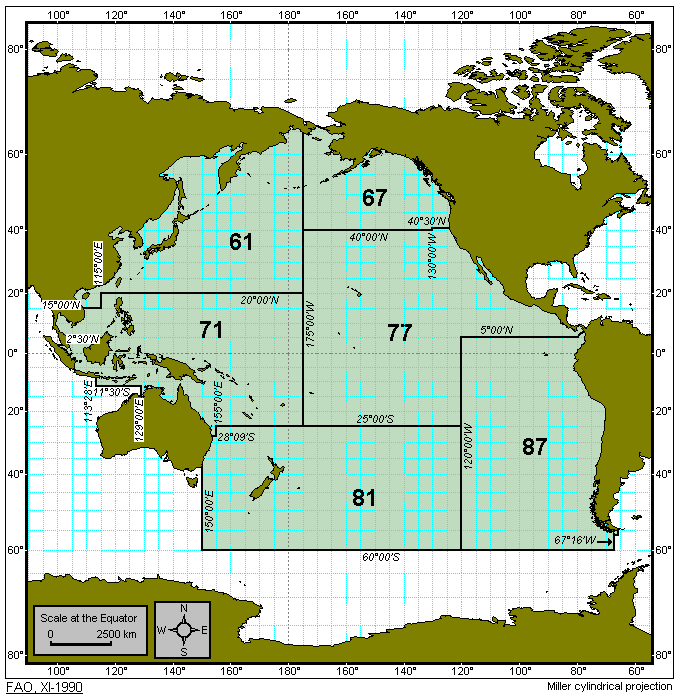
Catches in the Pacific region must specify a catch area as defined by the Food and Agriculture Organization of the United Nations (FAO) Map of Major Fishing Areas. The Pacific region is FAO67. See the map below or go to the Food and Agriculture Organization of the United Nations website for more information.
HS code and product weight
- Harmonized System (HS) Code – These codes are used to classify commodities, in this case, fisheries products. If you do not know the HS Code of your product, conduct the search using the description.
- Description – Enter the description of the product you are shipping (e.g. if you are shipping lobster, type Lobster into this field and press Search).
Multiple products are likely to be displayed when conducting a product search. Choose the product description and code for the form of the product that you are shipping (e.g. live lobster).
If you are having trouble determining the proper code for your product, please consult the Canadian Export Classification online catalogue or contact the Catch Certification Program: Operations Centre for guidance.
Note: If you need assistance using the Lookup table, see Lookup Tables.
Enter your product weight. For more information on product weight, see Weight Guidance.

Vessel tab
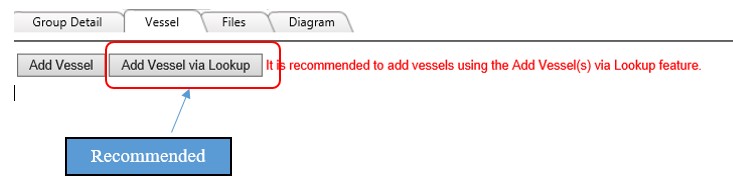
Enter the information for the vessel responsible for the catch that is being exported. When adding a vessel, it is more efficient to click ‘Add Vessel via Lookup’, which will open a window where you can search for vessels in the DFO database (see Lookup Tables). However, if the vessel does not appear when using Lookup, you may enter this information manually by clicking ‘Add Vessel’.
The following is a screen shot of the Vessel tab for a Catch Certificate – Standard:

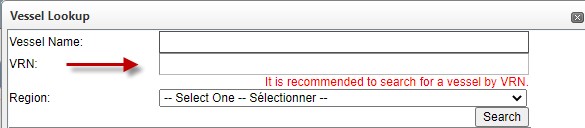
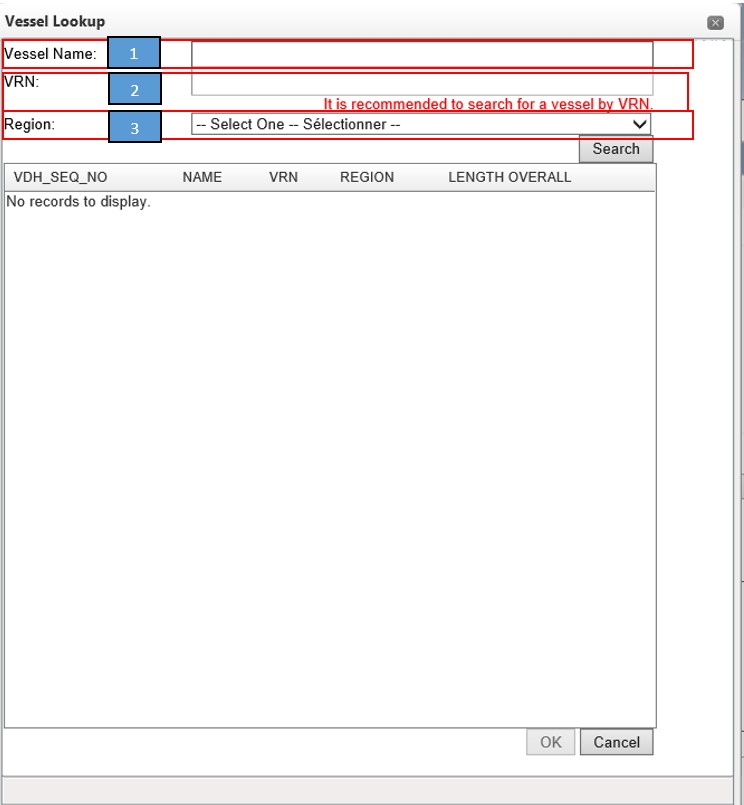
Below is the Vessel Lookup Window:

- Vessel Name – The registered name of the vessel.
- VRN – The Vessel Registration Number of the vessel. It is recommended to search for a vessel by VRN rather than by vessel name.
- Region – DFO Regions include: Central and Arctic, Gulf, Maritimes, Newfoundland and Labrador, Pacific, and Quebec.
Multiple Vessels Displayed:
When searching for a vessel, the FCS Vessel Lookup system may display multiple vessels with the same name, VRN, and Region. Multiple results are displayed because the system extracts vessels from multiple databases at Fisheries and Oceans. It is acceptable to use any of these vessels as long as the Vessel Name, VRN, and Region match that of the required vessel.
Once you search and find the vessel that you need, click the ‘OK’ button at the bottom-right of the window. This should insert the vessel information on the screen. You will then be required to add the mandatory vessel information in the remaining blue fields.
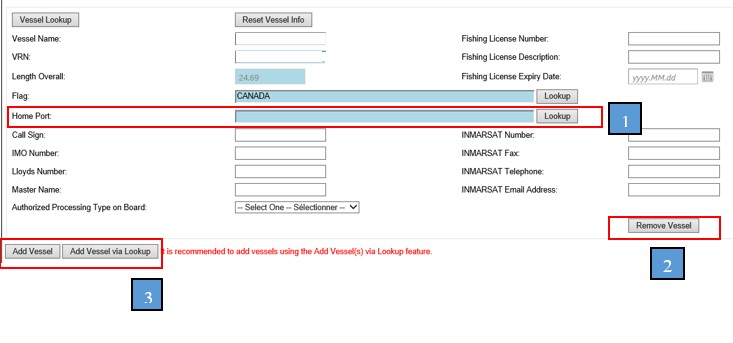
A screen shot of the Vessel tab is shown below.
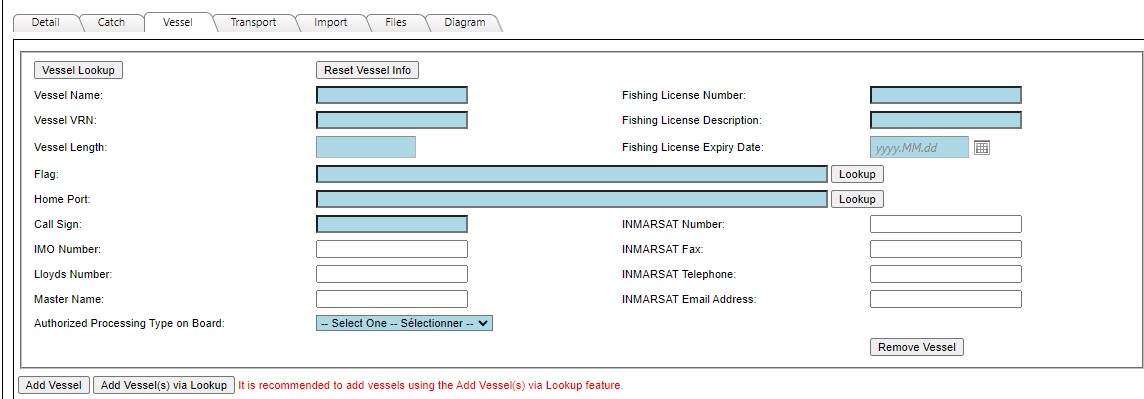
- Vessel Name – The registered name of the vessel.
- VRN – The Vessel Registration Number.
- Vessel Length – The overall length of the vessel in metres.
- Flag – Country where the vessel is registered. It is defaulted to Canada.
- Home Port – The registered home port of the vessel. If the homeport is unknown, Applicants should contact the fisher to obtain this information.
- Call Sign – Unique designation for a transmitting station, provided by Industry Canada. N/A or not issued is acceptable if you do not have this information.
- International Maritime Organization Number (IMO) – The IMO number is a unique identifier for ships. This field can be left blank if you do not know this information.
- Lloyds Number – Lloyds Registration Number for the vessel. This field can be left blank if you do not know this information.
- Master Name – Name of the master of the fishing vessel.
- Authorized Processing Type on Board – Select whether or not there is authorized processing on-board. If processing is done on the vessel, then select ‘Processing’ from the drop down menu.
- Fishing License Number – Valid fishing license number used for the catch.
- Fishing License Description – Enter the species fished
- Fishing License Expiry Date – Select the date when the fishing license expires
- Add Vessel/Add Vessel(s) via Lookup Buttons – Choose ‘Add Vessel’ or ‘Add Vessel(s) via Lookup’ to add the vessel.
Note: It is preferable to add via look up using the VRN. - Remove Vessel Button – Click this button to remove the current vessel.
- INMARSAT Information – Mobile Satellite Number, Fax, Telephone, or E-mail, if applicable.
Adding unnamed vessels to your application using the vessel lookup tool
Some vessels do not have names. You can add these vessels to your applications by using the Add Vessel via Lookup feature and entering the VRN. After clicking ‘Search’, the search result will display the vessel with the VRN in both the Vessel Name and VRN fields.
The vessel will be added to the application with the VRN in both the ‘Vessel Name’ and ‘VRN’ fields.

Transhipment tab
Transhipment is the shipment of goods to an intermediate destination, and then from there to yet another destination, without being landed. For instance, this tab must be completed if the product is caught by a vessel at sea, and then transferred to a different vessel at sea or in a port before it lands at its final destination.
If your consignment is being transhipped, click ‘Yes’ on the Detail tab, then fill out the required information. Once ‘Yes’ is selected, the fields below become available. A screen shot of the Transhipment tab is found below.
Note: Transhipment details do not have to be completed online through FCS. These details can be filled in by hand on a printed certificate after the certificate has been approved. Transhipment details will not be certified by the validating authority.
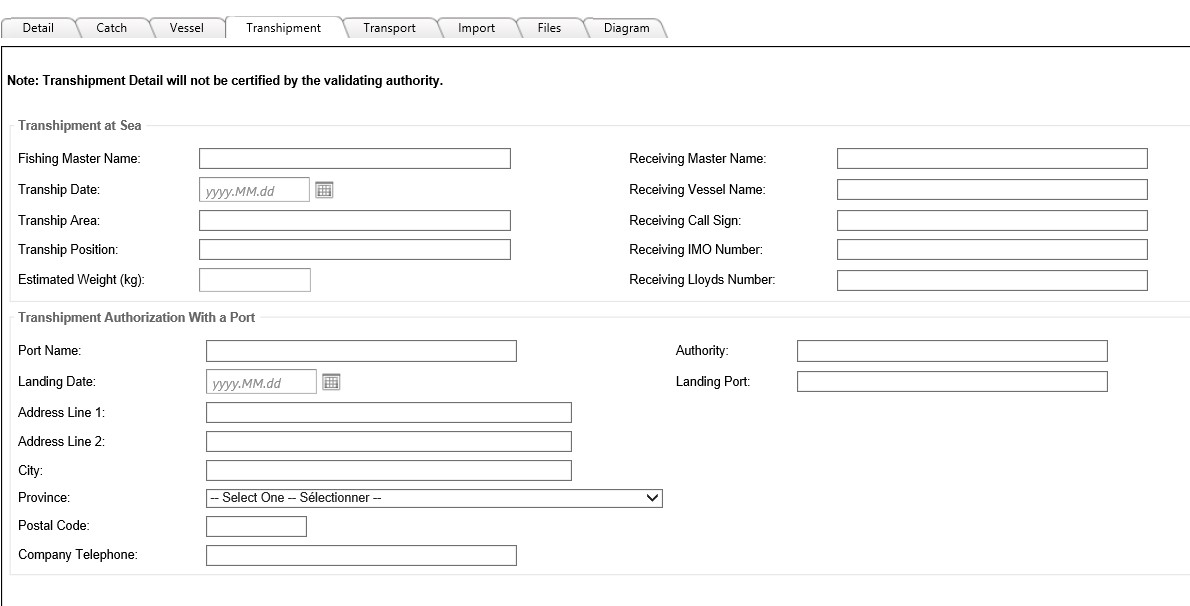
If the transhipment occurs at sea, fill in the top box called ‘Transhipment at Sea’. If the transhipment occurs in port, fill in the second box that is titled ‘Transhipment Authorization with a Port’.
Transport tab
Provide information for the company responsible for transporting the product, as well as the mode of transportation used (e.g. vessel, rail, air, truck). You are only responsible for providing transportation details from your facility to the next company in the chain of custody.
Clicking on Select Transporter/Importer, will display the Transporter/Importer List page. You will see the list of previously entered and saved transporters or importers. See Transporter/Importer List.
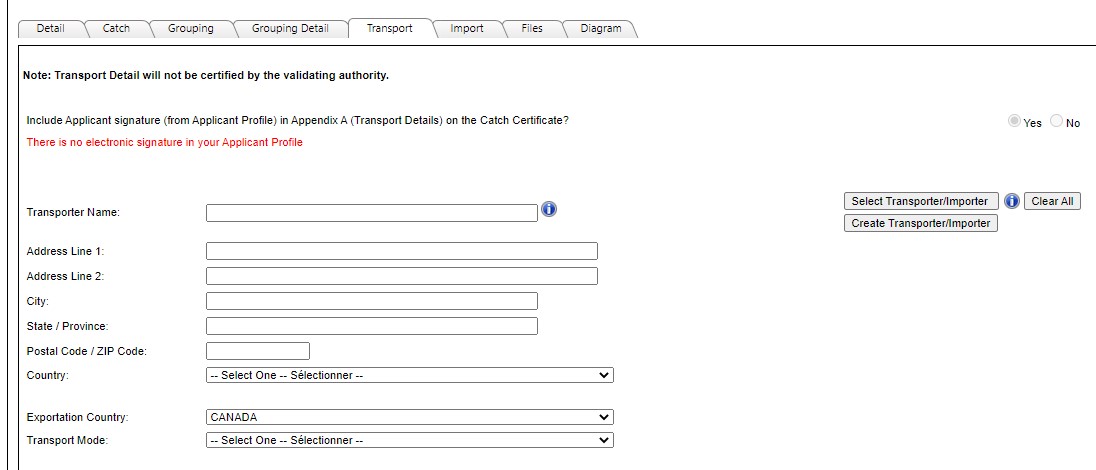
Note: Although most fields are not mandatory, it is recommended that you complete all applicable fields on the Transport tab.
Import tab
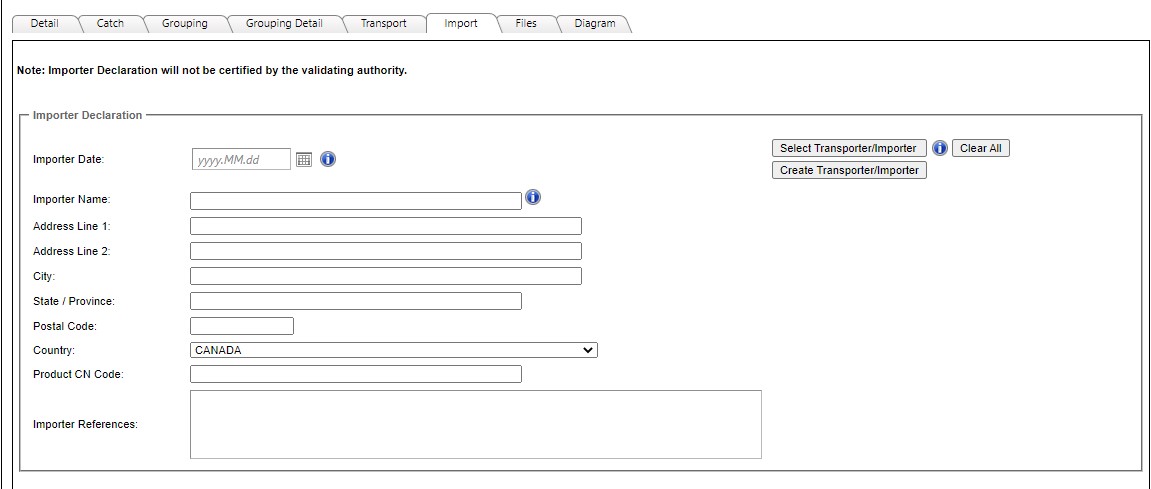
Provide the purchaser’s location and contact information. Indicate the anticipated date of import or the date the product arrives at the purchaser’s facility if being sold within Canada.
Below is a screen shot of the Import tab.
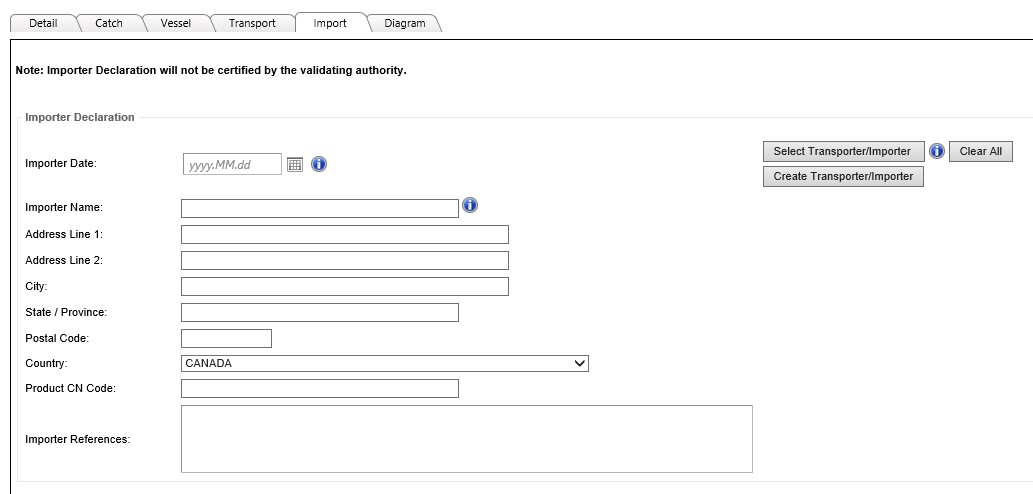
- Importer Date – Select the import date for the shipment, or the delivery date if being sold to another Canadian company.
- Product CN Code (Combined Nomenclature code) - This field contains the European version of the HS Code. This field is not mandatory but can be filled in if provided by the EU importer. Further information about CN Codes can be found on the Eurostat Website.
Clicking on Select Transporter/Importer, will display the Transporter/Importer List page. You will see the list of previously entered and saved transporters or importers. See Transporter/Importer List.
Diagram tab
The Diagram tab will show the hierarchy for certificates. Certificates and applications in all statuses will be displayed on the Diagram tab including retracted certificates.

Re-export tab
If product is imported into a country for which a catch certificate was issued, and then subsequently exported from that country to another, it is being re-exported. This tab will be completed if you are aware that your export consignment is intended to be re-exported from the country that you ship it to. The Re-Export tab will only appear if you answer ‘Yes’ to the question “Is the consignment intended for re-export from the country for which the catch certificate is being issued?” on the Detail tab.
If you do not know the re-export information, but you do know that the product is being re-exported, simply click the ‘Yes’ button and leave the fields blank to allow the importer to fill in this information.
Re-export details do not have to be completed online through FCS. These details can be filled in by hand on a printed certificate after the certificate has been submitted and approved. Re-Export details will not be certified by the validating authority.
Submit application
Once you are satisfied that your application contains all the required information, and that this information is accurate, click the ‘Submit Application’ button located above the tab menu.
When you click the ‘Submit Application’ button after correctly filling out all of the required information within the application, you will be taken to a screen that says ‘No deficiencies have been identified in the application information.’

Note: If there are any deficiencies or errors in the catch certificate application, (e.g. you did not complete a mandatory field), when you click ‘Submit Application’ there will be a list of deficiencies shown. The following is an example of a deficiency in an application because the home port of a vessel was not entered in a grouping application.

- Issue Type – Lists the tab in which the deficiency occurred.
- Issue Category – The exact field where the deficiency occurred.
- Problem – This section gives a detailed explanation of the problem / deficiency, so that you can properly correct it.
- View / Edit – Clicking the pencil icon will allow you to go back into the edit screen to fix the issue.
Once any deficiencies have been corrected, click the ‘Submit Application’ button. If all missing information has been entered and errors corrected, you will be brought to another screen that says ‘No deficiencies have been identified in the application information.’ This screen has another ‘Submit Application’ button to confirm your submission.
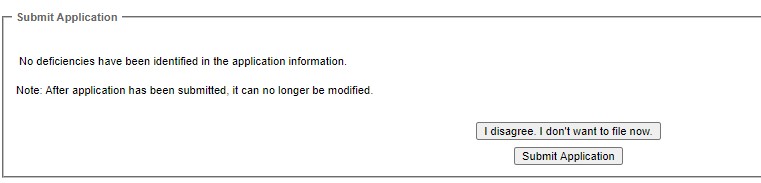
Once clicked, you will be brought to a screen that contains declarations that must be read and checked off before you are able to finalize your submission.
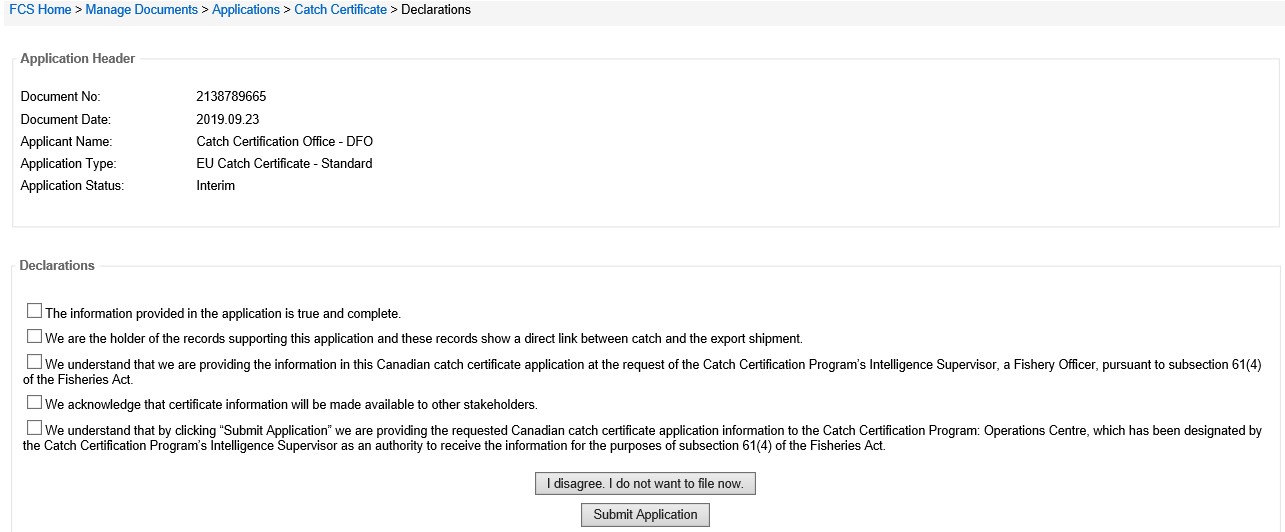
Once these declarations have been read and checked off, click the ‘Submit Application’ button.

You will receive an email notification from FCS to confirm submission of the application and another email notification when your application is approved.
If a correction to your application is required prior to approval, contact the Catch Certification Program: Operations Centre to withdraw the application. Changes can then be made and the application can be re-submitted. See Service Standards for application approval times.
Save this Record – At any time during the application process, the application can be saved and re-opened at another time by clicking on the ‘Save This Record’ button. In addition, each time the user clicks on one of the tabs in the application, the information is automatically saved.
Print Application Information – Clicking this button will prompt FCS to produce a Portable Document Format (PDF) report of all the information entered in the application. Adobe Reader is required to view reports in PDF format. Adobe Reader may be downloaded for free.
Grouping request application
This application form allows you to create various types of groupings, either vessel based or non vessel-based (buyer/agent, Aboriginal fishery, or fisher). The use of groupings is meant to accommodate complex fisheries where the interactions along the supply chain create challenges in creating Standard catch certificates or where the product was sourced from multiple vessels. After groupings have been approved, you may select the grouping(s) for inclusion in Group Based applications.
Note: If the catch was landed by a vessel of over 100 feet (30.48m) in length, you must complete a Standard application. See Catch Certificate – Standard for more information. Grouping requests cannot include vessels over 100 feet (30.48m) without prior approval.
There are two main types of groupings:
- Vessel-Based Group: Groupings which include groups of vessels you source product from. This type of grouping will be used by companies or Aboriginal bands that purchase directly from vessels. This category will also be used to represent fisheries that include a collector vessel which delivers the product of its feeder vessels to shore.
- Non Vessel-Based Group: Groupings which are community based and may include a buyer/agent you source product from, an Aboriginal band or organization or individual licensed fishers who participate in non-vessel based fisheries. In this type of grouping, no vessel is identified as the source of the product but the source community(ies) of the product must be identified.
Note: Each grouping must be reviewed and renewed for each fishing season. For more information, see Renewing a Grouping and Updating a Grouping
Grouping Request applications have a service standard of 10 business days for approval.
Grouping requests: Steps
- Select ‘Create Application’.
- Select the Application Type: Grouping Request.
- Complete each tab (more detailed instructions below).
- Review for accuracy.
- Click ‘Submit’ to submit your application – see Submit Application. The system will then notify you of any errors or omissions.
- Read and agree to the declarations listed
- Click ‘Submit’ to submit your application for validation. You will receive an email with the application’s service standard – see Service Standards.
Note: Save this Record – When creating a grouping request, remember to save often while taking the time to complete each tab.
Group detail tab
The Group Detail tab appears as follows:

- Application Description – This field is optional. Applicants can fill in the Application Description field with information that will help them to organize their groupings.
- Associated Species – Click the ‘Lookup’ button to select the species that will be associated with the grouping. Only one species entry can be included in a grouping, but in cases where licences are issued for species groups, (such as Pacific salmon or shrimp), the Associated Species selected may in fact be a genus or group of species. For more information on using Lookup Tables see Lookup Tables.
- Fishing Area – The catch area for the grouping will be selected from a drop down menu. All NAFO areas and species specific management areas are available to be selected, e.g.: LFAs, SFAs, etc. Groupings with multiple areas are also available for selection, e.g.: LFA 33/34 or 4S/4T.
- Group Name – The Group Name field is to be used by Applicants to enter information that will assist them in tracking and organizing their groupings.
- Group Alias – The alias is a short version of the Group Name that will be displayed on the catch certificate. The Group Alias must be 6-12 characters long, including spaces. All letters must be uppercase and it must contain at least two numbers which are next to each other. Examples: LOBSTER01; LOB2018
- Fishing Season – The Fishing Season field is used to designate the year in which product was caught. You will select the year that the grouping will be used for from the drop down menu. If the fishing season spans two calendar years, you will select the two years from the list.
Note: A fishing season needs to be selected for all types of groupings including non-vessel based groupings.
- Group Type – Group Types are divided into two categories: Vessel Based and Non-Vessel Based. Applicants can only select one Group Type from the entire list. Once the Group Type is selected, the corresponding tabs to be completed will appear, (e.g. Vessel tab, Buyer/Agent tab, Aboriginal tab, Fisher tab).
- Vessel Based Group Type – Choose this group type if the product was purchased directly from the vessels that caught the product. Vessel details are mandatory.
- Group Sub-Types:
- Vessels Only – If product was purchased directly from the vessels that caught the product.
- Buyer/Agent – If product was purchased from a buyer/agent who had purchased product directly from vessels.
- Aboriginal – If product was purchased from an Aboriginal band/or organization who had purchased product directly from aboriginal vessels.
- Collector – Choose this group type if there was a collector vessel and feeder vessels involved in the catch (Pacific region only).
- Non-Vessel Based Group Type – Choose this group type if the product was not sourced directly from vessels. These groupings must include the communities where the catch took place.
- Group Sub-Types:
- Buyer/Agent – If the catch was purchased from a buyer/agent who is not able to register in FCS and forward catch certificates.
- Aboriginal – If the catch was made by Aboriginal harvesters.
- Fisher – If the product was sourced from a fishery where no vessels were used, such as eel or alewife. Note: The option to select this group sub-type will only become available after the Associated Species has been selected and if it is a species for which licensing is non vessel-based, (such as eel or alewife).
Pacific salmon groupings
In general, applicants are asked to have species-specific groupings. Licences that are issued for Pacific salmon include all five species of Pacific salmon on one licence. Pacific salmon exporters can create or renew groupings that can include all five species of Pacific salmon. This will substantially diminish the number of groupings each salmon exporter will have within the Fisheries Certificate System (FCS).
When salmon exporters are creating their groupings, they will have the option to choose TSN Code – 161974, Description – Salmon, Pacific and Trout, Native (ONCORHYNCHUS).
Vessel based groups
Vessel Based Groups are groupings which include groups of vessels you source product from. This type of grouping will be used by companies or Aboriginal bands and organizations that purchase directly from vessels. This category will also be used to represent fisheries that include a collector vessel which delivers the product of its feeder vessels to shore.
Types of vessel based groupings
Vessels only
A grouping can contain 2 to 50 vessels. Fifty vessels is the maximum number of vessels permitted in a single grouping. If more than 50 vessels participated in the catch for the product being shipped, you need to create additional groupings to add to your Group Based application. There is no maximum number of groupings that a company can create or use in a Group Based application.
Groupings cannot include vessels that are over 100 feet (30.48m) in overall length. Product purchased from those vessels need to be submitted on a Standard certificate application instead. Some exceptions are permitted, mainly if the vessel operates within an inshore or mid-shore fleet. Off-shore vessels that are over 100 feet (30.48m) in length overall cannot be exempted. Please contact the Catch Certification Program: Operations Centre for vessel exceptions.
Groupings must specify the applicable species, fishing area and year. For example, if you have 10 vessels and 8 of these vessels catch lobster in one fishing area and the other 2 vessels catch silver hake, you would need to create 2 groupings, one for each species. If the 8 lobster vessels did not fish in the same area (4 fish in LFA 24 and 4 fish in LFA 26), you would create two lobster groupings, one for each fishing area.
Vessel grouping tabs:

Vessel tab
This tab enables you to add vessels to your grouping. When adding a vessel, it is more efficient to click ‘Add Vessel via Lookup’, which will open a window where you can search for vessels in the DFO database. See Lookup Tables for more information on using this feature. However, if the vessel does not appear when using Lookup, you may enter this information manually by clicking ‘Add Vessel’.
Below is the Vessel Lookup window:
- Vessel Name – The registered name of the vessel.
- VRN – The Vessel Registration Number of the vessel. It is recommended to search for a vessel by VRN rather than by vessel name.
- Region – DFO regions include: Central and Arctic, Gulf, Maritimes, Newfoundland and Labrador, Pacific, and Quebec.
Multiple Vessels Displayed:
When searching for a vessel, the FCS Vessel Lookup system may display multiple vessels with the same name, VRN, and Region. Multiple results are displayed because the system extracts vessels from multiple databases used by DFO. It is acceptable to use any of these vessels as long as the Vessel Name, VRN, and Region match that of the required vessel.
Once you search and find the vessel that you need, click the ‘OK’ button at the bottom-right of the window. This will insert the vessel information on the screen. You will then be required to add the mandatory vessel information in the remaining blue fields.
A screen shot of the Vessel tab is shown below.
- Home Port – The registered home port of the vessel. If the homeport is unknown, applicants should contact the fisher to obtain this information.
- Remove Vessel Button – Click this button to remove the current vessel.
- Add Vessel/Add Vessel via Lookup Buttons – Choose ‘Add Vessel’ or ‘Add Vessel(s) via Lookup’ to add multiple vessels.
Minimum number of vessels for a grouping is 2 vessels.
Note: It is recommended to use the Add Vessel via Lookup which will open a window where you can search for vessels in the DFO database. See Lookup Tables for more information on using this feature.
Adding Unnamed Vessels to the Fisheries Certificate System (FCS) via Lookup:
Some vessels do not have names. You can add these vessels to your applications by using the Add Vessel via Lookup feature and entering the VRN. After clicking ‘Search’, the search result will display the vessel with the VRN in both the Vessel Name and VRN fields.

The vessel will be added to the application with the VRN in both the ‘Vessel Name’ and ‘VRN’ fields.

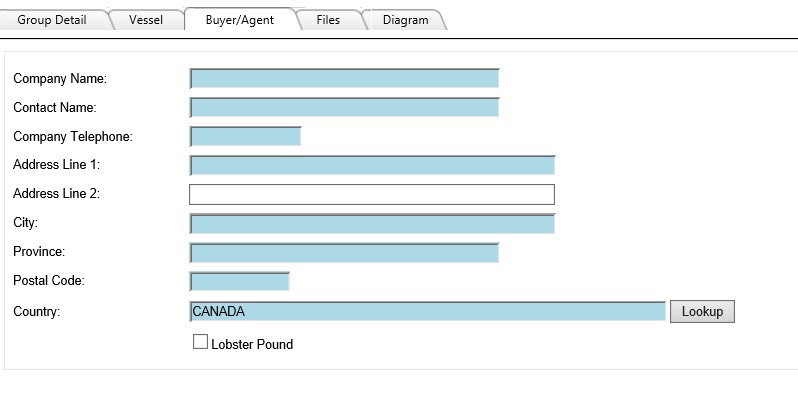
Buyer/Agent
If you purchase product from a buyer (intermediary), who had purchased product directly from vessels, or purchased product from another buyer, you can create a Buyer/Agent grouping. Buyer/Agent groupings can only be used in cases when the supplier of product who are not registered in FCS to create and forward catch certificates for the product they sell.
Each buyer/agent grouping can contain only one buyer/agent. If you have multiple buyer/agents, they will each require their own grouping.
If the buyer/agent is registered in FCS, the grouping cannot be approved. In this case, the registered company would create their own applications and forward their approved catch certificates to your company. See Forwarded Certificates for more information.
Buyer/Agent grouping tabs:

Vessel tab
See Vessel Tab for more information.
Buyer/Agent tab
The screen will display all the required fields that need to be completed for the company. Blue fields are mandatory.
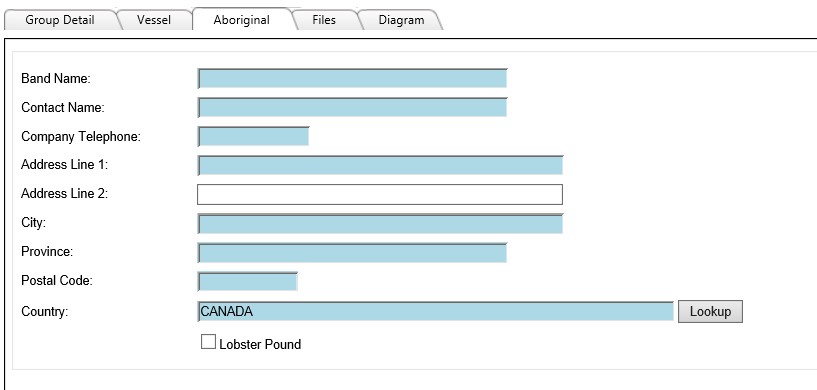
Aboriginal grouping
If you purchase product from an Aboriginal band, who had purchased product directly from vessels, you can create an Aboriginal grouping.
Each Aboriginal grouping can only contain one Aboriginal band. If you purchase from multiple Aboriginal bands, they will each require their own grouping.
Aboriginal grouping tabs:

Vessel tab
See Vessel Tab for more information.
Aboriginal tab
The screen will display all the fields that need to be completed for the Aboriginal band. Blue fields are mandatory.
Collector
Create this type of grouping if you purchased product from a fishery in which a collector vessel delivers the catch of one or more feeder vessels to shore.
Collector vessel grouping tabs:
Collector tab
Once the Group Detail tab is completed, click on the Collector tab and then click ‘Add Collector Vessel’ or ‘Add Collector Vessel via Lookup’.

Below is a screen shot of the details needed for this tab. Blue fields are mandatory.
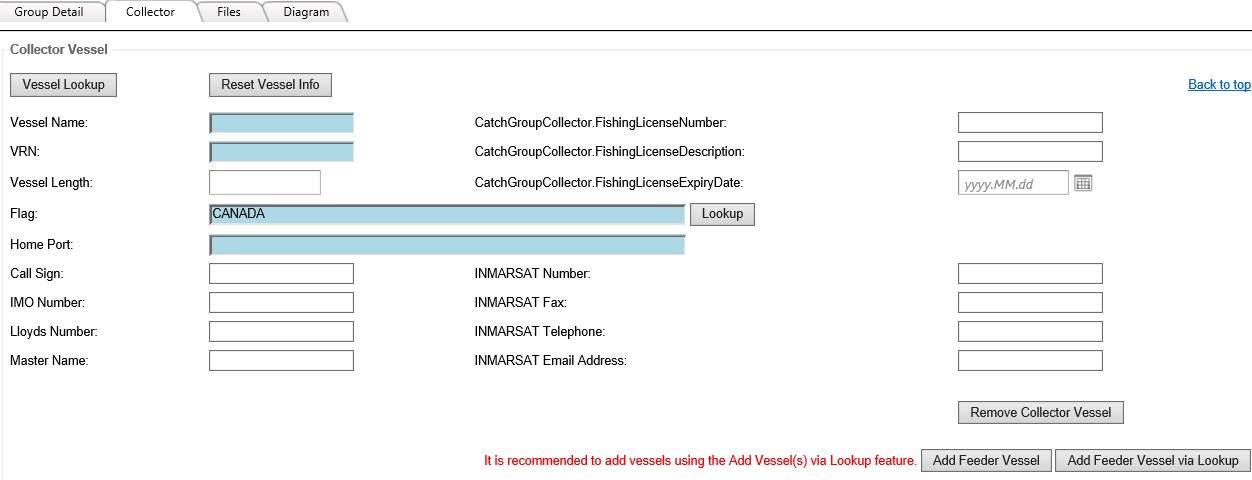
Vessel Name – The registered name of the vessel.
VRN – The Vessel Registration Number.
Vessel Length – The overall length of the vessel in meters.
Flag – Country where the vessel is registered. It is defaulted to Canada.
Home Port – The registered home port of the vessel. If the home port is unknown, applicants should contact the fisher to obtain this information.
Call Sign – Unique designation for a transmitting station, provided by Industry Canada. N/A or not issued is acceptable if you do not have this information.
International Maritime Organization Number (IMO) – The IMO number is a unique identifier for ships. This field can be left blank if you do not know this information
Lloyds Number – Lloyds Registration Number for the vessel. This field can be left blank if you do not know this information
Master Name – Name of the master of the fishing vessel.
Fishing License Number – Valid fishing license number used for the catch.
Fishing License Description – Enter species fished
Fishing License Expiry Date – Select the date when the fishing license expires
INMARSAT Information – Mobile Satellite Number, Fax, Telephone, or E-mail if applicable.
Remove Collector Vessel Button – Click this button to remove the current vessel.
Add Feeder Vessel Button/Add Feeder Vessel via Lookup Button – Choose ‘Add Feeder Vessel’ or ‘Add Feeder Vessel via Lookup’ to add the feeder vessels associated with the catch.
When adding a feeder vessel, it is more efficient to click ‘Add Feeder Vessel via Lookup’, which will open a window where you can search for vessels in the DFO database. See Lookup Tables. However, if the vessel does not appear when using Lookup, you may enter this information manually by clicking ‘Add Feeder Vessel’. For more information on adding vessels to a grouping see Vessel Tab .
Non-vessel based groups
Non-vessel based groups are groupings in which the product was not sourced directly from vessels. Non-vessel based groupings must identify the community(ies) where the catch was landed.
Types of Non Vessel-Based Groupings are as follows.
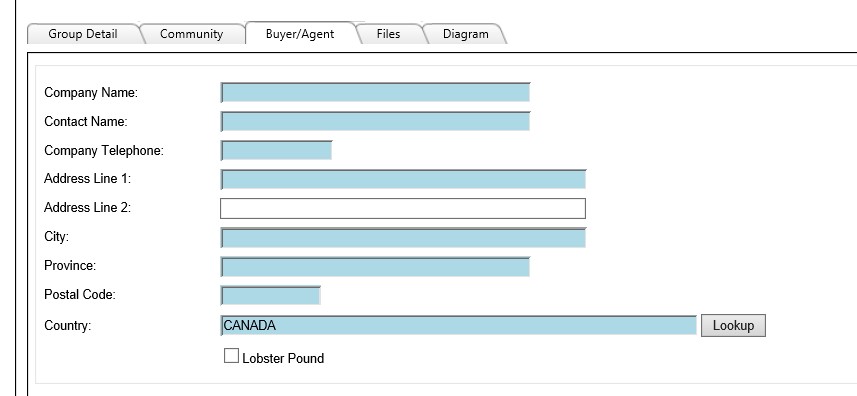
Buyer/Agent grouping
If the catch was purchased from a buyer/agent, select ‘Buyer/Agent’ and fill in their information within the Buyer/Agent tab. Each buyer/agent grouping can contain only one buyer/agent. If you have multiple buyer/agents, they will each require their own grouping.
Buyer/Agent grouping tabs screen shot below:

If the buyer/agent is registered in FCS, the grouping cannot be approved. In this case, the registered company would create their own applications and forward their approved catch certificates to your company. See Forwarded Certificates for more information.
Community tab
The community is where the fish product was sourced. Click on ‘Add Community’ to select a community where the catch was landed. Select the community using the Community Lookup feature.

Note: There is no limit to the number of communities that you can add to a grouping.

Buyer/Agent tab
The screen will display all the required fields that need to be completed for the company. Blue fields are mandatory.
Aboriginal grouping
If you purchase product from an Aboriginal band, you can create an Aboriginal grouping. Each Aboriginal grouping can only contain one Aboriginal band. If you purchase from multiple Aboriginal bands, they will each require their own grouping.
Aboriginal Grouping tabs screen shot below:

Community tab
See Community Tab for more information.
Aboriginal tab
The screen will display all the required fields that need to be completed for the Aboriginal band. Blue fields are mandatory.

Fisher
If the product was sourced from a fishery where no vessels were used, such as eel or alewife, the non-vessel based grouping sub-type will be Fisher.
Note: The option to select this group sub-type will only become available after the Associated Species has been selected and if it is a species for which licensing is non-vessel based, such as eel or alewife.
Fisher grouping tabs:

Community tab
See Community Tab for more information.
Fisher tab
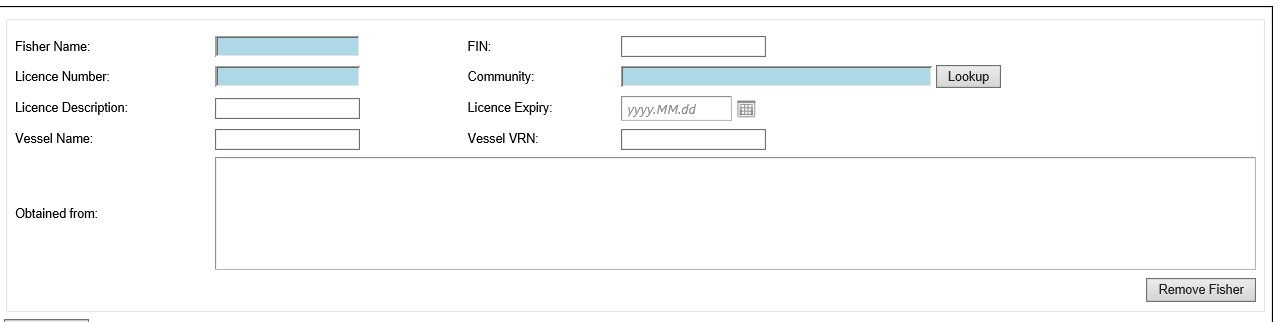
Select ‘Add Fisher’.
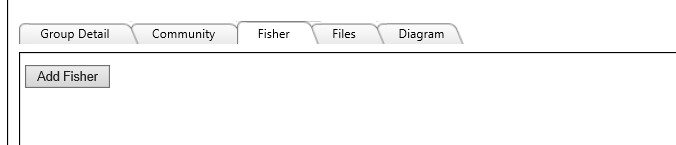
The screen will display all the required fields that need to be completed for each fisher. Blue fields are mandatory.
Submit grouping request
Once all fields have been completed, click the ‘Submit Application’ button, which is located above the tab menu.
Note: If there are any deficiencies or errors in the grouping application, (e.g. you did not complete a mandatory field), when you click ‘Submit Application’ there will be a list of deficiencies shown. Once these deficiencies have been corrected, click the ‘Submit Application’ button.
If all missing information has been entered and errors corrected, you will be brought to another screen that says ‘No deficiencies have been detected’. This screen has another ‘Submit Application’ button to confirm your submission. Once clicked, you will be brought to a screen that contains declarations that must be read and checked before you are able to finalize your submission. Once these declarations have been read and checked off, click the ‘Submit Application’ button.
You will receive an email notification from FCS to confirm submission of the application and another notification when your Grouping Request is approved. Once a grouping is approved it can be used to create Group Based applications.
If a correction to your application is required prior to approval, contact the Catch Certification Program: Operations Centre to withdraw the application. Changes can then be made and the application re-submitted. See Service Standards for application approval times.
Save this Record – At any time during the process, the application can be saved and re-opened at another time by clicking on the ‘Save This Record’ button. In addition, each time the user clicks on one of the tabs in the application, the information is automatically saved.
Print Application Information – Clicking this button will prompt FCS to produce a Portable Document Format (PDF) report of all the information entered in the application. Adobe Reader is required to view reports in PDF format. Adobe Reader may be downloaded for free.
Renewing a grouping and updating a grouping
Go to Manage Documents > Groupings
Renewing a grouping
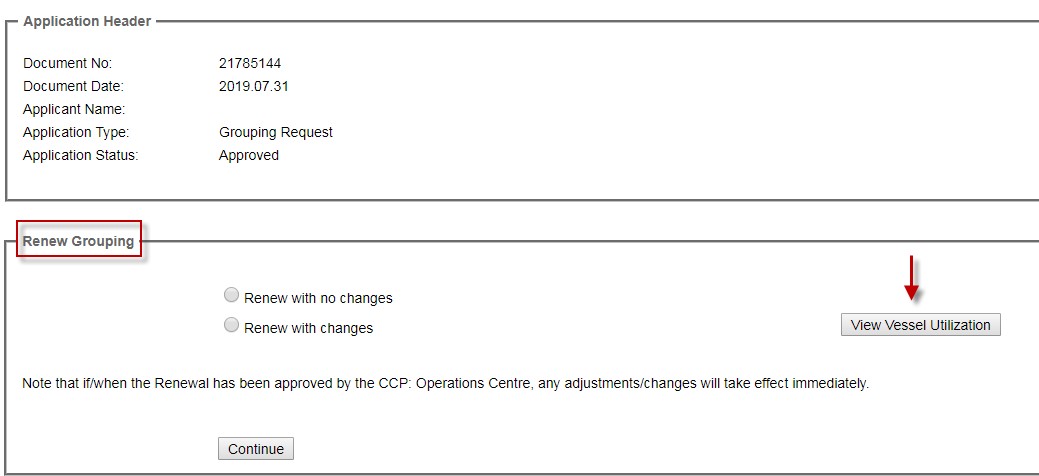
Renewing a Grouping

There are two options when renewing a grouping. The options are Renew with no changes or Renew with changes.
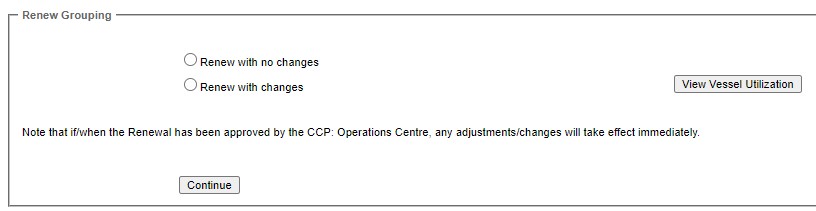
When an Applicant renews a grouping they can change the Fishing Season Date to the current year.
When a grouping is renewed, the assigned Certification Officer must validate every vessel and confirm that each vessel was licensed for the designated season, in the same way as they would for a new Grouping Request. The service standard for approving a grouping renewal is 10 business days.
Updating a grouping
This function is used when an Applicant wishes to add a vessel that they are sourcing from during the season after their grouping has been approved. If an Applicant wishes to remove a vessel or make a change to a vessel already in a grouping, the Update grouping feature cannot be used. The Applicant will need to ‘Renew with changes’ instead.

The Applicant can add one to five vessels, either via vessel look up, or manually. When the Applicant clicks on ‘Update’ they will receive a warning that they are limited to adding five vessels.

If the Applicant adds more than five vessels they will get a pop up warning.
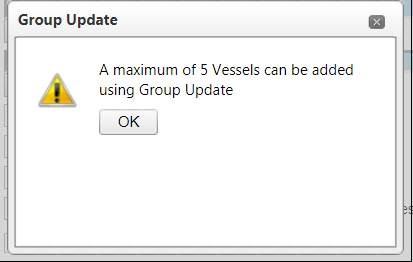
The Applicant will receive an error message if they try to submit an updated grouping containing more than five added vessels.

They will be unable to submit the grouping until excess vessels are removed bringing the number of added vessels down to five.
The grouping can be updated multiple times throughout the season, as long as the number of vessels does not exceed 50 in the grouping.
The service standard for approving a grouping update is two days. This function is meant to be used for in season changes to a grouping, and the amount of information that can be changed is limited so that processing times can be minimized and the grouping can be made available for use within a two day period.
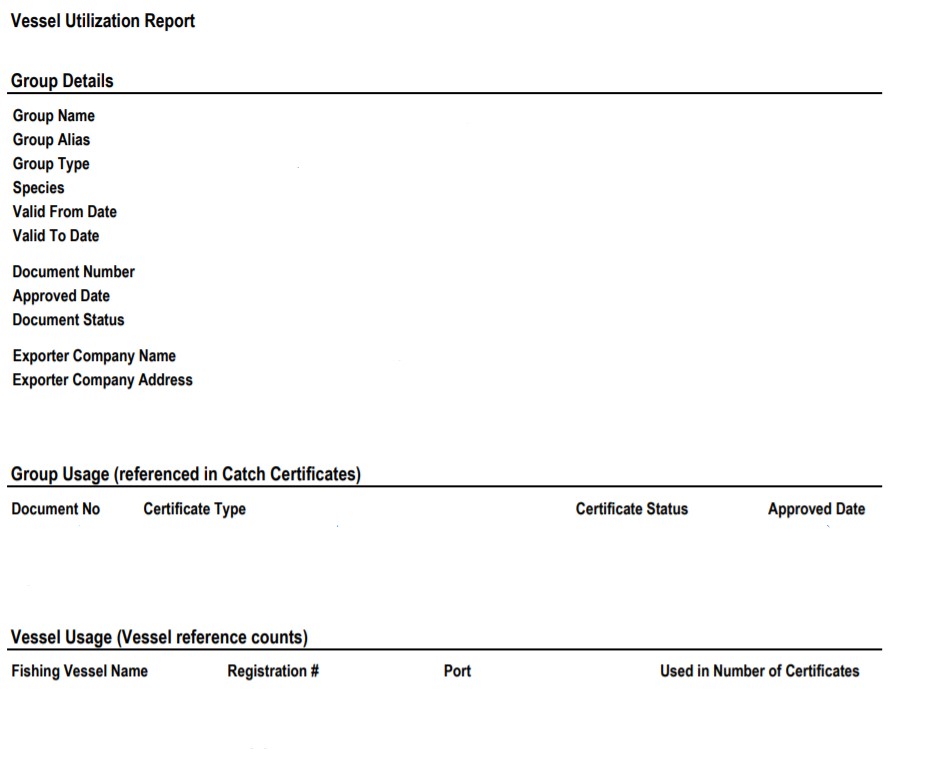
Vessel Utilization Report:
Once a grouping has been approved and used in Group Based catch certificates, the Vessel Utilization Report becomes available. This report will show how many times a grouping has been used in a Group Based catch certificate and generate a list of all of the certificates, including their document numbers. Also the report will show, for each vessel contained in the grouping, how many times the vessel has been used in a Group Based catch certificate. This report is generated in PDF format. An Applicant User can view this report and decide, for example, to remove a vessel from their grouping if it has not contributed to catch in a long time.
Accessing the Vessel Utilization Report when renewing a grouping.
Accessing the Vessel Utilization Report when updating a grouping.

- The first section of the report outlines the Group Details with the information about the grouping.
- The second section shows all the certificates that the grouping was used in and the status of the certificates along with the date that they were approved.
- The third section lists each vessel in the grouping and how many certificates each vessel was used in.
Catch certificate – Group based
This is a variation of the Standard Catch Certificate that accommodates situations where the catch is based on a pre-approved grouping. Before a Group Based application can be submitted, you must first create a grouping by applying for a Grouping Request.
Note: If the catch was landed by a vessel of over 100 feet (30.48m) in length, you must complete a Catch Certificate – Standard application.
Catch certificate – Group based: Steps
- Select ‘Create Application’.
- Select the Application Type: Group Based Certificate Application.
- Complete each tab (more detailed instructions appear below).
- Review for accuracy.
- Click ‘Submit’ to submit your application – see Submit Application. The system will then notify you of any errors or omissions.
- Read and agree to the declarations listed.
- Click ‘Submit’ to submit your application for validation. You will receive an email with the application’s service standard – see Service Standards.
Detail tab
The following is a screen shot of this tab for a Group Based catch certificate application.
- Application Description – This field is optional. Applicants can enter a document description for their own tracking and reference purposes.
- Exportation Date – Enter the date the shipment will be exported from Canada or the date the product leaves your facility if being sold within Canada.
- Are you the exporter who will be selling this product outside of Canada?
- Select No: If you are selling the product to another Canadian company and will be forwarding the certificate.
- Select Yes: If you are the company exporting the product to any company outside of Canada.
Note: If you select ‘Yes’ a second question will appear.

- Is the product being exported directly to the country for which this catch certificate is intended?
- Select Yes: If the shipment is going directly to the country for which the catch certificate will be issued.
- Example: You will use a catch certificate for the European Union when the product is being exported from a Canadian company directly to a company within any country in the EU.
- Example: The shipment will be transported to an airport or seaport outside of Canada and then directly to the country for which the certificate was issued. There is no change of ownership of the product as it moves to the foreign airport or seaport, you are selling directly to an importer located in the country for which the catch certificate is issued.
- Select No: If the shipment is going to another country before its final destination (considered an indirect shipment).
- Example: The shipment will be exported to a country which does not have a requirement for a catch certificate, prior to being re-exported to a country that does. e.g. product is being exported to China before being re-exported to Germany.
- Example: The shipment will remain in Canada but will be sold to a non-Canadian company prior to its export. Therefore, ownership of the product will be transferred to a company located in a country that does not have a requirement for a catch certificate, but since they are selling it to a country that has such a requirement, you will be providing them with a catch certificate. e.g. A company based in the United States is purchasing your product prior to exporting it from Canada to Ukraine. In this case, although the product never enters the United States, it is still considered an ‘indirect export’.
Note: Your answer must reflect the product’s chain of custody (ownership), rather than its transport or location.
- Is this a Transhipment? Transhipment refers to a consignment that is transferred to another vessel at sea or in a port, and continues to its final destination.
- Is the consignment intended for re-export from the country for which the catch certificate is being issued? Re-export refers to a consignment exported to the country for which the catch certificate is being issued that is then re-exported by that country to another foreign country.
Catch tab
Enter the catch information for the shipment. When a Group Based application is created, some information on the Catch tab needs to be filled in before going to the Grouping tab. The Applicant must enter the species, catch area and date ranges on the Catch tab before going to the Grouping tab. If they do not enter information in this order, there will be no groupings on the Grouping Tab available for selection. Groupings will only appear and be available for selection after the catch dates, catch area and species are entered. Once ALL catch dates have been entered, the Grouping tab will display all groupings that are valid for the catch dates.
Note: FCS will display all groupings for the designated species that are valid for those dates.
The Catch tab appears as follows:
- References of Management Measures – The application will default to ‘Fisheries Act’ as the default regulation. Please contact the Catch Certification Program: Operations Centre for more details on ‘US Legislation’ and ‘Coastal Fisheries Protection Act’.
- Health Certificate Number – Health certificate number as issued by the Canadian Food Inspection Agency (CFIA). It is recommended that you complete this field; however, it is not mandatory.
- Add Species – The first step in the Catch tab is to select the species contained in your shipment. It is mandatory to add at least one species.
Species
Click on Species lookup to add a species. See Species for more information.
Weight guidance
Enter the weight in the appropriate fields. See Weight Guidance.
Management area and catch dates
Add all the catch date ranges on the Catch tab first before selecting the Grouping tab. If there are no dates entered, there will be no groupings available for selection on the Grouping tab. Groupings will only appear and be available for selection after all the catch dates are entered.
Product and weights can then be added in any order.
Once ALL catch dates have been entered, the Grouping tab will display all groupings that are valid for the catch dates.
Note: FCS will display all groupings for the designated species that are valid for those dates.
See Management Area and Catch dates for more information.
HS code and product weight
See HS Code and Product Weight for more information.
Grouping tab
Once all the catch date ranges are selected and saved, the Grouping tab will display all groupings that are valid for those catch dates.
Once the Applicant selects the grouping(s) used, the selected grouping(s) will appear at the top of the list.

Grouping detail tab
On the Grouping Detail tab, the Applicant will then select the vessels from each grouping that contributed to the catch for the consignment being certified.

Transport tab
Provide information for the company responsible for transporting the product, as well as the mode of transportation used (e.g. vessel, rail, air, truck). You are only responsible for providing transportation details from your facility to the next company in the chain of custody.
Note: Although most fields do not appear as mandatory, it is recommended that you complete all applicable fields on the Transport tab.

Clicking on Select Transporter/Importer, will display the Transporter/Importer List page. You will see the list of previously entered and saved transporters or importers. See Transporter/Importer List.
Import tab
Provide the purchaser’s location and contact information. Indicate the anticipated date of import into the country for which the catch certificate is being issued, or the date the product arrives at the purchaser’s facility if being sold within Canada.
Below is a screen shot of the Import tab.
- Importer Date – Select the import date for the shipment, or the delivery date if being sold to another Canadian company.
- Product CN Code (Combined Nomenclature code) - This field contains the European version of the HS Code. This field is not mandatory but can be filled in if provided by the EU importer. Further information about CN Codes can be found on the Eurostat Website.
Clicking on Select Transporter/Importer, will display the Transporter/Importer List page. You will see the list of previously entered and saved transporters or importers. See Transporter/Importer List.
Diagram tab
The Diagram tab will show the hierarchy for certificates. Certificates and applications in all statuses will be displayed on the Diagram tab including retracted certificates.

Foreign export catch certificates
This type of certificate is required for product that is imported into Canada and subsequently re-exported to a country which has a requirement for catch certification.
Foreign Export Application: Steps
- Select ‘Create Application’.
- Select the Application Type: Foreign Export Certificate Application.
- Complete each tab (more detailed instructions appear below).
- Review for accuracy.
- Click ‘Submit’ to submit your application – see Submit Application. The system will notify you of any errors or omissions.
- Read and agree to the declarations listed.
- Click ‘Submit’ to submit your application for validation. You will receive an email with the application’s service standard – see Service Standards.
Foreign Export application tabs:

Detail tab
Detail tab:
- Application Description – This field is optional. Users can enter a document description for their own tracking and reference purposes.
- Exportation Date – Enter the date the shipment will be exported from Canada or the date the product leaves your facility if being sold within Canada.
- Are you the exporter who will be selling this product outside of Canada?
- Select No: If you are selling the product to another Canadian company and will be forwarding the certificate.
- Select Yes: If you are the company exporting the product to any company outside of Canada.
Note: If you select ‘Yes’ a second question will appear.
- Is the product being exported directly to the country for which this catch certificate is intended?
- Select Yes: If the shipment is going directly to the country for which the catch certificate will be issued.
- Example: You will use a catch certificate for the European Union when the product is being exported from a Canadian company directly to a company in any country within the EU.
- Example: The shipment will be transported to an airport or seaport outside of Canada and then directly to the country for which the certificate was issued. There is no change of ownership of the product as it moves to the foreign airport or seaport, you are selling directly to an importer located in the country for which the catch certificate is issued.
- Select No: If the shipment is going to another country before its final destination (considered an indirect shipment).
- Example: The shipment will be exported to a country which does not have a requirement for a catch certificate, prior to being re-exported to a country that does. e.g. product is being exported to China before being re-exported to Germany.
- Example: The shipment will remain in Canada but will be sold to a non-Canadian company prior to its export. Therefore, ownership of the product will be transferred to a company located in a country that does not have a requirement for a catch certificate, but since they are selling it to a country that has such a requirement, you will be providing them with a catch certificate. e.g. A company based in the United States is purchasing your product prior to exporting it from Canada to Ukraine. In this case, although the product never enters the United States, it is still considered an ‘indirect export’.
Note: Your answer must reflect the product’s chain of custody (ownership), rather than its transport or location.
- Is the consignment intended for re-export from the country for which the catch certificate is being issued? Re-export refers to a consignment exported to the country for which the catch certificate is being issued that is then re-exported by that country to another foreign country.
Plant tab
This is where you enter the detailed information regarding the plant where product was processed in Canada. If you are simply purchasing product from a foreign country, then exporting it without processing, enter your company information on this tab. If you do not have a health certificate for this shipment, you can use the plant number assigned by CFIA in the health certificate number field and the exportation date in the health certificate date field.
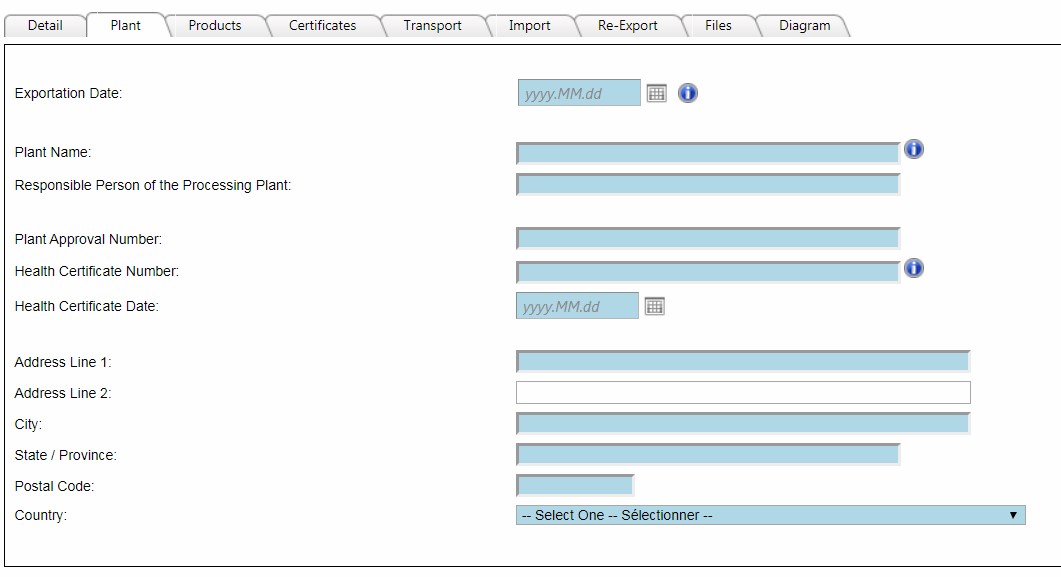
All fields are mandatory on this tab.
Products tab
This is where you identify the final product that you are shipping. Click the ‘Add Species / Product’ button to select the product first. The Product Lookup table will be displayed as follows.

- Harmonized System (HS) Code – These codes are used to classify commodities, in this case, fisheries products. If you do not know the HS Code of your product, conduct the search using the description.
- Description – Enter the description of the product you are shipping (e.g. if you are shipping lobster, type Lobster into this field and press ‘Search’).
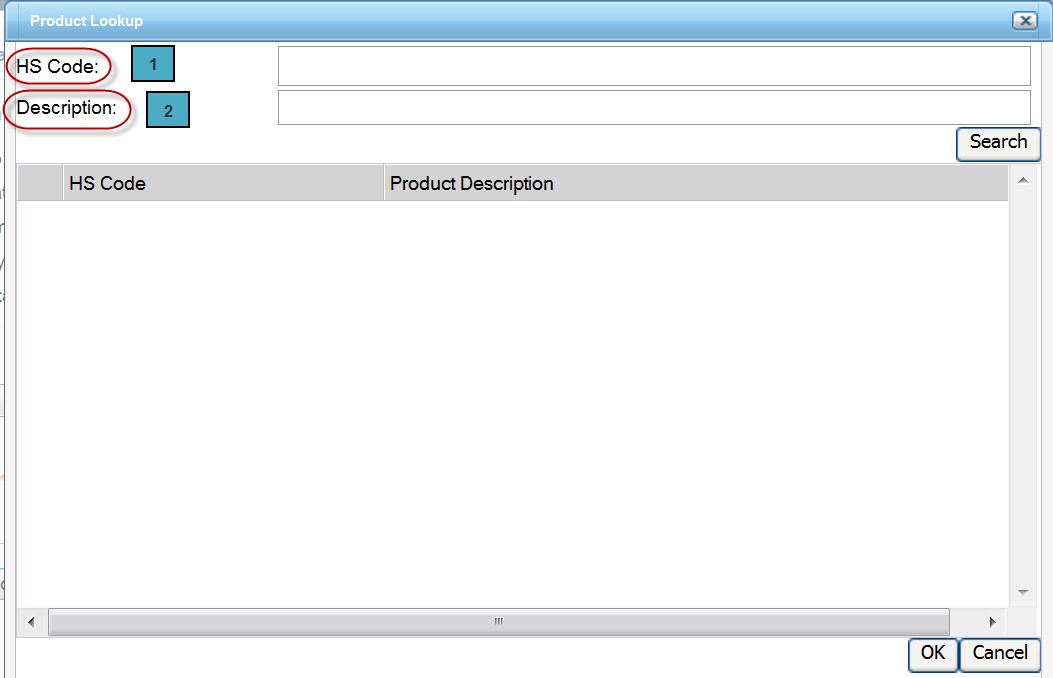
Multiple products are likely to be displayed when conducting a product search. Choose the product description and code for the form of the product that you are shipping (e.g. live lobster).
If you are having trouble determining the proper code for your product, please consult the Canadian Export Classification online catalogue or contact the Catch Certification Program: Operations Centre for guidance.
Click the ‘Lookup’ button beside the ‘Species’ field. A Lookup table will appear allowing you to search for a species using either a Taxonomic Serial Number (TSN) Code, the species description (lobster, shrimp, etc.), or Latin name. Below is a screen shot of the Species Lookup window.
- Taxonomic Serial Number (TSN) Code – The TSN is a coding system that provides structure to species names and their hierarchical classification. If you know the TSN Code for the species of product that you are shipping, type it in this field then press ‘Search’. If you do not know the TSN Code of your product, conduct the search using the species description. All TSN codes can be found on the Integrated Taxonomic Information System Website.
- Description – Enter the description of the species that you require (e.g. if you are shipping lobster, type Lobster into this field and press ‘Search’).
- Latin Name – This allows you to search the species by its Latin name (e.g. the Latin name for American Lobster is Homarus americanus).
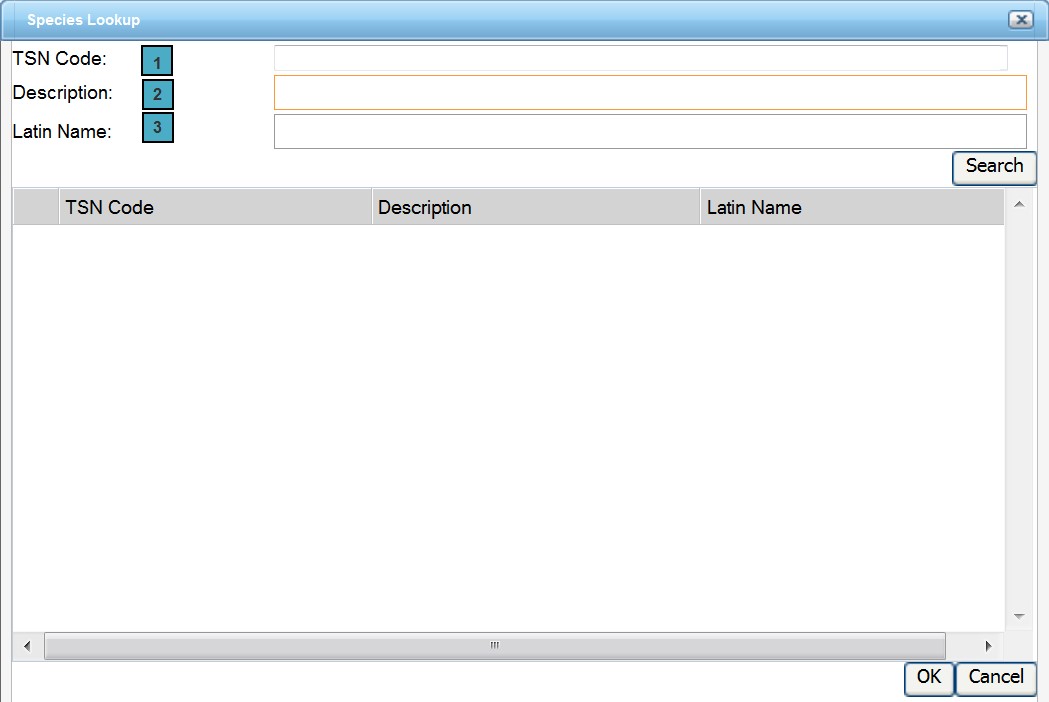
Multiple species are likely to be displayed when conducting a species search, choose the species that is most appropriate.
Note: If you cannot find the species that you are looking for, or you need assistance using the Lookup table, see Lookup Tables.
If you are shipping more than one product, you can add more product types by clicking the ‘Add Species / Product’ button. A minimum of one product is mandatory and each product will be displayed in the Product Table.
Certificates tab
On this tab, you will enter the identifying number(s) for all foreign catch certificates that you have received from non-Canadian companies and that apply to your shipment. A minimum of one certificate is mandatory. Click the ‘Add Certificate’ button to add additional certificates to the application. Note: There is no limit to the number of foreign certificates that you can enter on the Certificates tab.
Below is a screen shot of the Certificates tab:
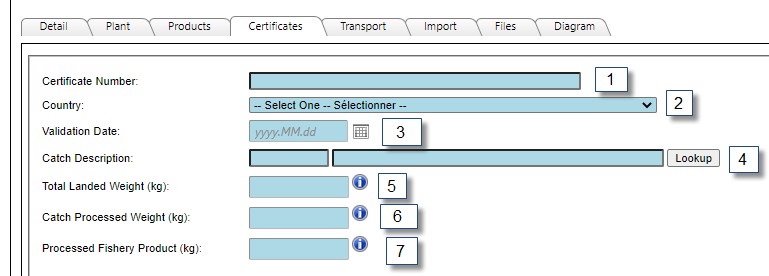
- Certificate Number – The foreign catch certificate number associated with the product you have imported.
- Country – The country that issued the catch certificate.
- Validation Date – The date the catch certificate was validated by the competent authority in the exporting country.
- Catch Description – Use the lookup table to add the species. See Lookup Tables for more information.
- Total Landed Weight (kg) – Weight at the time of landing, i.e. the amount of product that was imported into Canada.
- Catch Processed Weight (kg) – The Catch Processed Weight is that portion of the Total Landed Weight that was processed, resulting in the Processed Fishery Product weight. The Catch Processed Weight does not mean the total amount of the landed weight you had processed, but rather the weight of the final product prior to processing. Because the Catch Processed Weight is a portion of the Total Landed Weight, this amount cannot exceed the amount entered in the Total Landed Weight field.
- Processed Fishery Product (kg) – The product weight, after processing, that is being sent in this shipment.
Please refer to the section on Catch Certificate – Standard for instructions on how to complete the Transport, Import, and Re-Export tabs and instructions on how to submit the application.
Manage documents menu
The ‘Manage Documents’ drop down menu allows you to access all applications, certificates, and groupings for your company in FCS.
Manage Documents is the second item in the Navigation Menu at the top of your screen (as seen below).
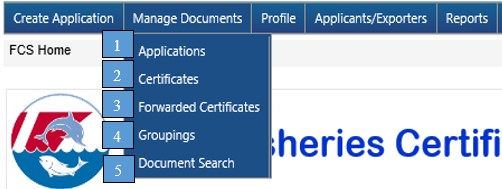
To access documents within the Manage Documents drop down menu, place your mouse over the ‘Manage Documents’ heading and select from one of the options that appear below.
- Applications – This section contains applications that you are working on or have submitted. For more information please see Manage Documents > Applications.
- Certificates – This section contains your validated and approved catch certificates. For more information see Manage Documents > Certificates.
- Forwarded Certificates – This section contains validated and approved certificates that are being forwarded to other companies that are registered in FCS. These certificates are used to account for product shipped between Canadian companies. For more information see Manage Documents > Forwarded Certificates.
- Groupings – This section contains your validated and approved grouping requests that can be used in Group Based applications. For more information see Manage Documents > Groupings.
- Document Search – This section allows you to search your FCS documents using various criteria such as Vessel Name, Document Number or Date. For more information see Manage Documents > Document Search.
Manage documents - Applications
When you select Manage Documents > Applications, your Application Criteria section and Application List will appear.
The following is a screen shot of Manage Documents > Applications:

Application criteria (Search)
This section allows you to search your applications using various filters and fields. This is especially useful when you have a large number of applications in your Application List.
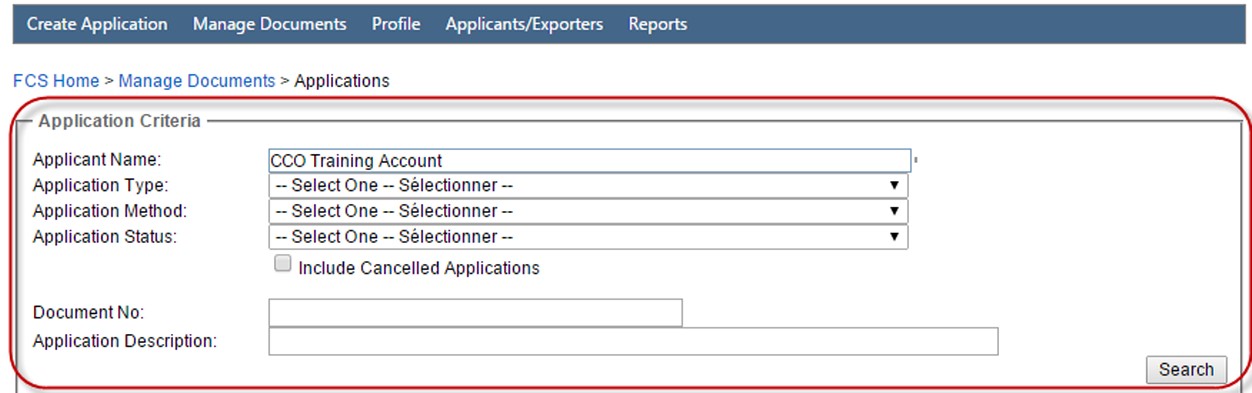
- Applicant Name – This displays your company name.
- Application Type – This drop down menu allows you to filter applications by choosing a specific Application Type. For more information see Types of Applications.
- Application Method – This drop down menu allows you to filter applications by choosing a specific Application Method. See the screen shot just below.
- Application Status – This drop down menu allows you to filter applications by choosing a specific Application Status. For more information see Application Status.
- Document No. – This field allows you to search your applications by entering a document number.
- Application Description – This field allows you to search your applications by entering an Application Description. For more information see Application Description.
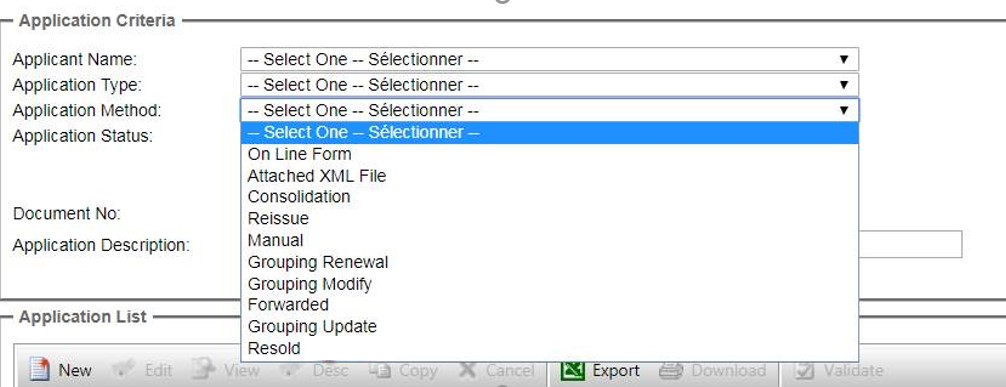
Application list menu
This section allows you to create and access your applications.
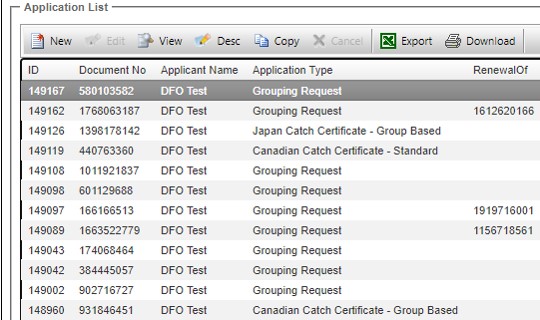
- New – Choose this option to create applications for Catch Certificates and Grouping Requests. For more information see Create application.
- Edit – Choose this option to edit applications that are in Interim status. Select the application you wish to edit (it will be highlighted in grey) and then click ‘Edit’. Your application will be displayed and you can enter or change any information you would like.
Note: You cannot edit a submitted application. If you need to edit a submitted application please contact the Catch Certification Program: Operations Centre and request to have your application withdrawn. - View – Choose this option to view an application. Select the application you wish to view (it will be highlighted in grey) and then click ‘View’. Your application will be displayed and you can view the information that was entered, but you cannot edit any details.
- Desc – Choose this option if you only wish to edit the Application Description.
- Copy – Choose this option to create a new application from one of your own existing groupings or applications. Select the application you wish to copy (it will be highlighted in grey) and then click ‘Copy’. A new application will be created that contains most of the information copied from the existing application. This can be efficient because you will not have to re-enter information that you have already input on your previous application.
Note: You cannot copy a certificate that has been forwarded to you. The Copy function is only available for certificates for which you were the original Applicant. - Cancel – Choose this option to cancel an application in Interim status. Select the application you wish to cancel (it will be highlighted in grey) and then click ‘Cancel’.
Note: You cannot edit or submit a cancelled application. - Export – Select the ‘Export’ button to export the application list to an Excel spreadsheet.
- Download – Choose this option to download an application which you can then print, save, or send as an email attachment. Select the application you wish to download (it will be highlighted in grey) and then click ‘Download’. You will then have the option of ‘Opening’ or ‘Saving’ the document. Once open, you can print by going to File > Print or using CTRL-P. If you would like to save the document as a Portable Document Format (PDF), continue with the ‘Save’ option and follow the prompts. Adobe Reader is required to view downloaded certificates in PDF format. Adobe Reader may be downloaded for free.
Application list headings
- ID – This is a unique ID assigned to each application within FCS.
- Document No. – Displays the Document Number.
- Applicant Name – Displays the name of your company.
- Application Type – Displays the type of application. For more information see Types of applications.
- Renewal Of – Lists the document number of the original grouping i.e. the grouping that was renewed.
- Update Of – Lists the document number of the original grouping i.e. the grouping that was updated.
- Service Standard Target Date – Displays the service standard target date. For more information see Service Standards.
- Application Status – Displays the Application Status. For more information see Application Status.
- Application Description – Displays the Application Description. For information see Application Description.
- Submitted Date – Displays the date the application was most recently submitted.
- Submitted By – Displays the user that submitted the application.
- Created By – Displays the user that created the application.
- Submitted User Telephone – Displays the telephone number for the user that submitted the application.
- Submitted User Email – Displays the email address for the user that submitted the application.
- Application Method – Displays the Application Method. For more information see Application Method.
Application status
The following is a list of all possible application status types.
- Interim – This is the status when an application has been created but has not yet been submitted for validation and approval, or has been withdrawn to facilitate corrections. An interim application can be edited and saved until it is submitted. For example, if you are working on an application but do not have time to finish it, you can save it and it will be available to be worked on later in your Application list.
- Submitted – This is the status when an application has been submitted for validation and approval.
Note: You cannot edit a submitted application. If you need to edit a submitted application please contact the Catch Certification Program: Operations Centre and request to have your application withdrawn so you can make corrections. - Recommendation – This is the status when an application has been recommended for further review by a supervisor. All grouping requests must be validated by a Certification Officer and recommended to a supervisor for final validation and approval.
Note: You cannot edit a recommended application. If you need to edit a recommended application please contact the Catch Certification Program: Operations Centre and request to have your application withdrawn so you can make corrections. - Declined – This is the status when an application has been denied approval by the Catch Certification Program. The Catch Certification Program: Operations Centre will communicate with an Applicant prior to declining any application.
- Cancelled – This is the status when an application has been cancelled and can no longer be submitted. A cancelled application will remain in your Application list, but it can no longer be edited or submitted. If you cancel your application in error, you can use the Copy function to create a new application with most of the information copied from the original. For more information see Copy.
Manage documents > Certificates
When you select Manage Documents > Certificates, your Certificate Criteria section and Certificate List will appear.
The following is a screen shot of Manage Documents > Certificates:
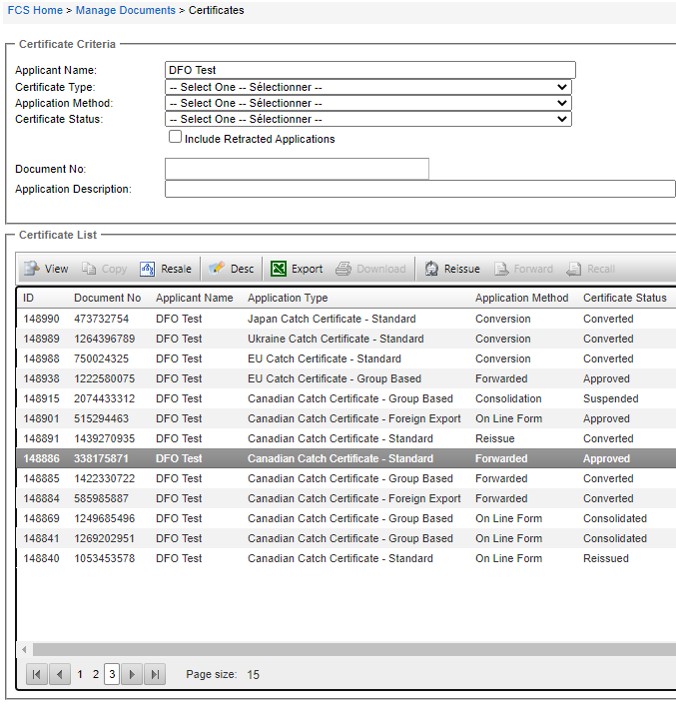
Certificate criteria (Search)
This section allows you to search your certificates using various filters and fields. This is especially useful when you have a large number of certificates in your Certificate List.
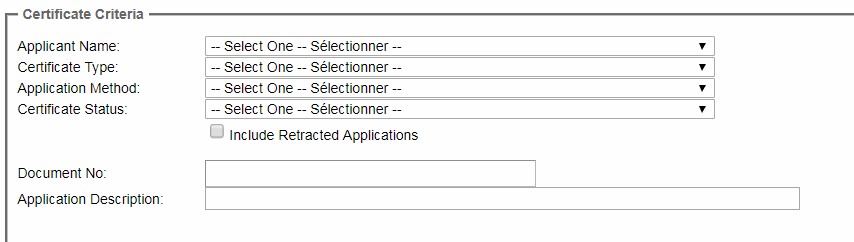
- Applicant Name – This displays your company name.
- Certificate Type – This drop down menu allows you to filter certificates by choosing a specific Certificate Type. For more information see Types of Applications.
- Application Method – This drop down menu (shown below) allows you to filter certificates by choosing a specific Application Method.
- Certificate Status – This drop down menu allows you to filter certificates by choosing a specific Certificate Status. For more information see Certificate Status.
- Document No. – This field allows you to search your certificates by entering a document number.
- Application Description – This field allows you to search your certificates by entering an Application Description. For more information see Application Description.
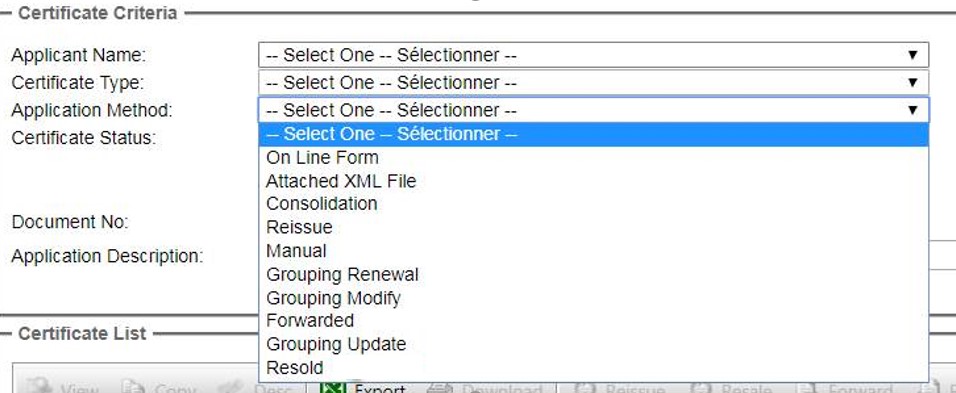
Certificate list menu
This section allows you to use your approved catch certificates to create new certificates, using the different available FCS functions.
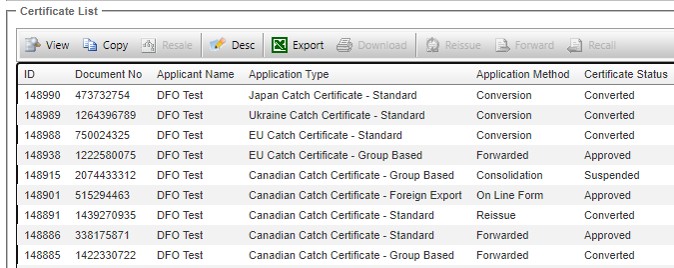
- View – Choose this option to view a certificate. Select the certificate you wish to view (it will be highlighted in grey) and then click ‘View’. Your certificate will be displayed and you can view the information that was entered, but you cannot edit any details.
- Copy – Choose this option to create a new application from one of your own certificates. You cannot copy a certificate that was forwarded to you. You can only copy certificates for which you were the original applicant. Select the certificate you wish to copy (it will be highlighted in grey) and then click ‘Copy’. A new application will be created that contains most of the information copied from the existing certificate. This can be efficient because you will not have to re-enter information that you have already input on your previous certificate.
Applicants can copy one of their own approved certificates to send a portion of that product. Once the necessary changes have been made, click the ‘Submit Application’ button, located above the tab menu. - Resale – Choose this option once a forwarded certificate has been accepted, and you are sending all or a portion of the product sourced from another company registered in FCS. For more information on reselling catch certificates, see Resale. Note: Applicants can still copy one of their own approved certificates to send a portion of that product.
- Desc – Choose this option if you only wish to edit the Application Description.
- Export – Select the ‘Export’ button to export the certificate list to an Excel spreadsheet.
- Download – Choose this option to either:
- Convert your Canadian catch certificate to the required country specific certificate based on your export destination. For the steps to convert your certificate see Convert.
- Download a Canadian catch certificate which you can then print, save, or send as an email attachment. Select the certificate you wish to download (it will be highlighted in grey) and then click ‘Download’. Select ‘Product is remaining in Canada (printing for records)’. You will then have the option to open or save the document. Once open, you can print by going to File > Print or using CTRL-P. If you would like to save the document as a Portable Document Format (PDF), continue with the ‘Save’ option and follow the prompts. Adobe Reader is required to view downloaded certificates in PDF format. Adobe Reader may be downloaded for free.
- Reissue – Choose this option if you would like to make certain changes to an approved certificate. For more information on reissuing catch certificates, see Reissue.
- Forward – Forwarding is used when product that requires a catch certificate is being sold to another Canadian company before being exported. Choose this option if you have sold your product to another Canadian company that is also registered within FCS.
- Recall – Choose this option if you want to recall a certificate that you have forwarded to the wrong company but that has not yet been accepted by the receiving company. Recalling a forwarding certificate will return the certificate to your Certificate List with an Approved status.
Certificate list headings
- ID – This is a unique ID assigned to each certificate within FCS.
- Document No. – Displays the Document Number.
- Applicant Name – Displays the name of your company.
- Application Type – Displays the type of application. For more information see Application Type.
- Application Method – Displays the application method. For more information see Application Method.
- Certificate Status – Displays the certificate status. For more information see Certificate Status.
- Application Description – Displays the Application Description. For information see Application Description.
- Submitted Date – Displays the date the application was most recently submitted.
- Submitted By – Displays the user that submitted the application.
- Service Standard Target Date – Displays the service standard target date. For more information see Service Standards.
- Approved Date – Displays the date the certificate was approved.
- Forwarded To – Displays the company the certificate was forwarded to (the receiving company).
- Component of Document – Displays the new document number associated with a reissued or consolidated certificate.
- Forwarded From – Displays the company the certificate was forwarded from (the originating company).
- Forwarded Document – Displays the document number of the original certificate during the forwarding process.
Certificate status
The following is a list of all possible certificate status types.
- Approved – Indicates the certificate is approved.
- Suspended – During the process of reissuing an approved certificate, the original certificate becomes suspended until the new application is either submitted or cancelled.
- Forwarding – Indicates the certificate has been forwarded to another company but they have not accepted it yet.
- Forwarded – Indicates the certificate has been forwarded and accepted by another company.
- Consolidated – This is when two or more approved Group Based certificates have been consolidated into a single certificate. For more information see Consolidate.
- Reissued – Indicates the certificate has been replaced with another certificate through the reissue function. For more information see Reissue.
- Resold – Indicates the certificate has been forwarded and then resold to another company. For more information see Resale.
- Converted – Indicates the certificate has been converted from its original country of destination. For example, a Canadian Catch Certificate has been converted to an EU Catch Certificate.
Manage documents > Forwarded certificates
From Manage Documents > Forwarded Certificates, Applicants can view certificates that are currently being forwarded to other companies, accept certificates that were forwarded to their company, or recall a certificate that was forwarded to another company in error.
To recall a certificate that was forwarded in error, click on the certificate and then click ‘Recall’.
Note: The certificate Application Method still needs to be in forwarding status in order to recall a certificate.
This will return the certificate to your Certificates List under Manage Documents > Certificates.
If the certificate was forwarded to the wrong company in error, and it was accepted, a copy needs to be submitted to replace it and the company that accepted the certificate in error must be contacted by the forwarding company to have the incorrect certificate retracted
To accept a certificate that was forwarded to your company, click on the certificate (it will be highlighted in grey) and click ‘Accept’. The certificate will then be moved to your Certificate List under Manage Documents > Certificates.

Manage documents > Groupings
When you select Manage Documents > Groupings, your Grouping Criteria section and Catch Group List will appear.
The following is a screen shot of Manage Documents > Groupings:

Groupings have a validity period that will correspond to the fishing season dates. This allows Applicants to continue to use their groupings long after a fishing season has ended.
The mandatory fields on the Group Detail tab will each provide all of the necessary information about the grouping. This information will be included on the Catch Group List for each individual grouping. The Group Name can be used by the Applicant to track and organize their company’s groupings. See Grouping Request Application for more information.
The Valid From Date and Valid To Date will be visible in the Catch Group List in FCS.
Grouping criteria (Search)
This section allows you to search your groupings using various filters and fields. This is especially useful when you have a large number of groupings in your Catch Group List.
- Applicant Name – This displays your company name.
- Group Type – This field allows you to search your groupings by type of grouping e.g. vessel, buyer/agent, etc.
- Document No. – This field allows you to search your groupings by entering a document number.
- Application Description – This field allows you to search your groupings by entering an Application Description. For more information see Application Description.
Note: Disabled groupings will not appear in the Catch Group List unless you check off the box ‘Include Disabled Entries’.
Catch group list menu
Catch group list:

- View – Choose this option to view a grouping. Select the grouping you wish to view (it will be highlighted in grey) and then click ‘View’. Your grouping will be displayed and you can view the information that was entered, but you cannot edit any details.
- Desc – Choose this option if you wish to edit the Application Description.
- Copy – Choose this option to create a new grouping that is a copy of an existing grouping. Select the grouping you wish to copy (it will be highlighted in grey) and then click ‘Copy’. A new grouping request will be created that contains most of the information copied from the existing grouping. This can be efficient because you will not have to re-enter information that you have already input on your previous grouping. For more information on the Copy function, see Copy.
- Renew – The Renew function is used when you want to maintain a grouping, but for a new fishing year. All of the information contained in your current grouping will carry over, but you will designate a new fishing year for the grouping. The approval process will require a full validation since a Certification Officer will verify each fishing licence for the new fishing year that you have indicated. There are two options available when renewing a grouping. You can ‘Renew with no changes’ or ‘Renew with changes’.
- Update - Choose this function when you wish to add a vessel that you are sourcing from during the season, after your grouping has been approved. If you wish to remove a vessel or make a change to a vessel already in a grouping, the Update feature cannot be used. You will need to renew the grouping using the ‘Renew with changes’ option instead. See Renewing a Grouping and Updating a Grouping for more information.
- Enable/Disable – Click this button to enable or disable a grouping. By clicking on a grouping and then clicking ‘Disable’ the grouping will not appear in your Catch Group List unless you select ‘Include Disabled Entries’ in the Grouping Criteria section. This will also prevent the grouping from appearing in your list of groupings that can be selected within a Group Based application.
- Export – Select the ‘Export’ button to export the grouping list to an Excel spreadsheet.
- Download – Choose this option to download a grouping which you can then print, save, or send as an email attachment. Select the application you wish to download (it will be highlighted in grey) and then click ‘Download’. You will then have the option of ‘Opening’ or ’Saving’ the document. Once open, you can print by going to File > Print or using CTRL-P. If you would like to save the document as a Portable Document Format (PDF), continue with the ‘Save’ option and follow the prompts. Adobe Reader is required to view downloaded certificates in PDF format. Adobe Reader may be downloaded for free.
Catch group list headings
- ID – This is a unique ID assigned to each grouping within FCS.
- Document No. – Displays the Document Number.
- Applicant Name – Displays the name of your company.
- Application Method – Displays the application method. For more information see Application Method.
- Application Description – Displays the application description. For information see Application Description.
- Submitted Date – Displays the date the application was most recently submitted.
- Submitted By – Displays the user that submitted the application.
- Approved Date – Displays the date the grouping was approved.
- Group Type – Displays the type of grouping. For more information see Grouping Request Application.
- Associated Species – The species associated with the grouping.
- Group Name – The name of the grouping. For more information see Grouping Request Application.
- Group Alias – The alias of the grouping. For more information, see Grouping Request Application.
- Valid From – Start of the fishing season that the grouping will be used for. For more information, see Renewing a Grouping and Updating a grouping.
- Valid To – End of the fishing season that the grouping will be used for. For more information, see Renewing a Grouping and Updating a grouping.
- Deleted / Removed – This column will display a check beside any groupings that have been disabled.
- Renewal of Document No. – If the grouping has been renewed, this field displays the document number of the original grouping.
- Update of Document No. – If the grouping is an update of another grouping, this field displays the document number of the original grouping.
- Copy of Document No. – If the grouping is a copy of another grouping, this field displays the document number of the original grouping.
Manage documents > Document search
Click Manage Documents > Document Search to search for documents using Applicant Name, Application Type, Application Status, TSN Code / Species, Management Area, Vessel Name, Vessel VRN, Health Certificate Number, Application From/To Date, Application ID or Document Number. This feature is useful if you are unsure of the status of a particular document, or where to find it. See below for a screen shot of Document Search.
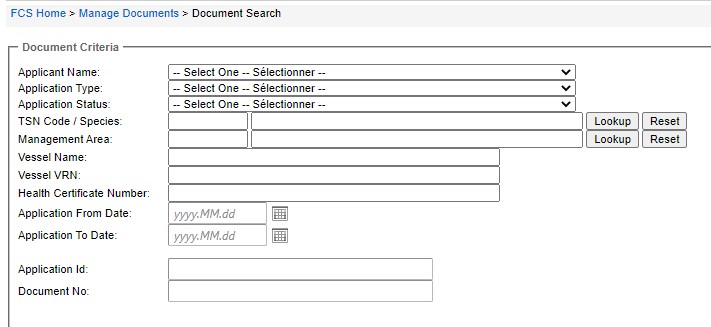
Profile
Edit profile
Certification Officers are unable to modify FCS User profile information (such as telephone/fax numbers, address or email address) on behalf of users.
The Applicant must login to FCS and follow the steps outlined below:
Select Profile > Edit Profile. A new window will open to the Dashboard page.
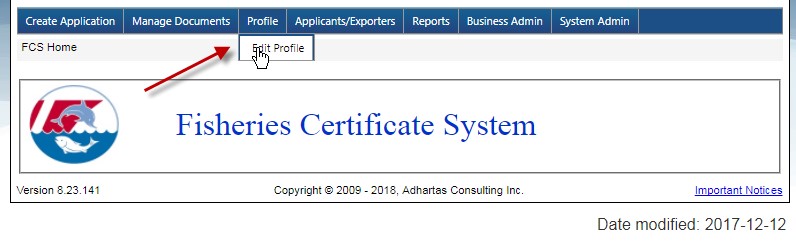
Select ‘Update Profile’ on the Dashboard page
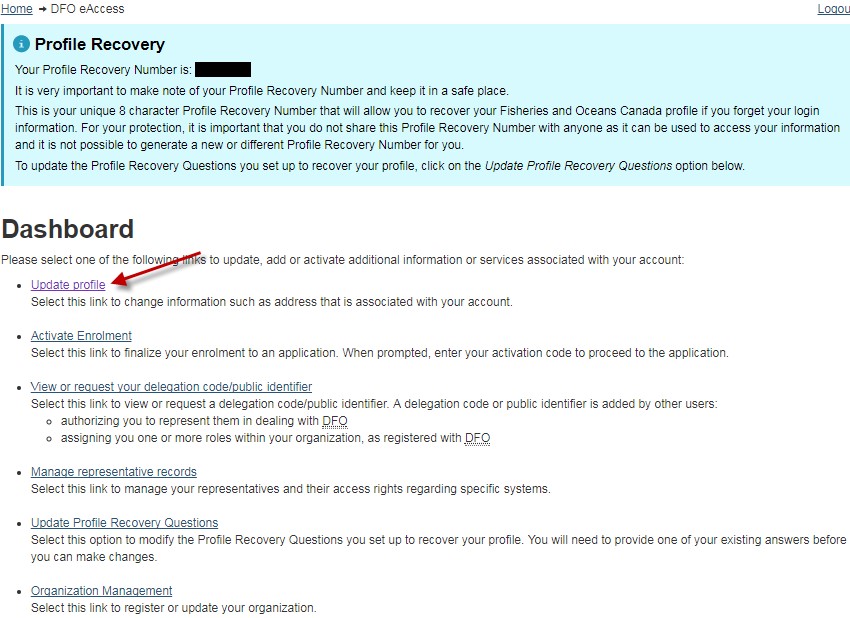
Select ‘Modify’ on the Profile Details page.
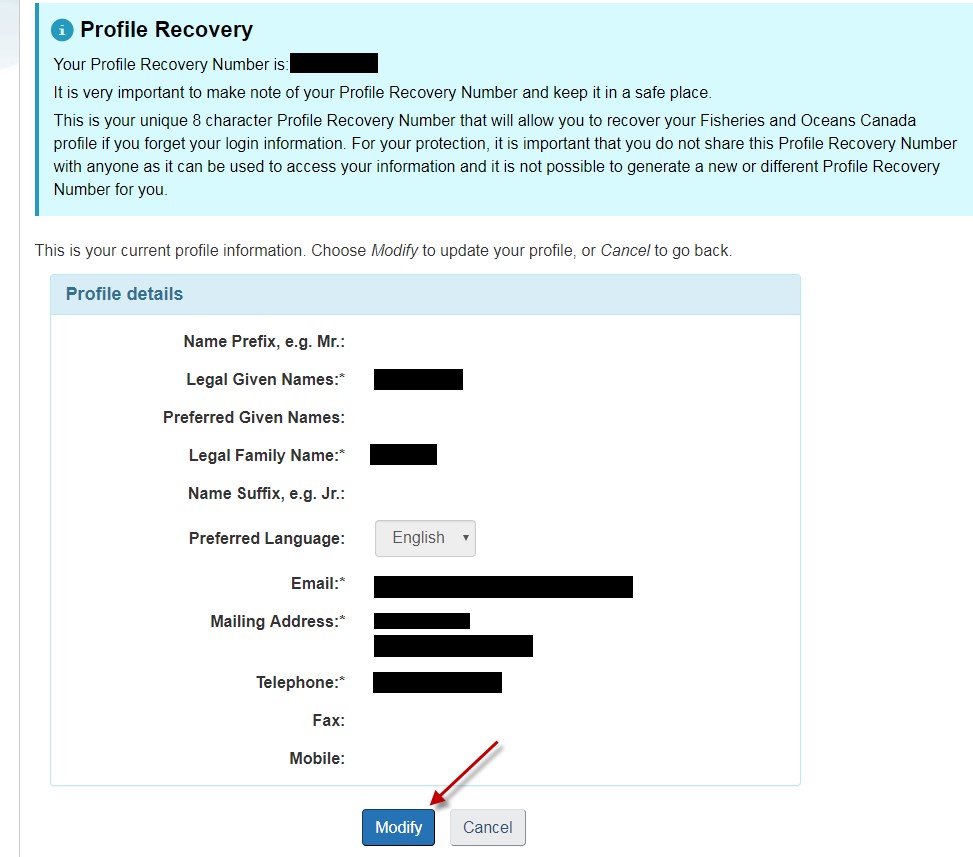
Select ‘I Accept’ on the Modify DFO Profile – Terms & Conditions of Use page.
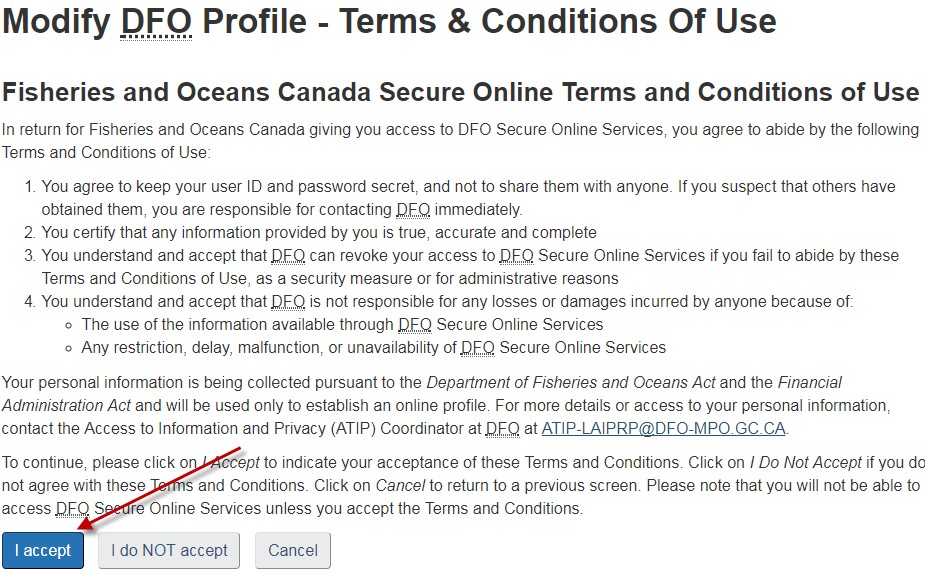
The Applicant can update the details of their profile and select ‘Next’.
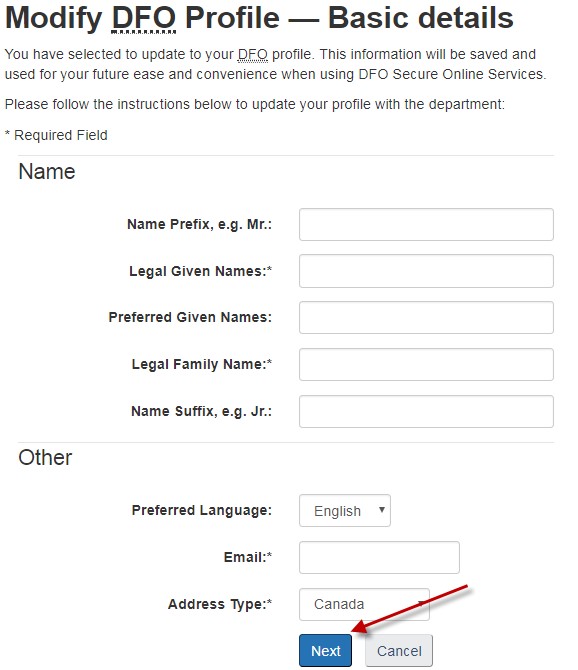
The Applicant can update their address and select ‘Next’.
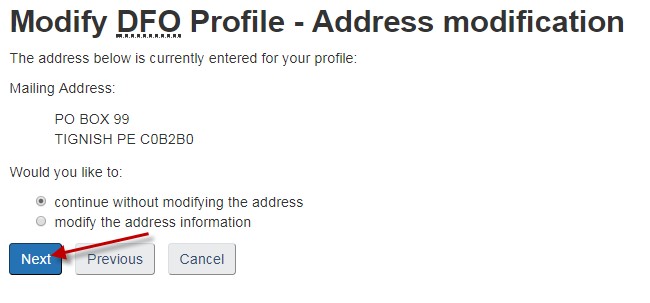
Once the Applicant has reviewed their profile they select ‘Save’ and are brought back to the Dashboard screen. The Applicant’s information will update in FCS the next time they login.
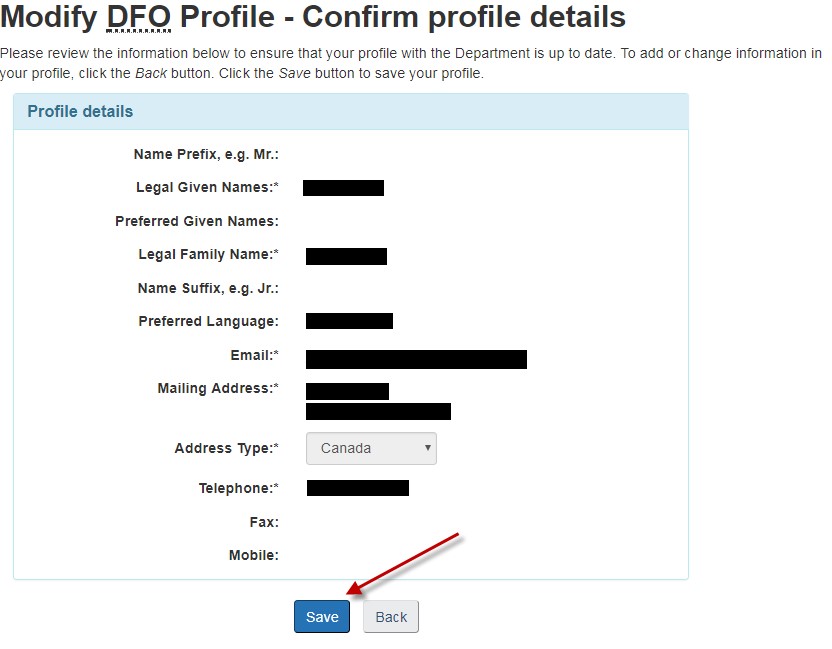
Note: Within each company, Applicant Managers can add, delete and change users but they cannot modify Applicant Users’ Secure Access Service (i.e. GCKey) profile information.
Applicant profile
This is the company’s profile information such as: ID, Company Name, Contact Information, Address, Applicant Seal and Applicant Signature.

Applicants/Exporters
Transporter/Importer list
This feature gives you the ability to create and maintain a Transporter/Importer list within your company’s account
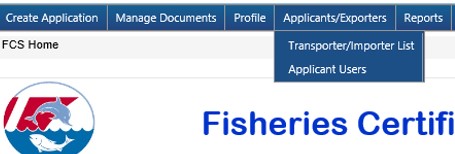
Clicking on Transporter/Importer List, will display the Transporter/Importer List page. You will see the list of previously entered and saved transporters or importers.
To add a new transporter or importer click on the ‘New’ icon.

This will open a blank page where you can add the information for a transport company or an importer, and save the information to have it added to the Transporter/Importer List.
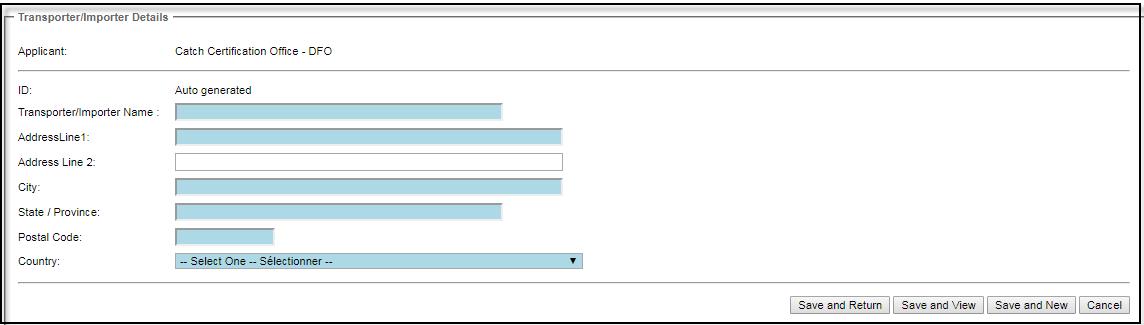
The next time you create an application, you will have the option to select a Transporter or Importer from your list of saved suppliers.
To do so, click on the ‘Select Transporter/Importer’ button from the Transport and Import tabs. If you have no transporters or importers saved to your list, you can click on ‘Create Transporter/Importer’, enter the information for the transport company or importer and save it.

When you click on the ‘Select Transporter/Importer’ button, a Supplier Lookup window will open.
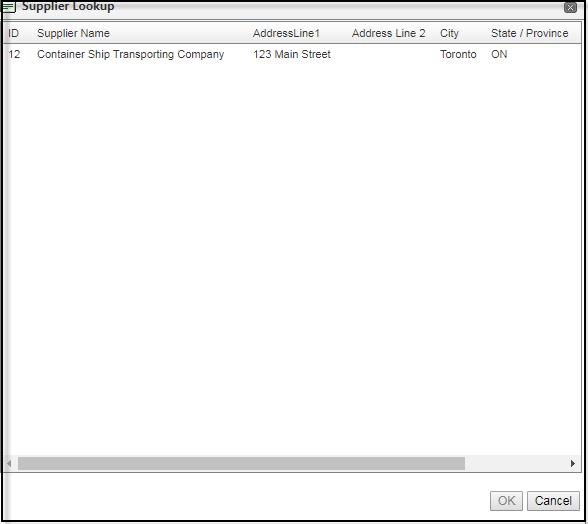
Simply select your transporter or importer from the list and all of the information for that company will auto-populate to the appropriate fields of the tab on the application. Once you have a list set up, it will be a useful time-saver for those who do business with the same transporter or importers regularly.
Applicant users
This page displays the detailed information for an FCS user. It allows users to access their accounts and allows Applicant Managers to add and edit user accounts within their company.
Applicant Managers can click on Applicants/Exporters > Applicant Users to see a listing of all users within the company. From here, users can be created, edited, enabled or disabled. User information can also be exported into an Excel spreadsheet.
When a user is no longer employed by the company, the Applicant Manager should disable that user’s account in FCS. To disable a user’s account, you must highlight the appropriate Username in your Applicant User List by clicking on it and then select the Enable/Disable button that is above the list of users.
Add new user / Edit user information
Note: New users can only be added by the company’s Applicant Manager or a Certification Officer.
To create a new user or edit an existing user:
Select ‘New’ to create a new user account or select a user and then select ‘Edit’ to edit an existing user account.
The following screen will appear:
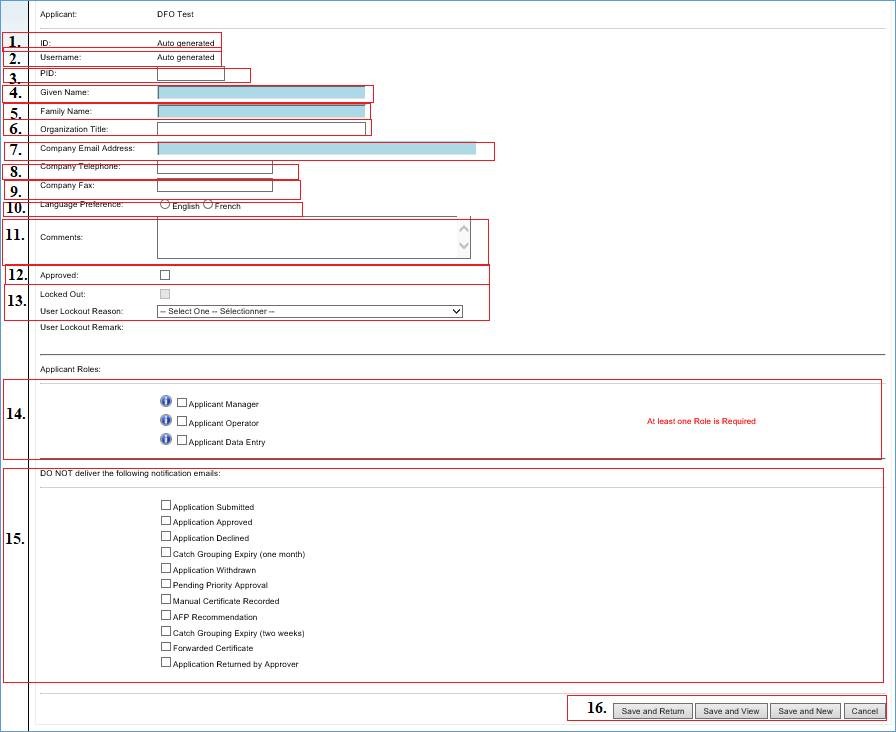
- ID – If creating a new user, the ID and User Name fields will be generated by FCS when the user details are saved. When viewing or editing an existing user profile the ID and User Name fields will be displayed in read-only format.
- Username – This field will contain the system-generated FCS Username ID (format will be Given Name_Last Name).
- Given Name – This field will be used by the system to create the FCS Username ID.
- Family Name – This field will be used by the system to create the FCS Username ID.
- Organization Title – Title of the user within their company.
- Company Email Address – This email address will be used to generate email notifications.
- Company Telephone – Telephone number of the user/company.
- Company Fax – Fax number of the user/company.
- Language Preference – The language preference (English/French) for communications with the Catch Certification Program.
- Comments – This is an optional field.
- Approved – The Applicant Manager can control access to FCS by using this field. If the field is checked, and the ‘Locked Out’ box is not checked, then the user can log in and use FCS. If the Approved field is not checked the user will be unable to log in to FCS but their user details remain saved in the system and they can be reactivated at any time.
- Locked Out – A user can be locked out of FCS under certain circumstances:
- Failure to return required documents may result in a user being locked out of FCS.
- The Catch Certification Program may administer follow-up procedures in cases where the audit of a previously issued catch certificate demonstrates that a user was not in compliance with the Terms and Conditions for use of FCS. This may result in a user being locked out of the system.
- Applicant Roles – The following table describes the system functionality available to each role.
Note: Only the Catch Certification Program: Operations Centre can create a user account for the Applicant Manager. This is the individual identified during the registration process as being responsible for the company’s account. If a change to the Applicant Manager is required please contact the Catch Certification Program: Operations Centre.
| Functions | Applicant Manager | Applicant Operator | Applicant Data Entry |
|---|---|---|---|
| Complete Applications Up To Submit | ✔ | ✔ | ✔ |
| Edit Interim Applications | ✔ | ✔ | ✔ |
| View Company Documents | ✔ | ✔ | ✔ |
| Submit Applications, Requests And Declarations | ✔ | ✔ | |
| Print Approved Certificates | ✔ | ✔ | |
| Forward Certificates | ✔ | ✔ | |
| Delegated Registration Authority For Company | ✔ | ||
| Request Certificate Cancellations | ✔ | ||
| Create, Edit and Disable User Accounts | ✔ |
Note: Most Applicant Managers choose the Applicant Operator role for their users because the Data Entry role does not allow a User to submit applications.
- Do NOT deliver the following notification emails: This section is used to manually suppress (disable) certain system-generated emails.
- Saving Options – There are a number of save options:
Save and Return to List View – Click on the ‘Save and Return’ button to save the user details and return to the Applicant User List page.
Save and View Details – Click on the ‘Save and View’ button to save the user details and immediately view the user details.
Save and New – Click on the ‘Save and New’ button to save the current user details and create a new user. The system will save the currently displayed user details and open a new user detail screen to allow for the creation of a new user.
Cancel – To cancel and return to the Applicant User List page, click on the ‘Cancel’ button. The system will not save any changes.
The following are not shown when creating new users, they are only shown when editing or viewing existing user accounts:
- Creation Date – FCS will automatically update this field at the time the account was created.
- Last Login Date – FCS will automatically update this field each time the user logs into the system.
- Last Lockout Date – FCS records the date a user is locked out.
Each new user will need to:
- Sign in using a Sign-In Partner or create a username and password through a GCKey Sign Up and complete the Self- Registration section. Once completed, the user should be on the Unregistered Account page.
- Choose ‘Activate a New User Account (requires an Activation Code)’ and select ‘Continue’. This code will be emailed to the new user at the time that their account is created.
Activate a new user account.
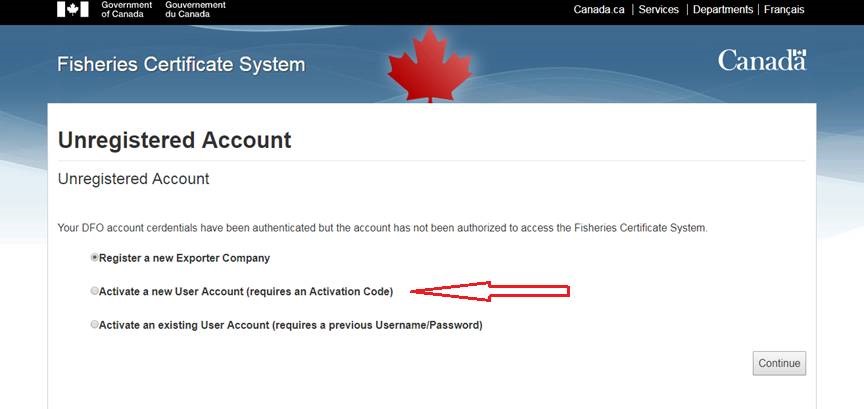
- Enter the business email address and activation code received in system-generated email and select ‘Activate Account’.
- Select ‘Continue’ on Account Activation screen.
- The user should now be logged into FCS.
Alternatively, if the user is having difficulty using the activation code, contact the Catch Certification Program: Operations Centre for assistance.
Change of applicant manager
If a company needs to change their Applicant Manager they must:
- Provide an updated Terms and Conditions and Delegation of Authority form; and
- Provide new proof of signing authority.
The Catch Certification Program: Operations Centre will:
- Create an account in FCS for the new Applicant Manager; and
- Will upload the signature of the new Applicant Manager to FCS.
This is the company’s authorized electronic signature that will appear on approved catch certificates.
Certificate functions
Convert
If you are the final exporter of the product that is being certified, you will have the option to convert your Canadian catch certificate to the required, country-specific certificate based on your export destination. You will do this by using the Convert function at the time of downloading your certificate for use.
Note: For indirect shipments, you must ask your importer for what country the certificate is required and convert it accordingly. For example, if your shipment was going to the United States and then on to the EU, you would need to convert to an EU certificate.
Here are the steps:
- Select the certificate from your certificate list. Click on the ‘Download’ icon.

- Select the country of destination (Canada, EU, Ukraine or Japan).
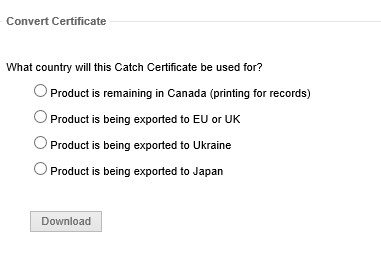
- If you have selected ‘Product is remaining in Canada’, you will then click on ‘Download’. You will then have the option to open or save the PDF document.
Note: You cannot print a copy of your original Canadian certificate after it has been converted. A new, country-specific certificate will be created and the original Canadian certificate will then remain in Converted status. If you require a PDF copy of your Canadian certificate for any reason before it is converted, then select the first option. You can print the Canadian certificate for your records and then proceed to convert to the country of your choice.
- If you have selected EU, Ukraine or Japan, you must click on the Convert button.
A confirmation box will open asking if you are sure. Click on ‘OK’.
- It will bring you to a page with a Download button. You will have the option to open or save the PDF document.
- The catch certificate for the country of destination selected will appear in PDF format. The Application Method will now show as Conversion.

Notes:
- This country-specific certificate will have a different document number than the Canadian catch certificate used to create it.
- The country-specific certificate is the certificate that should be presented to the importer.
- Once the certificate has been converted to the required country of market destination, you will no longer be able to change the country. Please contact the Catch Certification Program: Operations Centre if you must change the country of destination after it has been converted. We recommend that catch certificates only be converted to your required market country format at the time of export.
Forward
Forwarding is used when product that requires a catch certificate is being sold to another Canadian company before being exported. Choose this option to forward an approved certificate to another company registered within the Fisheries Certificate System (FCS). To forward a certificate, go to Manage Documents > Certificates and select the certificate you wish to forward (it will be highlighted in grey) and then click ‘Forward’. A new screen will appear that will allow you to choose the company (from a list of companies registered within FCS) that you wish to forward the certificate to. Select the desired company from the drop down menu then click ‘Forward Certificate’.
A screen shot of the Forward Certificate screen is shown below:
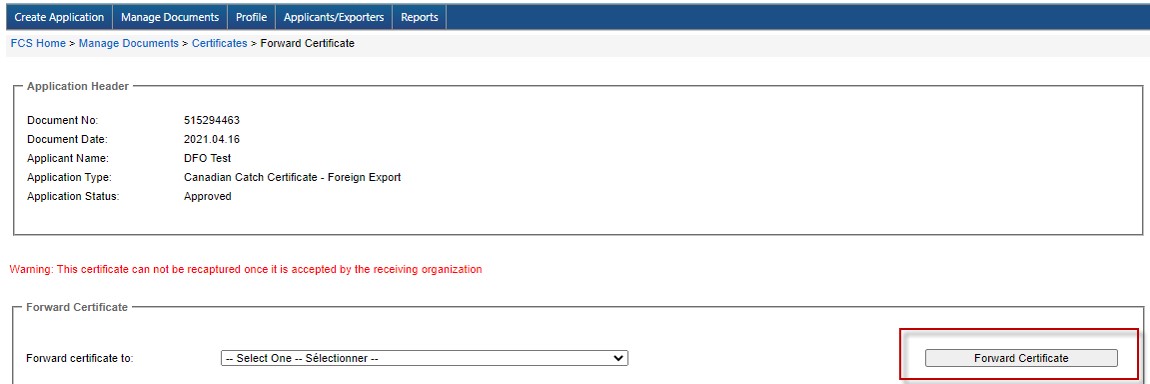
After clicking ‘Forward Certificate’, the certificate will be in ‘Forwarding’ status and can no longer be downloaded by you because the certificate is no longer valid and now belongs to the receiving company. The certificate will now appear under Manage Documents > Forwarded Certificates. Once the receiving company accepts the forwarded certificate, it will appear on their Certificate List and now belong to them. At this time, the certificate will appear in your Certificate list with a status of ‘Forwarded’.
Recall
If you have forwarded a certificate to the wrong company within FCS, you will need to recall it. If the receiving company has not yet accepted the certificate it can be recalled. Recalling a forwarding certificate will return it to your Certificate List with an Approved status. You will then be able to use this certificate in the same way as any other Approved catch certificate in your Certificate List, applying any of the FCS functions as necessary.
To recall a forwarding certificate, select the certificate you wish to Recall (it will be highlighted in grey) and then click ‘Recall’.

A new screen will appear showing the information for the forwarding certificate as well as the forwarding and receiving companies. Click the ‘Recall Certificate’ button to complete the recall option.
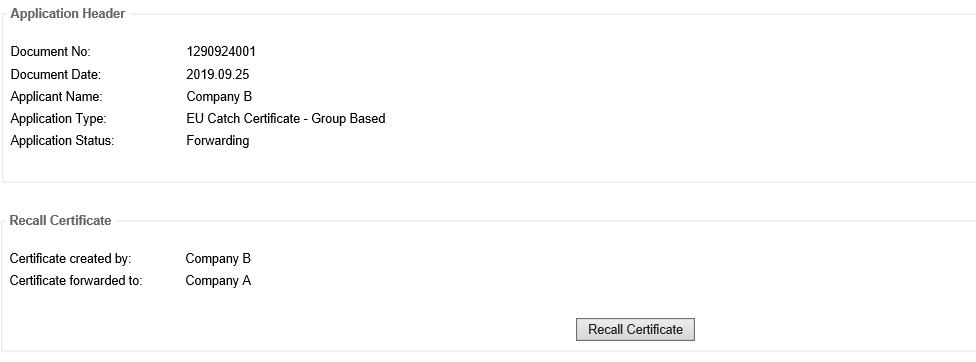
If the receiving company has accepted the forwarded certificate, it cannot be recalled. In that case the forwarding company will need to contact the receiving company and advise them that the certificate was forwarded in error and that the receiving company should have the certificate retracted.
Resale
Once a forwarded certificate has been accepted, an Applicant will be required to use FCS functions to make changes to it before they can use the certificate as their own. These functions include Resale and Reissue. You will use the Resale function when you are sending all or a portion of the product that was included on a certificate that another company registered in FCS forwarded to you.
To resell a certificate, go to Manage Documents > Certificates and select the forwarded certificate you wish to resell (it will be highlighted in grey) and then click ‘Resale’.
Once you click Resale, the original certificate will be in Resold status. A new application, with a new document number, will be created that contains all the information from the original certificate.
The only information fields that you are able to edit when using the Resale function on a certificate are:
- Detail Tab
- Catch Tab
- Weights can remain the same or be lowered. For more information on the weights see Weight Guidance.
- Product type can be changed.
- Transport Tab
- Import Tab
Once the necessary changes have been made, click the ‘Submit Application’ button, located above the tab menu. The application will then go through the validation process and be subject to the catch certificate approval service standards. See Service Standards.
To resell a certificate the Applicant will go to Manage Documents > Certificates and select the certificate (it will be highlighted in grey) then select the ‘Resale’ button.

This will create a new application in interim status with a new document number. The application in interim status will have an application method of Resold, which indicates that the certificate was created by using the Resale function. Resale is used when you are sending all or a portion of the product that was included on a certificate that another Canadian company registered in FCS forwarded to you.
The following section explains how to complete each tab when reselling a certificate.
Detail tab

The Applicant needs to enter the Exportation Date. This will be the date the shipment will be exported from Canada or the date the product leaves your facility if being sold within Canada.
The Applicant will then answer the series of questions on the Detail tab that will provide information on whether they are the final exporter of the product and if they are, whether the product is being shipped directly to the country for which the catch certificate is being issued.
Catch tab
The species is read-only (greyed out) and cannot be changed by the Applicant.
There will be a maximum weight displayed next to the corresponding weight field (shown above in the red box). This is the total weight on the certificate that was forwarded to your company. The maximum weight will also be the default weight displayed in the weight field. You can decrease the amount in this field to match the amount you are shipping or you can leave the default amount as entered if you are sending the whole amount in one shipment. In the example above, the maximum Estimated Live Weight available is 500 kg.
The management area and catch dates are read-only (greyed out) and cannot be changed.
You will need to add the product that you are shipping. Select ‘Add Product’ to enter the HS code and the product weight being shipped. You can add more than one product to the application. See Weight Guidance for information on the product weight.
Grouping tab
Grouping(s) selected by the originating company are read-only and cannot be changed by the Applicant. The group names of the groupings selected have been redacted for privacy reasons.

Grouping Detail tab
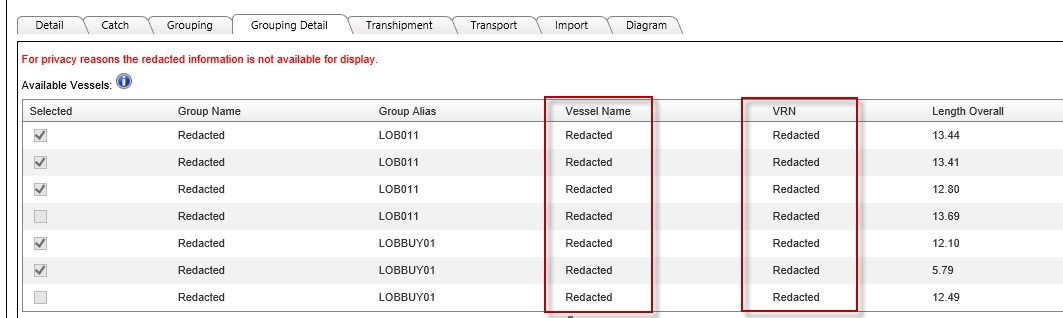
This tab shows all the vessels selected in all groupings used in the application in read-only status. Vessels selected by originating company cannot be changed by the Applicant. All the vessel names and VRNs selected have been redacted for privacy reasons.
Transport tab
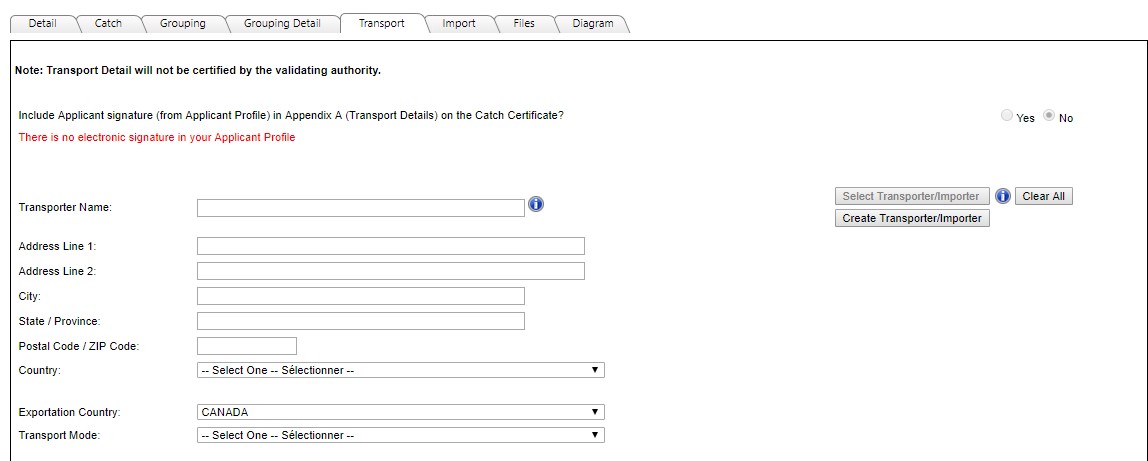
The Transport tab will be blank to allow the Applicant to enter the new transportation information.
Import tab
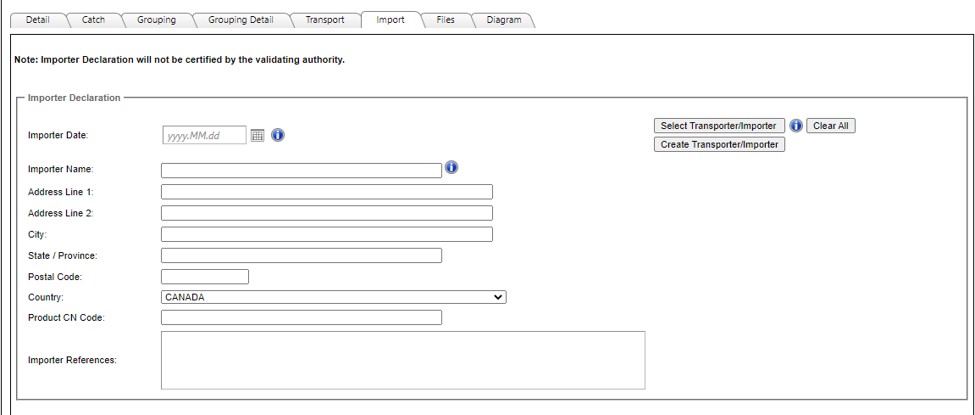
The Import tab will be blank to allow the Applicant to enter the new importer information.
Diagram tab

The Diagram tab will show the hierarchy for certificates that are resold.
The screen shot below shows an example of the diagram for a certificate that was resold five times. Note that one of the new certificates created from the Resale, was then also resold two times.
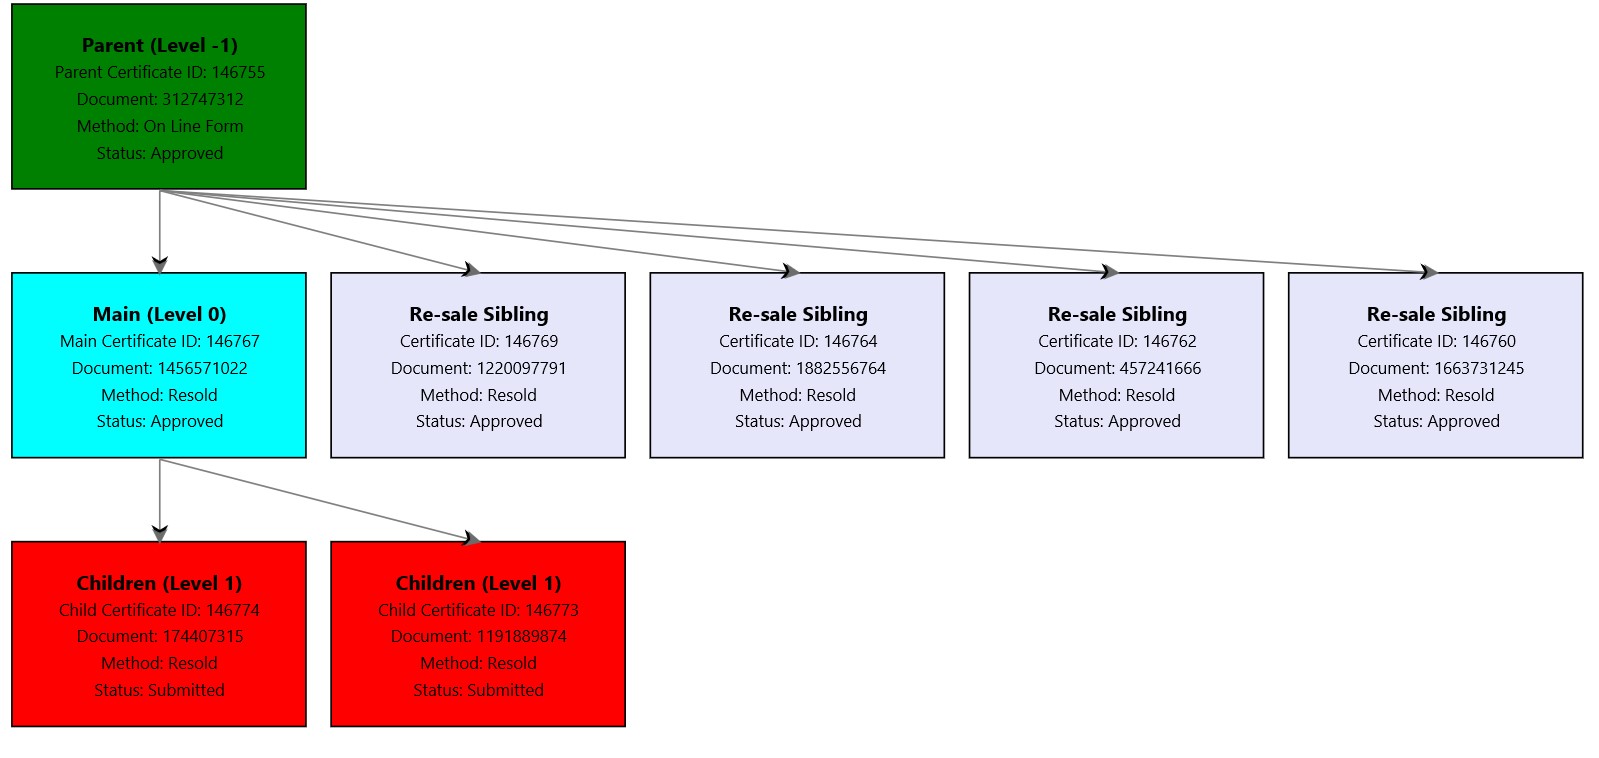
Certificates and applications in all statuses will be displayed on the Diagram tab, including retracted certificates.
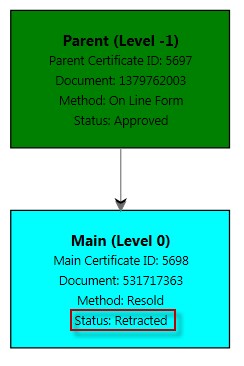
Copy
Choose this option to create a new application that is a copy of one of your own company’s existing certificates, groupings, or applications. The Copy function will create a new application in interim status that, once completed, can be submitted to the Catch Certification Program: Operations Centre for validation and approval. The Copy function allows you to use one of your prior certificates as a template, so that any data that remains the same can be pre-populated to a new certificate. Most fields can be edited to change the information when using the Copy function.
You cannot copy a certificate that has been forwarded to you from another company. Instead, you will use the Resale or Reissue functions on any certificates that you have received from another company, so that the source information entered for the product cannot inadvertently be changed. This will allow for better traceability through the seafood supply chain. For more information see Resale.
To copy an application or a grouping, go to Manage Documents > Applications and select the document you wish to copy (it will be highlighted in grey) and then click ‘Copy’.
To copy a certificate, go to Manage Documents > Certificates and select the certificate you wish to copy (it will be highlighted in grey) and then click ‘Copy’.
A new application will be created that contains information copied from the selected document.
The Copy function is often used when, for instance, an Applicant is creating multiple applications with similar information. The Copy function can also be used as a means to make corrections to an already approved catch certificate (as long as it was not forwarded to you). In this case, after having copied a certificate that you will no longer require, contact the Catch Certification Program: Operations Centre by email to request that the original certificate be retracted. To do this, you will need to provide the document number of the original certificate and the reason why it is no longer required.
When you copy an approved certificate, the information in the application will be identical to that on the original certificate, except for the exportation date, importer date, weight fields, and catch dates. These fields will need to be re-entered prior to submitting the copied certificate for validation and approval. See Differences between the Copy, Reissue, and Resale functions for further information.
Reissue
Choose this option if you would like to make certain changes to an approved certificate. Go to Manage Documents > Certificates and select the certificate you wish to reissue (it will be highlighted in grey) and then click ‘Reissue’. Once you click Reissue, the original certificate will be in suspended status until the new application is either submitted or cancelled. Reissued certificates are automatically approved and will be immediately available under Manage Documents > Certificates.
A new application, with a new document number, will be created that contains all the information from the original certificate. The only information fields that you are able to edit on a Standard or Group Based certificate through the Reissue function are:
- Detail tab
- Catch tab
- Health Certificate Number can be added or edited.
- Weights can remain the same or be decreased.
- Note: If you need to increase the weights, you cannot use reissue. Instead, a new application will need to be created and the incorrect certificate retracted.
- Transport tab
- Import tab
If you need to decrease the weights on an approved, forwarded certificate, you may use the Reissue function. However, the original certificate will be suspended and you will not be able to certify the balance of the weight of product that was forwarded to you.
Note: If you need to decrease the weights but must retain the balance for future use, you should use the Resale function.
Once the necessary changes have been made, click the ‘Submit Application’ button, located above the tab menu. When using the Reissue function, the new application will be automatically approved and available within your Certificate List.

The screen shot above shows the original certificate and the new certificate, within the Certificate List. The original certificate will be in Reissued status, and can no longer be used, while the new certificate will be in Approved status.
Note: When using the Reissue function, the new certificate will have a new document number. To find this number, locate the original certificate in the Certificate list. The ‘Component of Document’ column will provide you with the document number of the new certificate.
| Copy | Reissue | Resale |
|---|---|---|
| Can only be used on certificates for which you are the original Applicant Company (i.e. your own certificates). Used to create multiple applications with similar information and allows for a certificate to be used as a template for future applications. |
Used to make modifications to an approved certificate. | Used to modify a certificate that has been forwarded to you, when you are sending all or a portion of the product sourced from another company in FCS. |
| All fields can be edited. | Can only edit: Detail tab, health certificate number, transport and import information. | Can only edit: Detail tab, health certificate number, transport and import information. Must enter product type and product weight. |
| Weights can remain the same or be decreased. Weights can remain the same but form of the product cannot be changed. Weights can be decreased but form of the product cannot be changed. Note: Remaining weight CANNOT be used on another certificate. |
Weights can remain the same or be decreased. Weights can remain the same – if sending the entire amount from forwarded certificate in one shipment. Form of the product can be changed. Weights must be decreased - if sending only a portion of amount from forwarded certificate. Form of the product can be changed. Note: Remaining weight CAN be used on another certificate. |
|
| Must re-enter exportation date, all weight and catch dates. For Group Based applications: grouping(s) and vessel(s) need to be selected. |
All information carries over. | All information carries over and is read only except Detail, Transport and Import tabs, product type and product weight. |
| Application needs to be validated by an officer. | Automatically approved. | Application needs to be validated by an officer. |
| Original, approved certificate remains valid. | Original, approved certificate becomes “suspended” until new application is cancelled or approved. The original certificate cannot be used again. | Original certificate goes into “resold” status, can be resold again as it is still a valid certificate. |
| Has a new document number. | Has a new document number. | Has a new document number. |
Consolidate
Note: This option is only available for Group Based catch certificates. Standard and Foreign Export catch certificates cannot be consolidated.
Consolidation is used to combine two or more of your company’s own Group Based catch certificates into a single catch certificate. Certificates forwarded from another company can also be combined with your company’s own approved certificates, into a single certificate for a shipment. If you are sending a shipment that consists of product that has come from multiple sources you will need to use the Consolidation function.
Note: Once certificates have been consolidated, they cannot be separated back into individual certificates.
For example, if your consignment contains product for which you have certificates from multiple different companies, you can consolidate these certificates into one for the consignment.
If you are sending a shipment that consists of both your own product (the source is based on your company’s FCS groupings), and product from a forwarded certificate, you will need to create an application for your own product and once your certificate is approved, consolidate it with the forwarded, accepted certificate.
A consolidated catch certificate still needs to be submitted but does not need to be validated by the Catch Certification Program: Operations Centre since it consists of existing, approved Group Based catch certificates. The consolidated certificate will be available immediately under Manage Documents > Certificates.
Steps to consolidate catch certificates
Click on ‘Create Application’ from the main menu.

On the Create Application screen, select ‘Consolidate from Existing Certificates’.
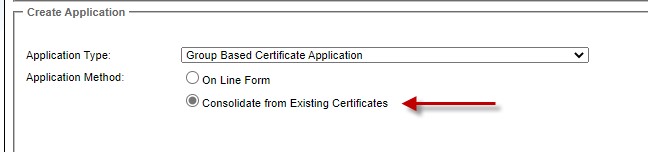
Click on ‘Continue’.
Select the catch certificates you wish to consolidate from the Available Certificate List by checking off the box next to each certificate you wish to consolidate.
For further assistance with regards to consolidation, please contact the Catch Certification Program: Operations Centre.
- Date modified: