
User training manual
4. Organizations
4.1 Using the System on behalf of an Organization
If you have been identified as a person who is authorized to conduct transactions using the National Online Licensing System for one or more Organizations, you may log inFootnote 39 to the system with your preferred log in credential to access the account or accounts of these Organizations.
Important Note
The National Online Licensing System supports a “one-to-many relationship.” This means that one person may be authorized to work on behalf of one Organization or many Organizations.
Once you have logged in, you may renew licences, submit requests, pay fees, print documents, and receive the notifications of any of your Organizations exactly the same way that a DFO Client will use the system. Although this role is similar to the representative role, they are not the same. Individuals who are authorized to manage an Organization are able to make modifications to the Organization. In addition to paying fees, renewing licences, submitting requests and printing documents, authorized individuals can also update an Organization, register a new Organization, and assign or remove another authorized individual from an Organization, while a representative cannot. Detailed instructions for carrying out these functions are found in the remainder of this section.
Before you begin acting on behalf of an Organization you will need to take an extra step by first selecting the Organization for which you want to complete transactions. To do this, you will click on the “Available Accounts” drop-down menu, scroll down to the Organization you want to select, and then click the “Select” button.
As an example, if you want to pay the fees of one of your Organizations, click the “Pay Fees” hyperlink in the “Payments” section of the left-navigation menu and the “Pay Fees” screen will appear.
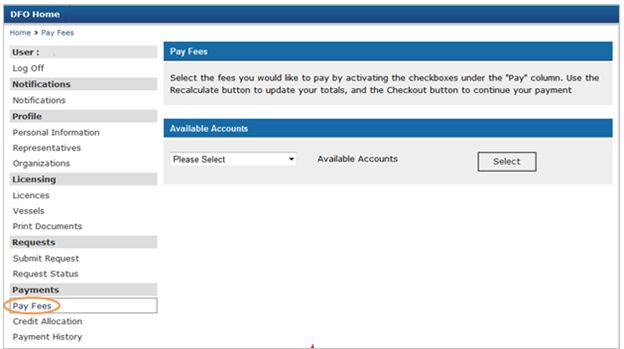
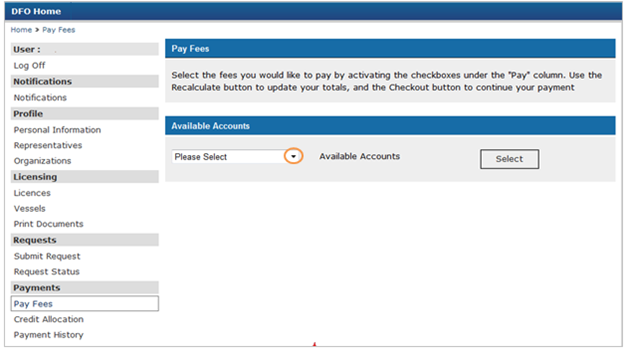
Under the “Available Accounts” section, click the arrow by the “Please Select” text and a drop-down menu will appear with the list of Organizations for which you have been authorized to complete licensing transactions. Using your cursor, scroll down to the Organization for which you want to pay fees and once the name of the Organization is highlighted, release the cursor and then, click the “Select” button.
The “Pay Fees” screen for this Organization will appear. You will know that this is the “Pay Fees” screen for this Organization in two ways. First, the “Available Accounts” near the top of the screen will show the name of the Organization in the box beside the “Select” button. Second, the “Account Information” in the middle of the screen will show the name of the Organization and the Organization’s National Online Licensing System Account Number.
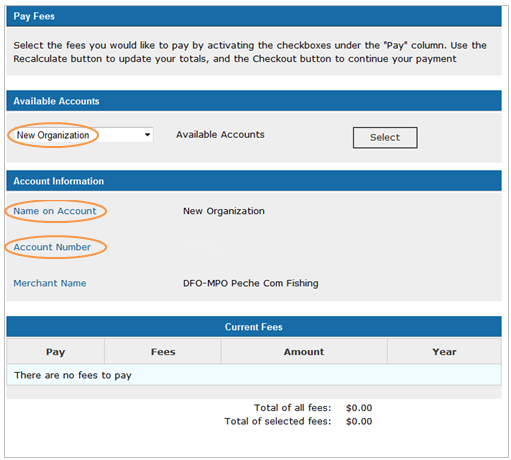
To pay one or more of the fees for this Organization, follow the steps explained in Section 5.3.
4.2 Updating your Organizations
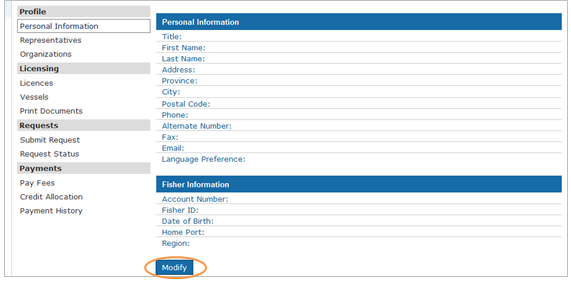
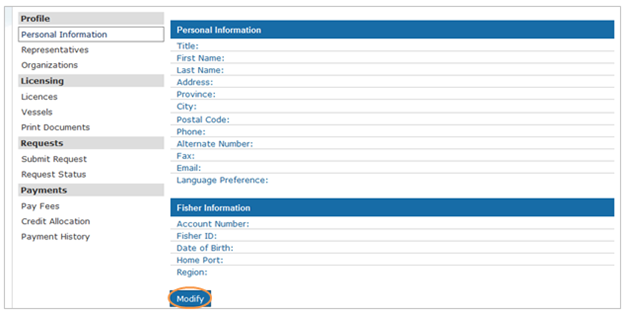
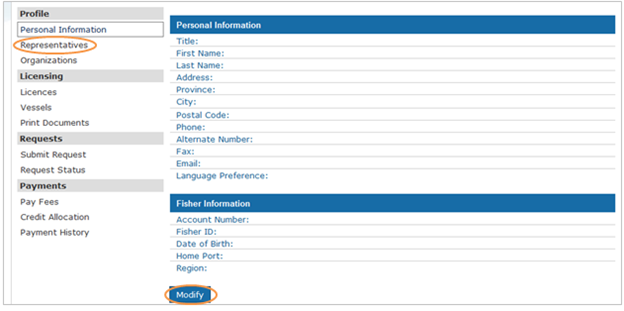
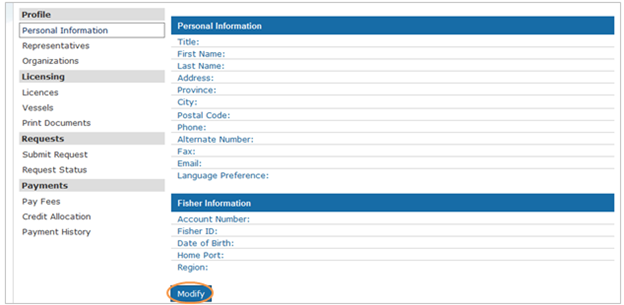
To update the information of one of the Organizations for which you are authorized to complete transactions using the National Online Licensing System, click the “Personal Information” hyperlink under the “Profile” section of the left-navigation menu, after you have logged in to the system.
Click the “Modify” button at the bottom of the “Profile” screen.
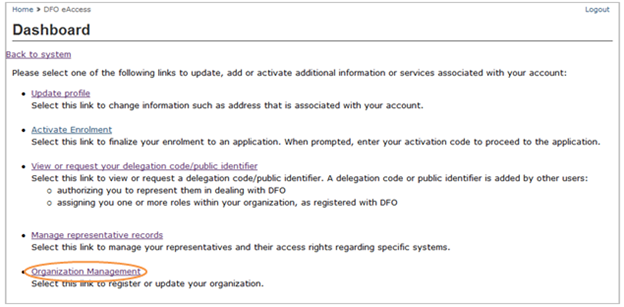
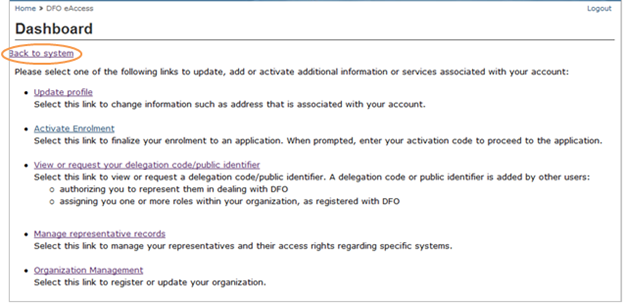
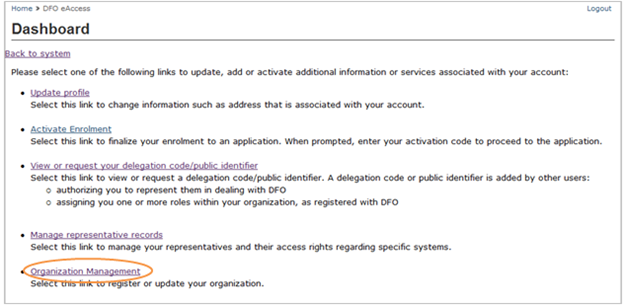
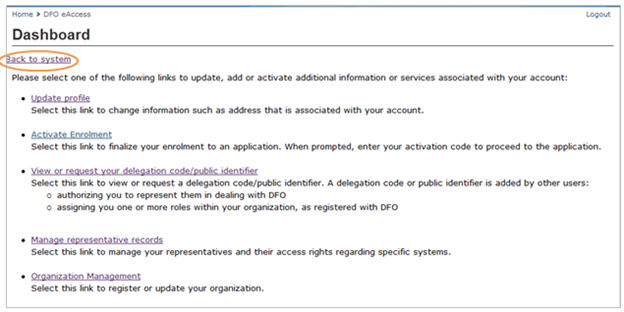
This will take you to the “Dashboard” screen, which is in a secure location of the Fisheries and Oceans Canada website. To update the information of an Organization, you will need to take a number of steps:
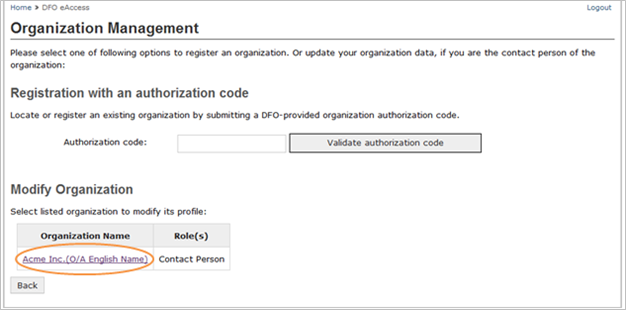
1. Click the “Organization Management” link.

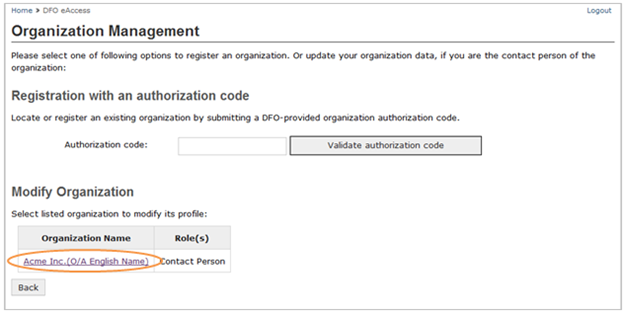
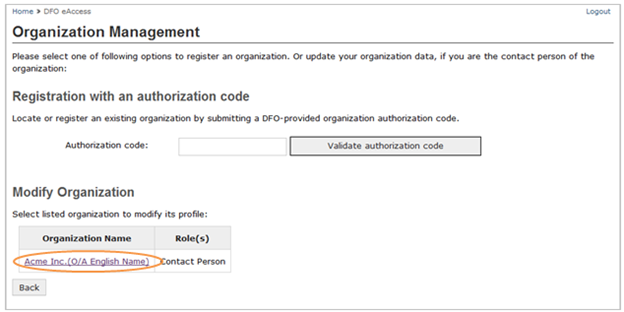
2. The “Organization Management” screen will appear. This screen will, once again, show the list of Organizations for which you have been authorized to conduct transactions using the National Online Licensing System. Select the Organization that you want to update by clicking the name of the Organization, and the “Organization Details” screen will appear.
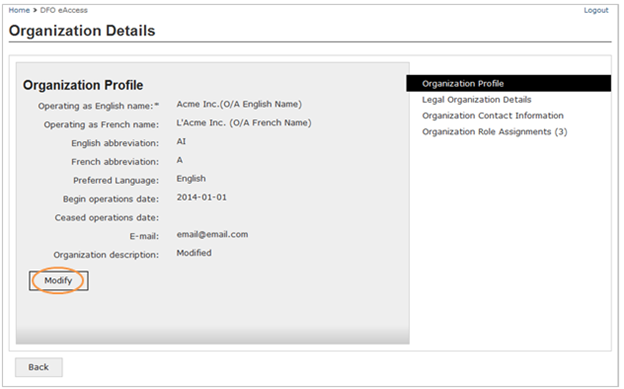
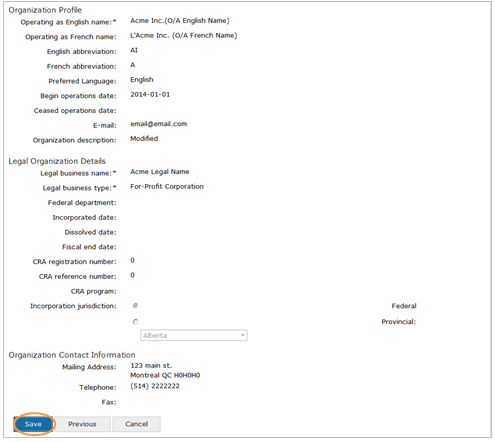
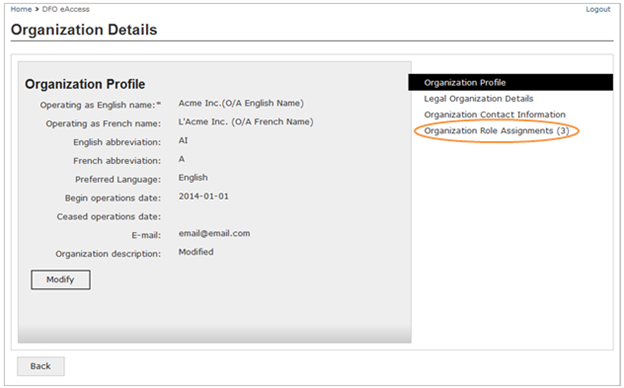
3. The “Organization Details” screen will list detailed information about this Organization. Scroll to the middle of the screen, after the “Organization Contact Information” table, and click the “Modify” button.
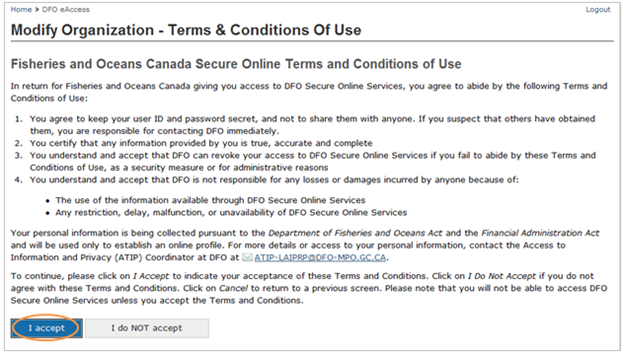
4. The “Modify Organization – Terms and Conditions of Use” screen will appear. After reading the screen, click the “I accept” button.
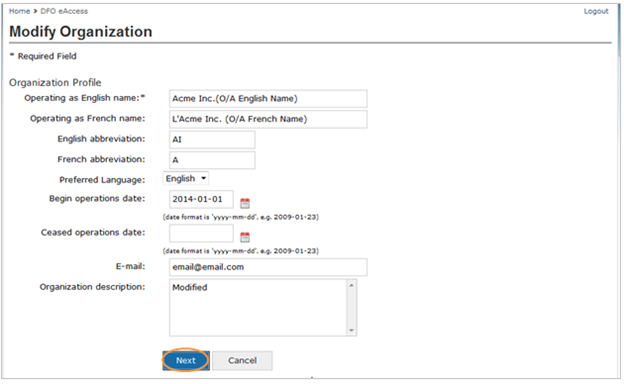
5. The “Organization Profile” screen will appear listing the information for an Organization to be included in the National Online Licensing System, such as the Organization’s operating name and the Organization’s e-mail address. Type in your required information. You may also choose to type in other information, such as the preferred language, the date the company began operating or a description of the Organization. When you are finished, click the “Next” button.
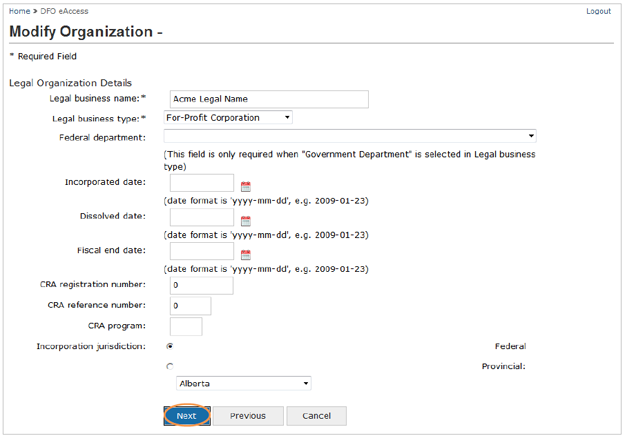
6. The “Legal Organization Details” screen will appear listing additional information about the Organization, such as the legal business name and legal business type. Type in this required information. You may also choose to type in other information, such as the incorporation jurisdiction (e.g., federal or provincial). When you are finished, click the “Next” button.
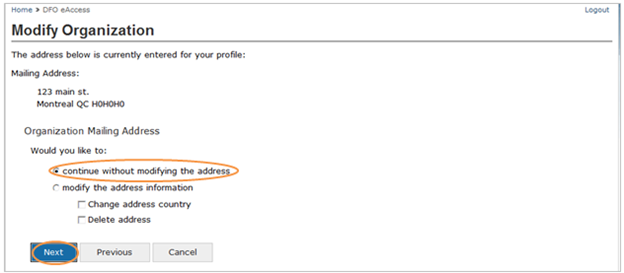
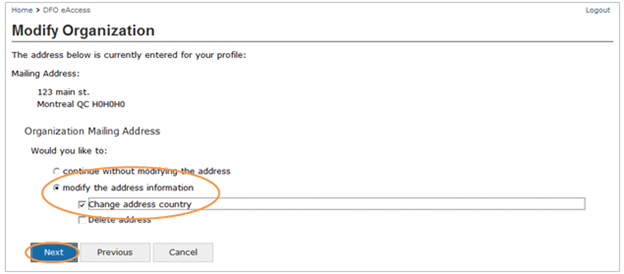
7. The “Organization Mailing Address” screen will appear. Review the mailing address that appears at the top of the screen. If this is the Organization’s current mailing address, you may continue without modifying the address. To do this, click your cursor in the circle beside the text “continue without modifying the address” and then, click the “Next” button. If this is not the Organization’s current mailing address, click your cursor in the circle beside the text “modify the address information” and, if required, click your cursor in the box beside the text “change address country.” When you have finished, click the “Next” button.
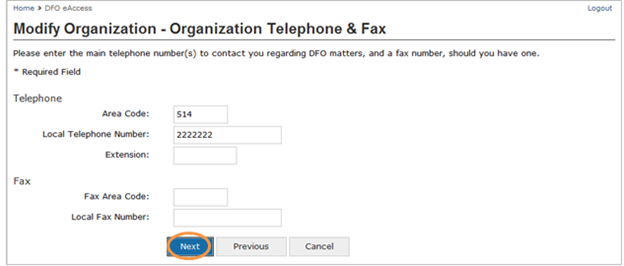
8. If you chose the “continue without modifying the address” button, you will need to review the Organization’s telephone number and fax number. Type the required information into the “Modify Organization-Organization Telephone & Fax” screen. When you are finished, click the “Next” button.
9. You will come to the “Organization Profile Confirmation” screen. From this screen, click the “Save” button to return to the “Organization Details” screen. Click the “Back” button to return to the “Dashboard” screen and then click “Back to System” hyperlink to return to the National Online Licensing System.
10. If you chose to “modify the address information,” you will need to make the necessary address changes through a series of screens. Follow steps #5 through #8 which are outlined in Section 3.2.2 of this manual. While the first part of each screen will be different, e.g., “DFO Registration” will be replaced with “Update Organization Profile,” the instructions will remain the same.
4.3 Registering a New Organization
Important Note
Before you can register an Organization, you must have the Organization authorization codeFootnote 40 that was provided to the Organization by Fisheries and Oceans Canada. If you want to register more than one Organization, you will need to have the Organization authorization code for each of these Organizations.
To register a new Organization within the National Online Licensing System, click the “Personal Information” hyperlink under the “Profile” section of the left-navigation menu, after you have logged in to the system.
Click the “Modify” button at the bottom of the “Profile” screen.
This will take you to the “Dashboard” screen, which is in a secure location of the Fisheries and Oceans Canada website. To register an Organization, you will need to take a number of steps:
1. Click the “Organization Management” link.
2. The “Organization Management” screen will appear. This screen will, once again, show the list of Organizations for which you have been authorized to conduct transactions using the National Online Licensing System or, if you have not yet registered an Organization with the Department, there will be no Organizations listed. Type in the DFO-provided Organization authorization code into the “Authorization code” box and then, click the “Validate authorization code” button.
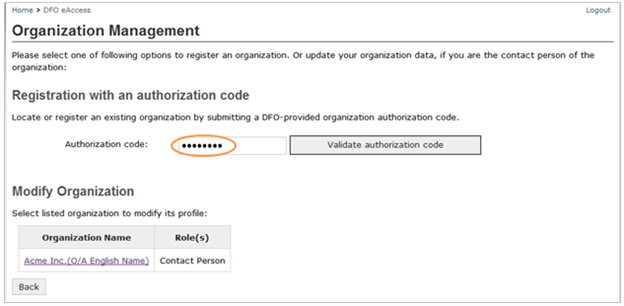
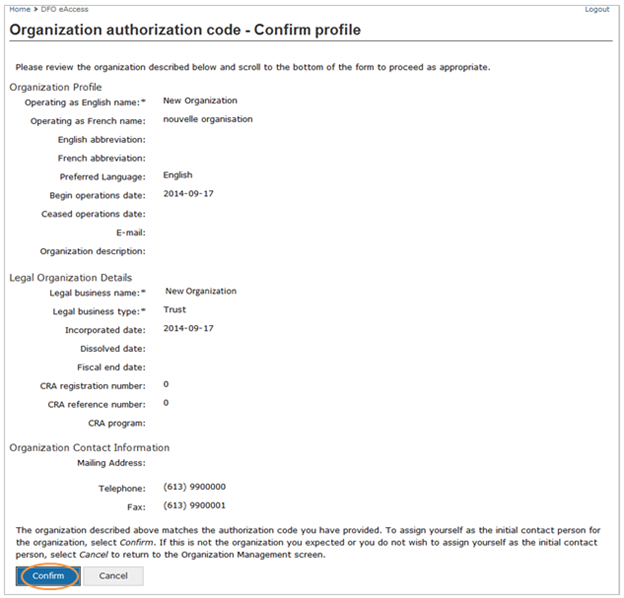
3. The “Organization authorization code- Confirm profile” screen will appear. Review the Organization details to ensure that the information listed on this screen is accurate. If one of the required fields (marked with an asterisk or *) is incomplete, you will be prompted to fill in the missing information. If the Organization’s profile details are complete and correct, click the “Confirm” button.
4. If you need to provide additional information to complete your Organization’s profile, click the “Modify button. Then, follow steps #4 through #8 which are outlined in Section 4.2 of this manual.
4.3.1 Getting your Organization Authorization Code
To register an Organization, you will need to have an Organization authorization code provided to you by Fisheries and Oceans Canada. This eight-digit set of numbers will be different for every Organization.
To get your Organization authorization code, contact Client Support.Footnote 41
4.4 Assigning an Authorized Individual to an Organization
Important Note
Before you can assign an authorized individual, you must have their public identifier.Footnote 42 If you want to assign more than one authorized individual, you will need to have the public identifier of each of these persons.
To assign one or more authorized individuals to manage the business of an Organization using the National Online Licensing System, click the “Personal Information” hyperlink under the “Profile” section of the left-navigation menu, after you have logged in to the system. Click the “Modify” button at the bottom of the “Profile” screen. You may also assign one or more authorized individuals by clicking on the “Representatives” hyperlink under the “Profile” section of the left-navigation menu. Click on the “Modify Representatives” hyperlink once in this screen.
These two methods will both take you to the “Dashboard” screen, which is in a secure location of the Fisheries and Oceans Canada website. To assign an authorized individual to an Organization, you will need to take a number of steps:
1. Click the “Organization Management” link.

2. The “Organization Management” screen will appear. This screen will show the list of Organizations for which you have been authorized to conduct transactions using the National Online Licensing System. Select the Organization to which you want to assign a new authorized individual, and the “Organization Details” screen will appear.
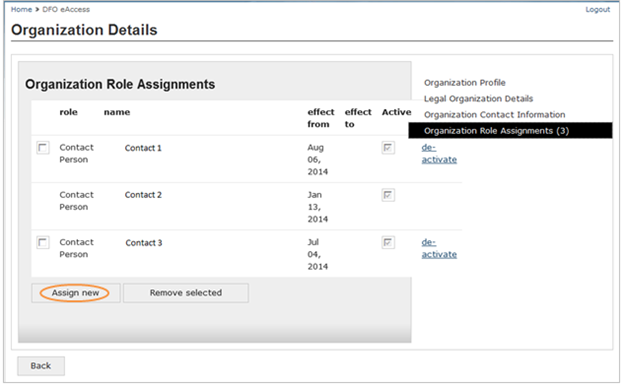
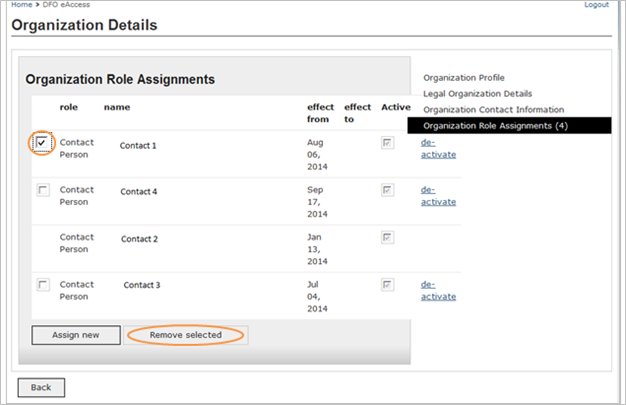
3. At the side of this screen is a section called, “Organization Role Assignments” in which all of the persons authorized to complete licensing transactions on behalf of this Organization are listed. Click the “Assign New” button at the end of this list.
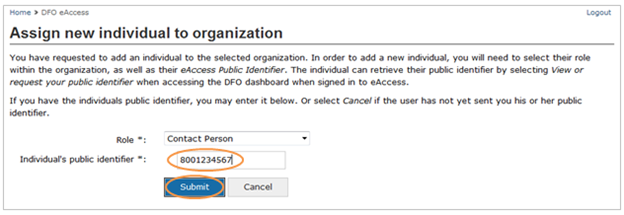
4. The “Assign new individual to Organization” screen will appear. Choose the role of this individual, such as “Contact Person” and then, type in the individual’s public identifier. When you are finished, click the “Submit” button.
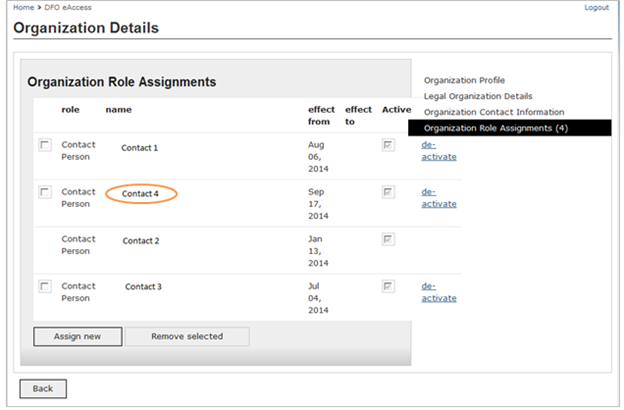
5. You will return to the “Organization Details” screen and the individual who you just assigned as an authorized person to complete transactions using the National Online Licensing System will be added to the list under the “Organization Role Assignments” section.
6. To return to the National Online Licensing System, click the “Back” button, under the “Organization Contact Information” table, and click the “Back” button at the bottom of the “Organization Management” screen. Then, from the “Dashboard” screen, click the “Back to System” hyperlink.
4.4.1 Getting a Public Identifier
To be assigned as an authorized individual who may complete business transactions using the National Online Licensing System for an Organization, you will need to have a public identifier. This 10-digit set of numbers will be different for every person. To get your public identifier, you will follow almost the exact same process used by representatives who need to get their delegation code. This is explained in Section 3.2.1 of this manual. The only difference is that your final step will require that you contact the individual acting as an Organization’s representative and give them your public identifier. Then ask them to take the steps necessary to assign you as an authorized individual for an Organization.Footnote 43
4.4.2 Registering an Online Profile with the Department
You will need to register an online profile with the Department before you may obtain your public identifier and be assigned as an authorized individual who may complete business transactions using the National Online Licensing System for an Organization.
To do this, you will follow the exact same process used by representatives who need to register a profile with the Department. This process is explained in Section 1.6.2 of this manual.
4.5 Removing an Authorized Individual from an Organization
To remove or deactivate one or more individuals authorized to manage the business of an Organization using the National Online Licensing System, click the “Personal Information” hyperlink under the “Profile” section of the left-navigation menu, after you have logged in to the system.
Click the “Modify” button at the bottom of the “Profile” screen.
This will take you to the “Dashboard” screen, which is in a secure location of the Fisheries and Oceans Canada website. To remove an authorized individual from an Organization’s list of authorized individuals, you will need to take a number of steps:
1. Click the “Organization Management” link.
2. The “Organization Management” screen will appear. This screen will show the list of Organizations for which you have been authorized to conduct transactions using the National Online Licensing System. Select the Organization from which you want to remove an authorized individual, and the “Organization Details” screen will appear.
3. At the bottom of this screen is a section called “Organization Role Assignments” in which all of the persons authorized to complete licensing transactions on behalf of this Organization are listed. Using your cursor, click the box beside one or more individuals you wish to remove or deactivate from the list and a checkmark will appear in each box that you click. When you are finished, click the “Remove selected” button at the bottom.

Important Note
You also have the option of “deactivating” an authorized individual if this person may not be conducting business for the Organization for a select period of time, but will do so again in the future. You may want to choose this option, for example, when the authorized individual is taking an extended lea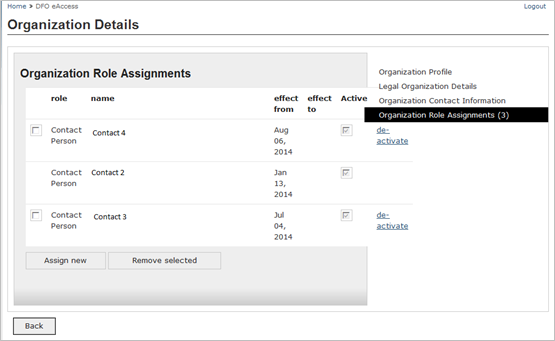 ve of absence. You also have the option of “deactivating” an authorized individual if this person may not be conducting business for the Organization for a select period of time, but will do so again in the future. You may want to choose this option, for example, when the authorized individual is taking an extended leave of absence.
4. You will return to the “Organization Details” screen and the individual who you just removed as an authorized person to complete transactions using the National Online Licensing System will be removed from the list under the “Organization Role Assignments” section.
5. To return to the National Online Licensing System, click the “Back” button, under the “Organization Contact Information” table, and click the “Back” button at the bottom of the “Organization Management” screen. Then, from the “Dashboard” screen, click the “Back to System” hyperlink.
- Date modified: