
User training manual
1. Accessing the System
There are a number of steps you will need to take in order to access the National Online Licensing System. Moreover, there are some extra steps required for the first time you log in to the system. You will need to have a few things ready, such as access to a computer that is connected to the Internet, an e-mail address, a Government of Canada approved log in credential, and potentially a DFO passcode.
1.1 Getting Started
1.1.1 Computer with Internet Access
The first thing you will need to access the National Online Licensing System is a computer that is connected to the Internet. If you do not have a computer or access to the Internet,Footnote 2 there may be computers and internet access available at public libraries and Internet cafés. Some Service Canada Centers also have computer terminals with Internet access to Government of Canada websites, including the National Online Licensing System. To check whether your community or a nearby community has access to the Internet, contact Client Support via e-mail or telephone as listed in Section 7.
1.1.2 E-Mail Address
You will need an e-mail address so the Department may notify you when you have received a new notificationFootnote 3 (or message) on the system. If you do not have an e-mail account, you may set one up by searching “e-mail services” through the Internet search engine on your computer or non-government computers at public libraries and Internet cafés.
1.1.3 Access to a Printer
You will need to print your fishing licence and other licensing documents when these documents have been added to your account. You should also print a copy of any invoices and attach them to the Transaction Statement that you receive after making a payment through the system with your credit card or debit card – or when you make a payment in person at the bank.Footnote 4
Computers at libraries and Internet cafés typically include printing services for a small fee. You may also be able to print your documents from a Service Canada center computer terminal. In addition, documents saved on a data storage device (such as a USB key) may be brought to a print shop.
1.1.4 Internet Browser Software
To access the Internet, you will need an Internet browser software application loaded on your computer, such as Microsoft® Internet Explorer, version 8 or above. An Internet browser application is typically included in the suite of software that is provided to you when you purchase a computer.
Important Note
The National Online Licensing System was developed with the following system specifications in mind: a computer running a Microsoft® Windows-based operating system with Microsoft® Internet Explorer version 8 or higher installed with the cookies enabled. The system may also work with other specifications, such as: a different Internet browser (e.g., Chrome, Firefox, etc.) or another operating system (e.g., MAC OS, IOS, Android, etc.), but Fisheries and Oceans Canada offers no guarantees of compatibility.
1.2 Log In
After you have turned on your computer, open your Internet browser and type in the following website address into the address bar at the top of the screen: https://fishing-peche.dfo-mpo.gc.ca
Then, press the “Enter” key on your computer keyboard.
You will be on the National Online Licensing System “Welcome” screen. Use your cursor to click the button to select your preferred language to get to the next step in the log in process.

1.3 Ways of Logging In
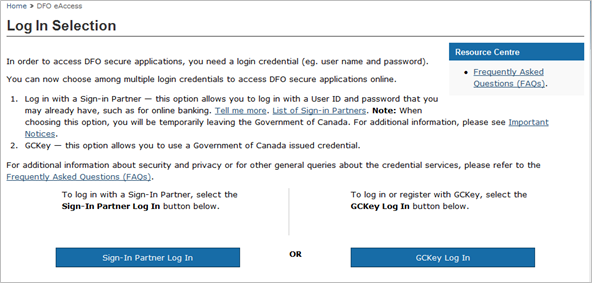
After clicking the log in button in your preferred language from the National Online Licensing System “Welcome” screen, you will be directed to a screen called “Log In Selection.” Every time you access the new system, you will need to log in using a Government of Canada approved credential (User ID and password). There are two options to choose from: GCKey and a Sign-In Partner.Footnote 5
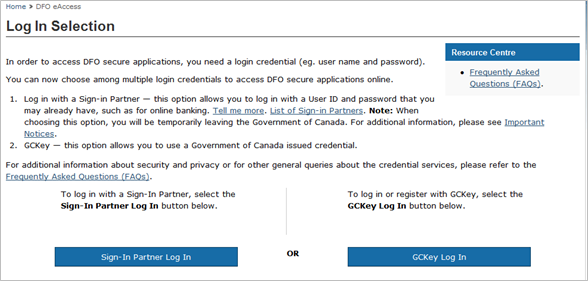
1.3.1 Sign-In Partner Log In
“Sign-In Partner Log In” is available through SecureKey Concierge (securekeyconcierge.com). This option will allow you to log in to the National Online Licensing System with a user name and password that you may already be using for an online system, such as for online banking. For example, at present SecureKey Concierge has five banking partners: TD Canada Trust, BMO Financial Group, Choice Rewards, Tangerine and Scotiabank.
SecureKey Concierge is easy to use, protects your privacy and offers no exchange of passwords or personal information (i.e. name, address, date of birth, etc.) in this process. Your Sign-In Partner will not know the government services you are accessing and the government will not know which Sign-In Partner you are using.
If you prefer this log in credential option, click on the blue “Sign-In Partner Log In” button to the left of the screen and follow the instructions provided.
Important Note
If you choose this option, you will temporarily leave the Fisheries and Oceans Canada website. SecureKey Concierge is also responsible for providing any technical support that you may have using this login option. For more information, contact: Consumer Support.
1.3.2 GCKey
GCKey is a secure Government of Canada User Identification (ID) and password that is used as an anonymous credential for a person over a federal government online system. You may use a GCKey to access the National Online Licensing System as well as other online Government of Canada services.
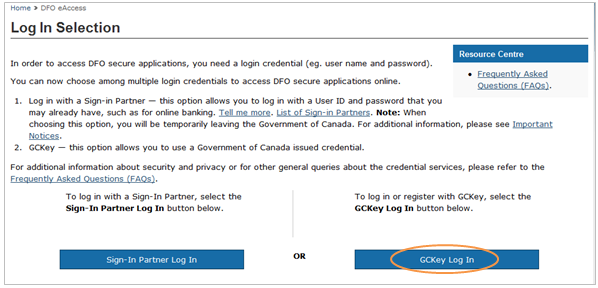
If you already have a GCKey User ID and password, click on the blue “GCKey Log In” button to the right of the screen to log in.
1.4 Getting your GCKey
You will need to take three steps in order to begin the GCKey registration process from the “Log In Selection” screen:Footnote 6
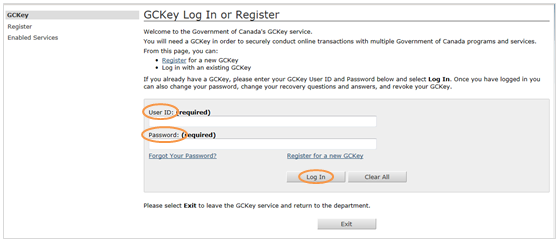
1. Click the blue “GCKey Log In” button on the “Log In Selection” screen and you will be directed to the GCKey “Log In or Register” screen.

2. Click the “Register” hyperlink on the left-navigation menu.

Quick Tip
Blue underlined text is a hyperlink to another website or webpage.
3. The “Terms and Conditions of Use” screen will appear for you to please read carefully and accept. After reading the screen, click the “I accept” button so you may begin the registration process.

1.4.1 Registration Information
Registering for a GCKey involves creating a GCKey User ID and password. You will complete this by taking three steps:
- Create a GCKey User ID;
- Create and choose recovery questions, answers, and hints; and
- Create and confirm a password.

1.4.1.1 GCKey User ID
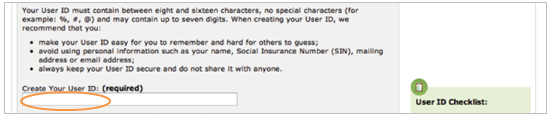
Your GCKey User ID is the name that you will use to log in to the National Online Licensing System. It is a combination of eight to sixteen letters, no characters and up to seven numbers, such as: Dfofisher123.
Your GCKey User ID should be easy to remember and hard for others to guess, and the use of any personal information should be avoided, such as your name, Social Insurance Number (SIN), or address. You should write this information down and keep it in a safe place, as your User ID cannot be retrieved, if forgotten. Keep your User ID secure and do not share it with anyone.
When you have created your GCKey User ID, you should type it into the white box.
1.4.1.2 Recovery Questions, Answers, and Hints
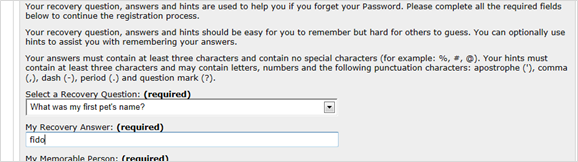
The recovery questions, answers, and hints are there to help you if you ever forget your GCKey password. So before you create your GCKey password, you will need to choose a recovery question and insert the answer as well as a hint that will help you remember this information in the future.
Scroll down to the “Select a Recovery Question” box and click the drop-down arrow to select one recovery question from a number of questions provided, such as “What was my first pet’s name?” Please remember to choose recovery questions that work the best for you; if you do not have a dog then this recovery question would not be the best choice. Type in the answer to the question that you chose in the box below, such as: fido.
Next, you are required to type in a memorable person, as well as a memorable person “hint” to help you remember who you chose as a memorable person.
Type your memorable person into the “My Memorable Person” box and type the hint in the “My Memorable Person Hint” box. The memorable person and hint must contain at least three characters.
For example, if your memorable person is your daughter, Kim, type Kim in the “My Memorable Person” box and daughter in the “My Memorable Person Hint” box.

Your last recovery question requires you to type in a memorable date, as well as a memorable date “hint” to help you remember what you chose as a memorable date.
Type the date into the “My Memorable Date” box and type the hint into the “My Memorable Date Hint” box. Use four digits for the year, two digits for the month, and two digits for the day, separated by hyphens, such as 2013-04-01.
For example, if your memorable date is your daughter’s birthday, type it (e.g., 1993-05-21) in the “My Memorable Date” box and Kim’s birthday in the “My Memorable Date Hint” box.

1.4.1.3 GCKey Password
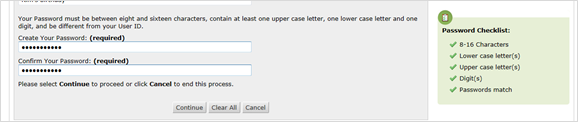
To complete the process of registering for a GCKey, you need to create and confirm your password. Your GCKey password must be different than your GCKey User ID. To ensure security, your password must also meet the following criteria:
- It is between eight and 16 characters;
- It contains at least one upper case letter;
- It contains at least one lower case letter;
- It contains at least one digit; and
- It does NOT contain any of the same three consecutive letters from your User ID.
Important Note
If your GCKey password contains three or more consecutive letters that you have already used in your GCKey User ID, you will receive an error message that says “Your password cannot contain your GCKey User ID.”
For example, if you chose the following GCKey User ID and GCKey password…
User ID: FrancineJones
Password: Marine90House4 …
it would be rejected, because the system recognizes “ine” in “Francine” and “ine” in “Marine”. Although the password is very different from the GCKey User ID, the system recognizes similarities and automatically rejects the password for security reasons
When you have created a password that meets all of the criteria, scroll down to the “Create Your Password” box and type in your password.
To confirm your password, you will be prompted to type it in again in the box below. Should you accidently type in a different password the second time, you will be required to retype the password in both boxes to ensure they are the same.
Similar to the creation of your User ID, make sure to write down your password and keep it in a safe place. When you are finished, click “Continue.”
The “GCKey Registration Complete” screen will appear. To access the National Online Licensing System, click the “Continue” button. If this is your first time logging in to the system, follow the steps outlined in Section 1.6. For return visits to the system, follow the steps outlined in Section 1.5.

1.5 Log In with GCKey
To log in to the National Online Licensing System using your GCKey User ID and password, type the website address of the system into your Internet browser (https://fishing-peche.dfo-mpo.gc.ca) and then the language of choice selection screen will appear, click on the “English” button to get to the “Log In Selection” screen.
Click “GCKey Log In” button to access the “GCKey Log In or Register” screen and type in your GCKey User ID in the “User ID” box and your GCKey password in the “Password” box. Click the “Log In” button when you are finished.
1.5.1 GCKey Welcome Screen
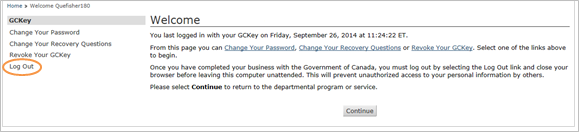
A GCKey welcome screen will appear after you log in with a GCKey User ID and GCKey password.
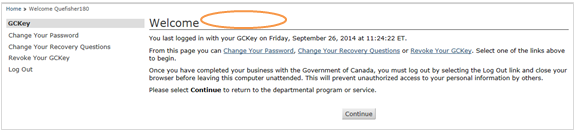
This is your GCKey screen. It displays your GCKey User ID at the top of the screen, which signals that your GCKey User ID and password are valid. It also indicates the date and time that you last logged in to a Government of Canada online system using your GCKey User ID and password.
From this screen, you may change your GCKey password, change your recovery questions, or revoke your GCKey. To do this, click on the menu items to the left of the screen included in the circle below. Take note of the “Log Out” link at the bottom of the left-navigation menu as well.
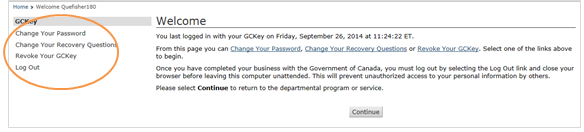
Whenever you log off the National Online Licensing System, you should automatically be logged out of your GCKey. If you do return to the GCKey welcome screen, click the “Log Out” link to ensure that you have logged out of your GCKey. You should also remember to close your Internet browser to prevent any unauthorized access to your account by others.
By clicking the “Continue” button, you will be into the National Online Licensing System – unless this is the first timeFootnote 7 that you are logging in to the system.
1.6 First Time Log In
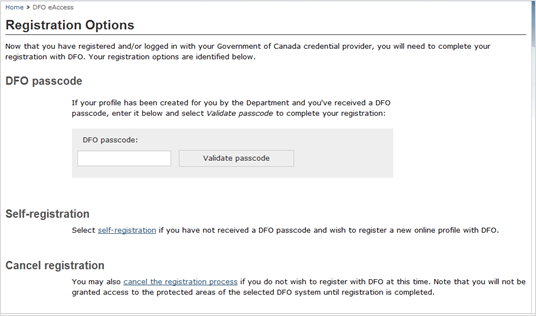
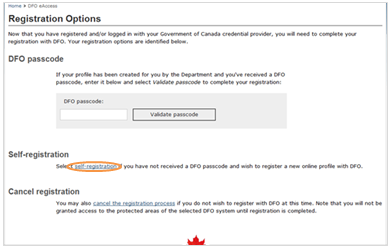
For the first time you log in to the National Online Licensing System, and after you have logged on using your Sign-In Partner or GCKey User ID and GCKey password, you will be directed to a screen called “Registration Options.”
If this is the first time that you have ever logged into the system and don’t have a passcode, please refer to the next Section 1.6.2.
If you received a new Passcode as the result of lost or forgotten user information, this is the screen where you will enter the Passcode that Fisheries and Oceans Canada mailed to you so that the information for you as a fishing licence holder, such as your Fisher Identification Number (FIN), may be connected with your log in credential (GCKey or Sign-In Partner User ID and password).
1.6.1 Your DFO Passcode
Your DFO Passcode is a unique personal identification number that you may receive in the mail or by telephone from the Department. It should not be confused with your GCKey or Sign-In Partner password, which you create on your own. Your Passcode is specifically used to recover your profile information.
The Passcode is eight characters long and contains a combination of letters and/or numbers. It is a private code and must not be shared with anyone.
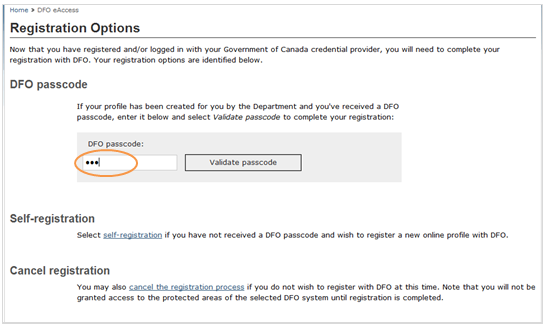
When typing your Passcode into the “DFO passcode” box, make sure you type it in exactly as you see it. It will appear as dots in the box to keep your information secure by preventing others from seeing what you are typing. Click the “Validate passcode” button after you type in your Passcode.
If you need a new Passcode for one of the following reasons, please contact Client Support:
- You have lost it or it has expired;
- You have lost your GCKey User ID or Sign-in Partner log in information; or
- You have forgotten your GCKey Password and you have also forgotten your Recovery Questions.
Important Note
A lost or expired passcode can be replaced by contacting Client Support,Footnote 8 and requesting a Passcode Reset.
1.6.1.1 Confirm Profile Details
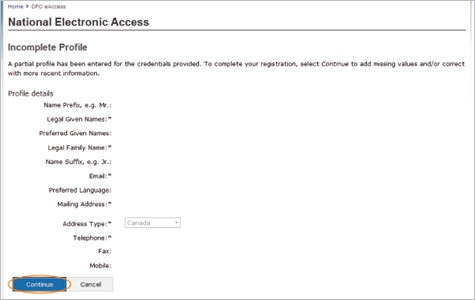
Clicking the “Validate passcode” button will bring you to the “DFO-issued passcode – Confirm profile” screen.
You should take the time to ensure that the personal information listed in the “Profile details” box is accurate. If one of the required fields (marked with an asterisk or *) is incomplete, you will be prompted to fill in the missing information. For example, if there is no e-mail address in the field beside “Email:*” you will need to provide your e-mail address.Footnote 9 If your profile details are complete and correct, click the “Continue” button.
1.6.1.2 Accept Terms and Conditions of Use
To complete your registration with Fisheries and Oceans Canada, read the “Terms and Conditions of Use” and click the “I accept” button. You will automatically be taken to the National Online Licensing System.

If you click the “I do NOT accept” button, the registration process will stop and you will not have access to the National Online Licensing System at this time. If you choose this option there may be some consequences, such as a delay in availability of services.
1.6.1.3 Request a New Passcode
You will need to request a new DFO Passcode if you have lost your Passcode, your Passcode has expired or you have changed or have forgotten your GCKey User ID and password. Also, if you make any changes to your Sign-In Partner information you will require a Passcode reset to enter into the system. To request a new DFO Passcode, contact Client Support.
1.6.2 Self-Registration - Registering an Online Profile with the Department
If this is your first time using the National Online Licensing System, you will need to register an online profile with the Department before you may become a DFO Client.
To do this, you will need to complete a few key steps:
1. Log in to the National Online Licensing System by following Section 1.2 through Section 1.6 which are explained in this manual.Footnote 10
2. As this is the first time you log in to the system, you will be directed to a screen called “Registration Options.” Click on the “self-registration” hyperlink under the “Self-registration” section.
3. The “DFO Registration – Terms and Conditions of Use” screen will appear. After reading the screen, click the “I accept” button.

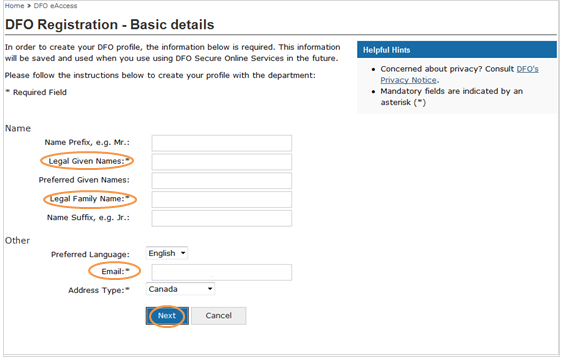
4. The “DFO Registration – Basic details” screen will appear. Type in your first and last name, as well as your e-mail address and mailing address type. The other fields on this screen, such as your preferred language (e.g., English or French) are optional, so you may choose whether or not you wish to type in this information. When you have finished, click the “Next” button.
Note:
The “address type” field is the country in which you live, such as Canada.
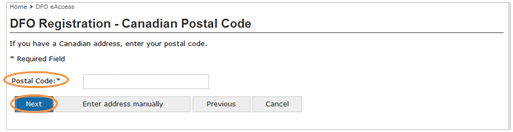
5. The “DFO Registration – Canadian Postal Code” screen will appear.Footnote 11 Type in your postal code and click the “Next” button. This will automatically generate your mailing address on the next screen called, “DFO Registration – Canadian Civic Address.”
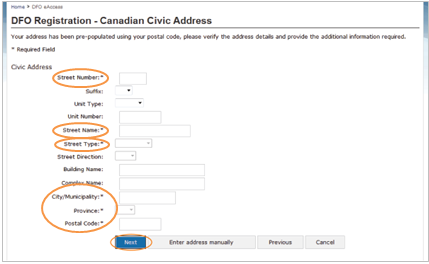
6. Verify that the address that appears on the “DFO Registration – Canadian Civic Address” screen is your address. If there is any missing information, you will be prompted to type in this information. If the address is correct, or when you have completed typing in the missing information, click the “Next” button.
Note:
You will also have the option of typing in your address information manually, by clicking the “Enter address manually” button. You may want to use this option, for example, when your entire address needs to be changed.
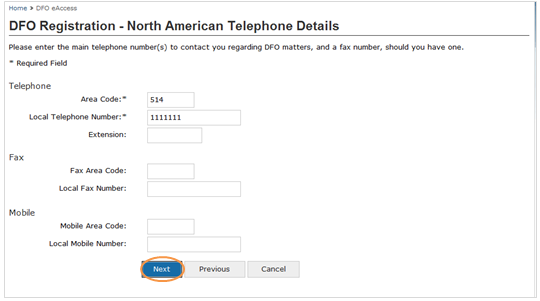
7. The “DFO Registration – North American Telephone Details” screen will appear. Type in your telephone number, including the area code. You may also choose to provide a fax number and/or a mobile number, but these are not required. When you are finished, click the “Next” button.
8. All of the information that you have provided will now appear on the “DFO Registration – Confirm profile details” screen. Take a few minutes to review this screen to ensure that the information is correct. If it is correct, click the “Save” button. If you need to change any of this information, click the “Back” button to return the screen on which you need to make any changes.

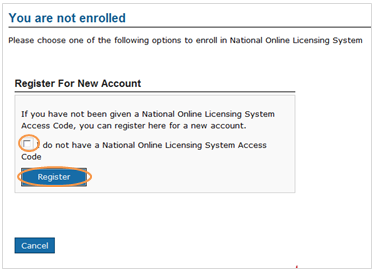
9. Once you click the “Save” button, the “National Online Licensing System – You are not enrolled” screen will appear. Since you do not have a DFO passcode, click your cursor in the box beside the “I do not have a National Online Licensing System passcode” message and then, click the “Register” button.
10. You will now be on the National Online Licensing System and may complete the tasks required of you.
1.7 Return Log In
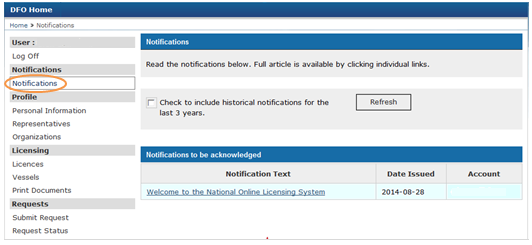
Logging in to the National Online Licensing System is much faster after registering for the first time. Once you log in using your GCKey or Sign-In Partner User ID and password, the “Notifications” screen of the licensing system will automatically appear.
1.8 System Log Out
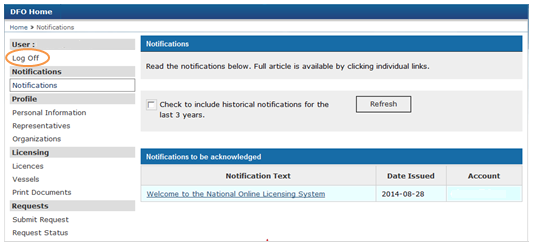
When you are finished using the National Online Licensing System, click the “Log Off” link at the top of the left navigation menu.
Next, remember to log out of your GCKey or Sign-In Partner (if the system has not done this automatically).
Finally, close your Internet browser to ensure that your information is not accessible to any unauthorized users.
- Date modified: