
Renewing your Licence and Paying your Fees: Step-by-Step
-
Click the “Pay Fees” link under the “Payments” section of the left-navigation menu.
NOTE: To renew a licence, you must pay the licence renewal fee.

-
Click your cursor in the white box beside the fees you wish to pay. A checkmark will appear in each box you click.
TIP: To deselect a fee, click the box a second time to remove the checkmark.

- Click the “Recalculate” button to show the total of all the fees selected, if you are paying more than one fee. Then, click the “Checkout” button.

-
Review the information to ensure it is correct. Then, click the “National Online Licensing System Transaction Statement” button to print a statement. Once your statement is printed, click the “Pay Now” button.
TIP: To correct any information, click the “Back” button.
NOTE: You should always print your Transaction Statement.


-
Review the information to ensure it is correct. To change any information, click the “Return to National Online Licensing System” link.
NOTE: Once you click on “Pay Now” to initiate a payment process using a credit card or Interac Online, you will have 15 minutes to complete the payment transaction and return to the National Online Licensing System to confirm payment and issue a receipt. After 15 minutes your session with the National Online Licensing System will expire and the payment will not be registered or confirmed by Fisheries and Oceans Canada.
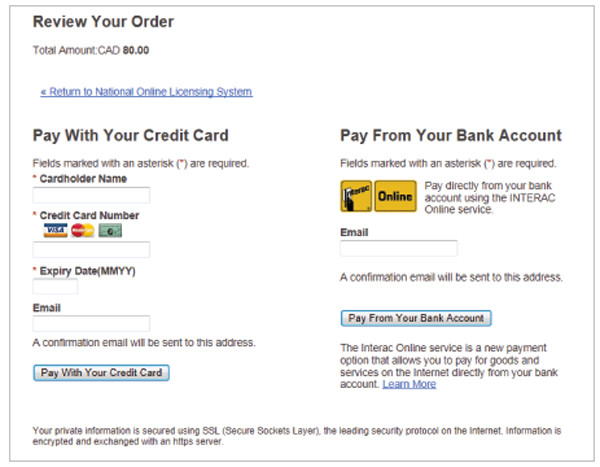
To pay with your credit card:
1) Type the name on the credit card, the credit card number, the credit card expiry date, and your e-mail address in the spaces provided. Then, click the “Pay With Your Credit Card” button.
2) If you do not have a permanent credit card, you may use a “pre-paid” credit card obtainable from most grocery, convenience and drug stores and other common commercial business locations. However, in order to pay online with a pre-paid credit card, that card must be of the embossed (raised numbers) type and bear an expiry date. If you experience any difficulties with a pre-paid card, you should contact the card issuer for advice and direction.
3) Un-embossed (flat surface) cards cannot be used.
4) Payments using Visa debit cards are not accepted.
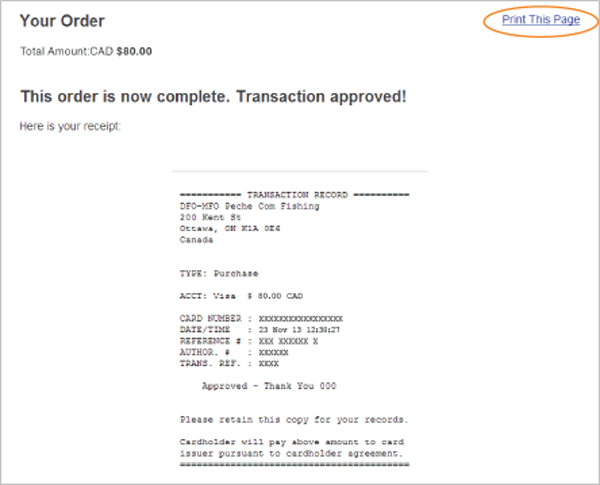
5) Click the “Print This Page” link to print your receipt.
NOTE: Attach your receipt to the transaction statement you printed earlier for proof of payment.
To pay using Interac Online:
NOTE: You must first be registered for Interac Online banking through the Bank of Montreal, Royal Bank, Scotiabank, TD Bank, Envision Financial, or Libro credit Union as these are the only banking institutions presently registered for Government of Canada payments using Interac Online.
1) Type your e-mail address in the space provided and click the “Pay from your Bank Account” button.
2) You will be prompted to select your online bank. Simply follow the instructions presented by the selected bank and enter any account or bank card data requested. Payments using Visa debit cards are not accepted.
3) Then select the bank account that you wish to pay from. Next, confirm the payment amount.
4) You will then be returned to the National Online Licensing System.
5) Click the “Print This Page” link to print your receipt.
NOTE: Attach your receipt to the Transaction Statement you printed earlier for proof of payment.
To pay at a bank or other financial institution:
1) If you want to pay your fees using telephone banking, online banking, or an automated banking machine or at an in-person teller, you need to set up Fisheries and Oceans Canada as a “payee” with your National Online Licensing System account number.
2) There are currently nine major financial institutions offering payee services to DFO. These are:
- Bank of Montreal
- Scotiabank
- Royal Bank of Canada
- TD Canada Trust
- National Bank
- CIBC
- HSBC
- Caisse centrale Desjardins du Québec
- Credit Union Central of Canada
3) If you choose to use the online banking option, the “payee” or merchant name for Fisheries and Oceans Canada will be listed as “DFO-MPO Peche Com Fishing.”
Some financial institutions have used alternate payee names such as “DFO-MPO Peche Comm Fishing” or “Peche et Oceans Canada Comm.”
Once you have successfully searched, identified and chosen one of the above “payee” names, you will be prompted to provide your 12-digit National Online Licensing System Account Number.
4) It is possible that your selected financial institution is not a “participating” or “clearing” institution and does not include Fisheries and Oceans Canada as a payee. Adding a payee is at the discretion of each financial institution, and a process that must be initiated by the institution.
In such cases, you may wish to request that your financial institution add Fisheries and Oceans Canada as a payee. If the financial institution will not add Fisheries and Oceans Canada as a payee, you have a number of other options:
- Pay online with a credit card directly through the National Online Licensing System. Under certain conditions, you may use a “pre-paid” credit card.
- Pay using Interac Online through the National Online Licensing System at the following participating financial institutions: Bank of Montreal, Royal Bank, Scotiabank, TD Bank, Envision Financial, or Libro credit Union.
- Pay at another “participating” bank or financial institution that includes Fisheries and Oceans Canada as a “payee”. It is possible that, in these cases, the institution may require you to open an account or pay a transaction service fee.
NOTE: You cannot use TelPay third party electronic bill payment services. Receiver General for Canada requires that fund transfers be directly from the client's financial institution to the Receiver General, with no middle agent.
5) To pay at the bank in person, bring your printed Transaction Statement to the teller.
NOTE 1: It may take three to five business days for your payment at a bank or other financial institution to show on the National Online Licensing System.
NOTE 2: You are not finished paying your fees until you log on to the National Online Licensing System and apply the amount you paid to the financial institution against the licensing fees you want to pay.
6) Log in to the National Online Licensing System and click the “Credit Allocation” link on the left-navigation menu.
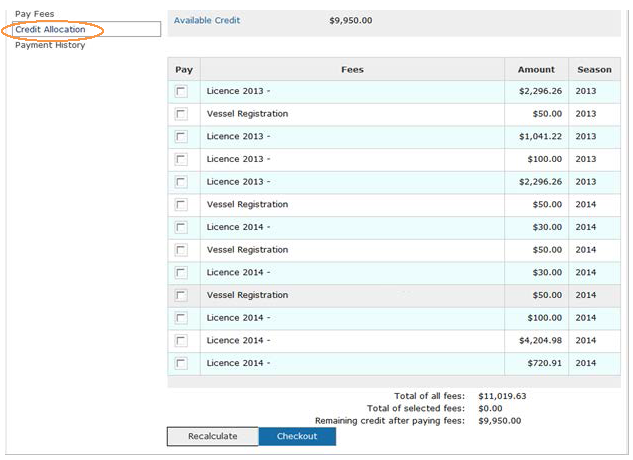
7) Click your cursor in the white box beside the fees you wish to pay by applying the payment you made at the bank. A checkmark will appear in each box you click.
TIP: To deselect a fee, click on the box a second time to remove the checkmark.
NOTE: Your available credit is displayed in the “Account Information” section.

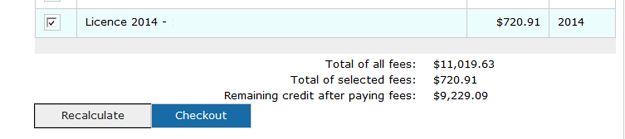
8) Click the “Recalculate” button to show the total of all the fees selected, if you are applying a credit to pay more than one fee. Then, click the “Checkout” button.
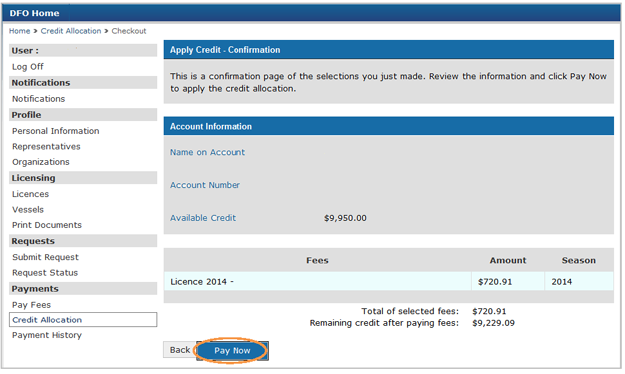
9) Review the information to ensure it is correct. Then, click the “Pay Now” button.
TIP: To correct any information, click the “Back” button.
-
Once your payment has been processed, it will be recorded in the systemFootnote1and your documents will be issued for you to print.Footnote2
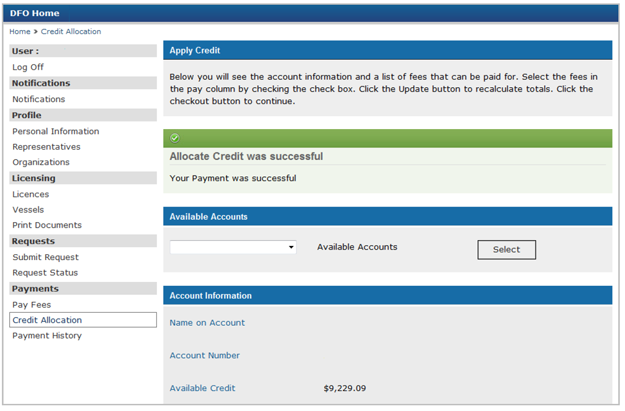
NOTE: You will receive a notification in your account when your documents are ready.
- Date modified: