
Otolith annuli ageing methods
Learn about otolith annuli thin sections preparation and production ageing.
Preparation of thin sections
Preparation of thin sections
Often the best form of preparation for otolith annuli is in thin sections. They may also be appropriate for examining daily increments in large otoliths. Transverse sections through the core are the norm.
This embedding and sectioning method is good for otoliths more than 3 mm in length and suitable for careful preparation of individual otoliths with an Isomet saw.
Embedding
It’s possible to section very large otoliths (over 2 cm in length) with an Isomet saw without embedding. It’s also possible to embed large otoliths (over 1 cm in length) in molten wax prior to sectioning. However, for precise sectioning, it’s best to embed the otolith in a hard epoxy. Most transparent and very hard epoxies and setting compounds will work for embedding.
To prepare the epoxy:
- add it with the hardener in a paper cup on a tared top-loading balance
- don’t use a plastic cup
- stir for a minimum of 3 to 4 minutes
- sonify in the cup to remove bubbles for 5 minutes, or until clear
- some froth will stay on top
- if you have only a few otoliths to embed, let the epoxy sit for 5 to 15 minutes to set a little
The epoxy and hardener will stay soft for 45 to 60 minutes, which is enough time to embed about 20 otoliths.
Free pour procedure

A few millilitres of epoxy poured into pear shapes on sheets of Parafilm.
To use the free pour procedure:
- pour a few millilitres of epoxy into a pear shape (around 2 cm long and 1 to 2 cm wide) on a sheet of Parafilm
- label a small piece of paper and stick the label into the narrow end of the epoxy pool
- prepare a separate preparatory pool of epoxy to be used for all otoliths
- push the otolith into the preparatory pool of epoxy, sulcus side up
- use a fine probe to remove all bubbles from around the otolith, particularly in and around the sulcus
- use forceps to lift the otolith out of the preparatory epoxy and put it sulcus side down into the embedding pool of epoxy
- keep the long axis of the otolith parallel to the long axis of the epoxy pool
- push the otolith to the bottom, making sure there are no bubbles
Let the epoxy solidify overnight, then wipe the bottom of the epoxy with 95% ethanol. Pour a few millilitres of freshly mixed epoxy over the bottom to encase the otolith on both sides. Allow to set 3 days before sectioning. Use 95% ethanol to remove spilled liquid epoxy.
Mold procedure

Prepared labels for otoliths coated with epoxy.
We use 12-well molds, size 19 by 11 cm, made of silicone EPDM (silicone combined with a synthetic rubber) molds. The individual wells are 4 by 2 by 0.5 cm. They each hold up to 4 mL of epoxy.
To prepare the molds, use a small brush to apply a light coat of release agent such as Frekote (Henkel/Loctite) to each well. Then allow them to dry. It’s best to apply the release agent immediately following the last use of the mold.
Prepare labels and coat the otolith with epoxy as you would in the free pour procedure. Allow to solidify overnight before removing the embedded otolith. Don’t wipe with ethanol. There is usually no need to coat the otolith with additional epoxy to encase. Cure 3 days prior to sectioning.
Sectioning

Isomet low-speed diamond bladed saw.

An epoxy-embedded otolith clamped perpendicular to the saw blade with a V-notch clamp, whereby the otolith is positioned on the lower surface of the epoxy block.
We use an Isomet low-speed diamond bladed saw for preparing otolith sections, but any equivalent saw may be used. Fitting the saw with 2 blades separated by a spacer allows you to prepare a thin section from an epoxy-embedded otolith with a single cut in about 2 minutes.
Clamp the epoxy-embedded otolith perpendicular to the saw blade with a V-notch clamp, so the otolith is positioned on the lower surface of the epoxy block. Fill the water tray for the saw with 60% glycerin in water to a level where it just touches the tip of the blade. We use 10.16 cm blades between 7.62 cm flanges. Exposing only 1.27 cm of free blade will minimize blade wobble.
If you’re using 2 blades, use a thin metal or plastic spacer to separate them with a diameter of 7.62 cm and a thickness appropriate to the section being prepared. Typically, you’ll use a 500 micrometre spacer to produce a 400 to 500 micrometre otolith thin section.
You may run the saw relatively quickly (which is still slow) with 100 g of weight on top until the blade is almost through the epoxy. Stop the saw immediately after 1 side of the epoxy block falls off. Remove the block from the clamp and use fingers or forceps to break off the section (which is probably attached to the block by very little). Rinse the thin section in 95% ethanol, then use a scalpel to cut off the broken block attachment point.
Polishing
Polish 1 side of the section with 30 micrometres of dry lapping film mounted on a smooth surface (such as a glass plate), then 3 micrometres lapping film, using a finger.
The polish can be brief, and should be to remove coarse scratches only. In many cases, polishing isn’t necessary.
Mounting
You may then mount the section onto a microscope slide with a mounting medium. We often use a cyanocrylate glue or thermal-setting plastic.
However, a more durable bond can be made with epoxy. To do this, use an approach similar to that of making a blood smear. Use a microscope slide to spread a layer of epoxy on 1 half of the mounting slide. Make the epoxy layer no thicker than the section (such as 400 micrometres thick).
Slide the section into the epoxy making sure that there are no bubbles underneath and no epoxy on top of the section. Press the section down onto the slide and allow to dry 2 to 3 days. Polish the top of the section if required.
Production ageing
Production ageing
Age determination is an important component of fish stock assessments. In our laboratory, we section and age tens of thousands of otoliths each year in support of stock assessments.
Our production methods involve:
- embedding 50 to 100 otoliths in a polyester resin block
- sectioning with a high-speed saw to produce transverse thin sections
- coating with a photographic clear coat to enhance visibility
- ageing under an image analysis system
Using these methods, it’s possible for 1 person to prepare around 300 to 800 otoliths per day, or to age about 200 per day.
However, these methods are most appropriate for robust otoliths at least 1 cm in length. Smaller or more fragile otoliths are best embedded in epoxy and sectioned individually with an Isomet saw, a process which is much more time-consuming.
Embedding

Aluminum embedding tray for epoxy resin.
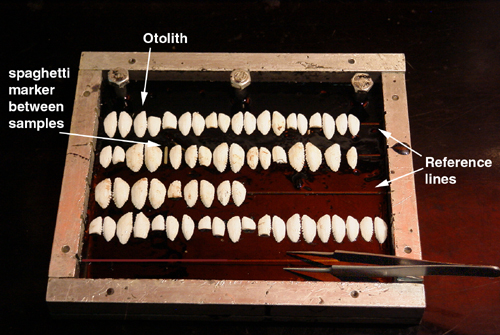
Otoliths positioned on reference lines in an embedding tray whose base coat of epoxy has been poured.
For moulds, we use aluminum trays with outside dimensions of 177 by 154 by 18 mm. The trays have:
- grooved bottoms and sides to produce cutting guides
- removable sides to assist in the release of the hardened resin block
- removable bolts which serve to make holes for the insertion of the positioning posts on the saw
Apply a thin layer of household paste wax to the inside of the tray to seal all seams. This will release the block from the mould and prevent leakage of resin.
To ensure correct sequencing of sections, we place a piece of dry spaghetti diagonally across the tray from upper left to lower right corners.
We carry out all procedures involving resin in a fume hood and remove any resin spills with acetone.
Pour a layer of resin mixture into the trays to cover the spaghetti strand and fill the corners. Once the resin has set, you may etch reference lines into it, using the grooved lines on the tray as guides. Arrange otoliths with the core of the otolith positioned on the reference line. Fill the trays with resin, taking care not to disturb the alignment of the otoliths. Leave the tray to cure for a minimum of 24 hours prior to sectioning.
You can place 100 to 150 otoliths (depending on the sizes) in a single tray.
Sectioning
We adapted a surface grinder to accommodate a diamond-edged cutting wheel and modified it to include a:
- splash tray with water drainage
- mounting bracket and cutting base for the resin block
- water outlet to provide cooling and lubrication to the cutting wheel
For sectioning, we:
- remove blocks (approximately 10 mm thick) from the moulds
- mount the blocks in the saw on the positioning posts
- secure the blocks with the mounting bracket
We use the vertical, horizontal and lateral controls to position the edge of one of the block's cutting guides so it’s in alignment with the saw's cutting wheel.
Sections (1 mm thick) are removed, rinsed with water, and air-dried. Sections to 0.5 mm thickness can be produced without breakage.
You must take care to ensure that individual otoliths, or otolith pairs, can be identified throughout the embedding and sectioning procedures. You may use a soft pencil to write otolith numbers on the cut resin strips, directly under the otolith.
Mount strips of sectioned otoliths and appropriate labels onto sheets of clear acrylic (185 by 95 by 2 mm) with transparent spray coating. After the plates have dried, apply a topcoat of spray to protect the sections and enhance their clarity. The coating tends to hide scratches and grooves in the cut surface of the otolith.

High-speed cutting saw for mass-embedded otoliths in resin.

Close-up of cutting wheel cutting through embedded resin mold mounted in high-speed saw.
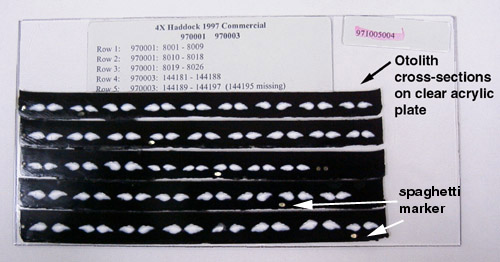
Strips of sectioned otoliths mounted on an acrylic sheet.
Ageing

Inexpensive image analysis system used for reading mass-embedded otolith sections.
Once the plates have dried, you may age otolith sections using an image analysis system with reflected light and a magnification of 10 to 12 times.
Otoliths prepared in this manner provide an efficient and cost effective means for ageing and storing large numbers of samples. Since the otolith plates are dry, they may be stored compactly (vertically in filing cabinets) with an indefinite shelf life.
- Date modified: